7.1 Settings and shortcut interaction
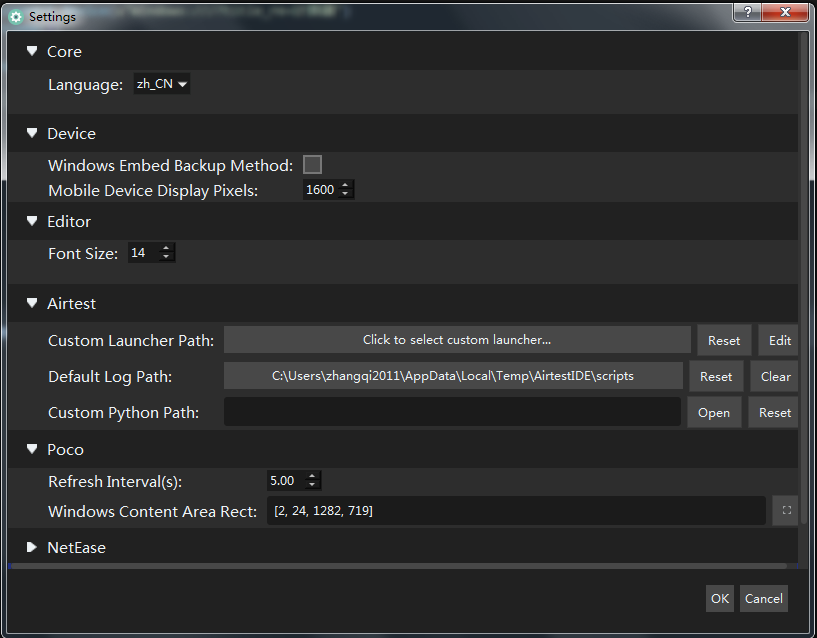
AirtestIDE provides some additional configuration options. In the menu bar of the main interface, you can select Options-Settings to enter the settings interface:
1. Core
language settings
In the Language option, you can set the language of AirtestIDE to Chinese (zh_CN) or English (en_US).
Skin theme settings
In the drop-down menu of Theme, you can select the skin theme of AirtestIDE. There are currently two themes available, the dark theme DarkShadow and the light theme MoonLight.
2. Device
View the coordinates of your phone screen
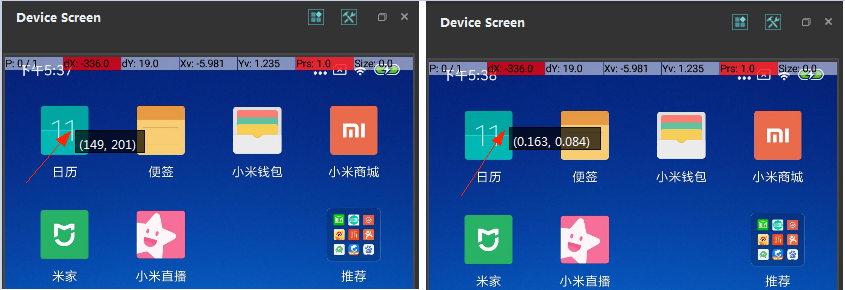
Check the Show Real-time Cursor Coordinate option to display the coordinates of the mouse position on the phone screen in real time. And you can easily get the coordinates. At this time, Click the right mouse button and you can also automatically copy the current coordinate information to the clipboard. So you only need to paste directly to insert the coordinates of the click position in the code.
In the case where the Show Real-time Cursor Coordinate option is checked, and then you check the Relative Coordinate option , the IDE will display the relative coordinates from (0, 0) to (1, 1).Using relative coordinates can avoid problems such as cross-resolution operating points beyond the screen, and relative coordinates can make coordinate operations more compatible.
Embedded mode of Windows window
Since some windows applications may have some problems in the default embedding scheme, such as the inability to embed, the inability to operate the application after embedding, the black screen, etc., we also provide an alternate embedding solution.Check the option Connect windows without embedding to use the alternate scheme for Windows mode operation.
If this option is checked, when embedding the windows window, please use the display desktop of Windows and minimize all applications on the desktop, then only restore AirtestIDE and the application under test to the desktop.Click on AirtestIDE's Select Window button, use the green box to select the application to be tested, then the IDE's device panel will disappear, and you can record normally.
The effect displayed on the phone screen
When the Android phone is connected, AirtestIDE will display the real-time synchronization screen of the phone in the Device window.If you feel the clarity is low, you can modify the value of Mobile Device Display Pixels. The higher the number, the higher the resolution.The default is 800, and the value ranges from 300 to 2000.
If you still feel that the real-time picture clarity of the mobile phone is not high enough, you can check the Use Javacap mode in the drop-down menu before connecting the mobile phone (if the mode is unchecked, the IDE will use Minicap to connect the mobile phone by default), and then connect.In Javacap mode, you can see a higher resolution phone screen, but the delay will be slightly higher than the default Minicap mode.
3. Editor
compatibility mode
Due to graphics card compatibility issues, some users may not be able to see the text in the script editing window and log window when starting AirtestIDE, or they will crash after starting, but double-click on the CompatibilityMode.bat in the folder to start successfully.
In order to avoid having to double-click the script every time we start it, we have added an option to the settings:

By default, the default mode is selected. If AirtestIDE cannot be started normally, you can try to select the other three options in the drop-down menu and Restart AirtestIDE to see if the script editing window and log view can be displayed normally. If it can take effect, it will be started with this configuration item when starting AirtestIDE in the future. There is no need to manually double-click the compatibility mode.bat script to start AirtestIDE each time.
font size
The size of the text in the edit window and the log window can be adjusted. The default is 14px.In AirtestIDE, you can also change the text size by holding down ctrl+mouse wheel.
AutoComplete
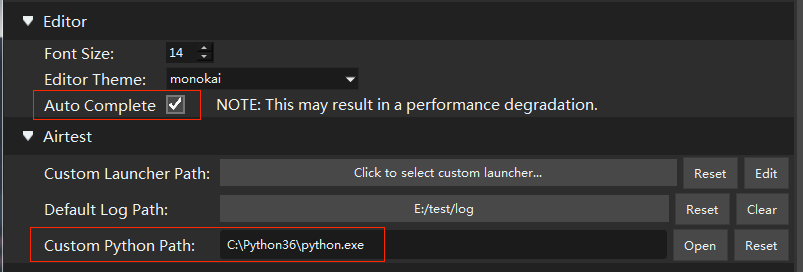
Auto Complete provides the python code auto-completion function in the edit window. By default, this function is not checked because it may cause performance degradation on some machines.
When this option is turned on, you can enjoy the code completion completion prompts for the airtest and poco libraries when editing the code in AirtestIDE.If you want to be able to perform more automatic completion of more python libraries, it is recommended to refer to python environment deployment. After deploying the local Python environment, set the corresponding path of python.exe in the Custom Python Path option of the IDE. You can use the more powerful python code auto-completion effect.
If you modify the path to Custom Python Path, you need to restart the IDE to allow the new code completion to take effect.
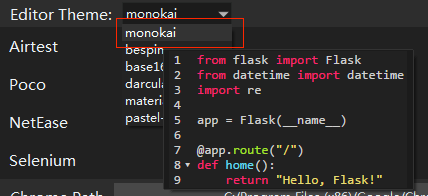
The theme of the Edit box
According to the two different color matching skins provided by AirtestIDE, we have added several corresponding edit box code themes to choose from. When hovering over the theme name, you can see the preview image:
4. Airtest
The Airtest module has 3 configuration options. By default, you can use AirtestIDE to run scripts without setting it.
If you need to set the content, the following is a sample:

Set the launcher path
The option Custom Launcher Path sets the path to a custom file launcher.py . Normally this option does not need to be set. For more details, please refer to Tutorial.
Click Reset to clear this option. Clicking Edit will open a simple editing window for quickly editing the file launcher.py.
Set the default storage path of the log file
Default Log Path is used to specify the log directory when running the script in AirtestIDE. The IDE will place the generated log file and screenshot data in this directory by default.
Clicking the Reset button will set the log directory to the default temp directory of the system. Clicking the Clear button will automatically clear the files in the directory and free up the hard disk space. Please confirm that there are no important log files to keep before operation.
Run the script using the native Python environment (trial)
Custom Python Path allows you to run a script written in AirtestIDE using the local python.exe.Since AirtestIDE has a built-in python 3.6.5 environment, if you want to be able to use your own local python environment, you can change the default python.exe that running script by setting this option.(You can run some third-party libraries installed locally , or you can use the local python2 environment, etc.)
Click Open to open the file selection window. Be sure to select a locally installed python.exe path. Clicking on Reset will clear the contents.
In the mac system, you need to set the path of python executable file. If you are using the system python, you can use the directive which python to get the path to the python executable file (if it is python3, you need to use which python3 directive):
>which python3
/Library/Frameworks/Python.framework/Version/3.6/bin/python3
Fill in the path to the AirtestIDE settings window. Please note that the path is the executable file path in the bin/ directory, not the directory where python is located.
If you use a virtual environment, you need to fill in the python executable file path in the virtual environment directory, for example, in the mac system may be /Users/username/.virtualenvs/your_env/bin/python3.
note:
-
If you want to use a local Python environment to run scripts, you need to deploy the airtest and pocoui environment in advance . Please refer to the
Running Scripts Using Local Python Environmentsection in [Chapter 4 Running Scripts] for environment deployment. -
After setting the local
python.exepath in AirtestIDE, the script will be started byAirtestIDE/sample/custom_launcher.pyby default. If you use your own launcher.py, please set your own launcher.py path in AirtestIDE. For an introduction to launcher.py, please check out the documentation.
5. Poco
The refresh interval of Poco element
The Refresh Interval option is used to configure the interval between refreshing the Poco-UI tree in the Poco Assist window.The unit is seconds and the default is 5s.
Set the window position in Poco-Windows mode
After embedding the window of Windows game, if you want to use Poco to view the interface elements, you can set the window position by Windows Content Area Rect. This is to display the poco element mark on the Windows window. If it is not set, there is no impact on the script run.
6. Selenium
Set the Chrome path
Click to set the path of Chrome.exe to run Selenium related functions. For details, please refer to selenium tutorial.
Note: If you have geckodriver installed and configured in the path environment variable and then check the checkbox "Use Firefox instead of Chrome" , you don't need to set the Chrome path.
However, we strongly recommend that you switch to Chrome because the Firefox browser does not support recording.
7. Other shortcuts
- In the script editing area or the Log window, you can adjust the text size in real time by holding down Ctrl + mouse wheel.
- In the script editing area, you can search for content by pressing Ctrl+F.
- In the script editing area you can comment or uncomment the code by pressing Ctrl+/.
- When switching Poco mode, there will be a prompt to insert the code, please click Yes to confirm.
- Inside the Poco Assist window, you can hide or display the UI search box by pressing Ctrl+F.