XIII. Web Automated Testing with Airtest-Selenium
XIII. Web Automated Testing with Airtest-Selenium
1.Preface
Selenium is an automated testing tool for web applications. It runs directly in the browser and can simulate user operations on the browser. AirtestIDE provides a window for users to use Selenium. It leverages the Airtest-Selenium framework, which encapsulates the Selenium Python library with additional image recognition APIs and the ability to generate web-based test reports.
- airtest_touch: Click an image.
- assert_template: Assert that the image exists.
- snapshot: take a snapshot of the webpage.
- switch_to_previous_tab: Switch to the previously opened tab.
- switch_to_new_tab: Switch to the newly opened tab.
- ...
This article will use the Selenium window on AirtestIDE to explain how to perform automated testing on a browser.
2.Introduction to the Functions of Selenium Window
1) Open the Selenium window in AirtestIDE
By default, the Selenium window is not displayed in the IDE. To open it, click the "Window" button at the top of the IDE and select "Selenium Window" from the options. This will open the Selenium window on the left side of the IDE interface.

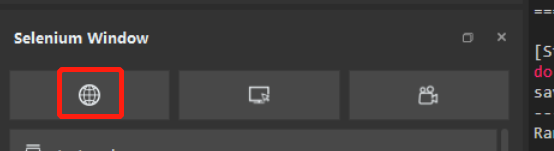
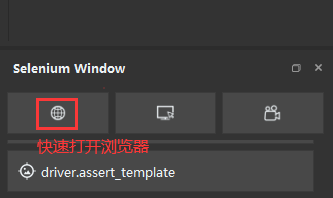
2) Shortcut button for inserting initial code
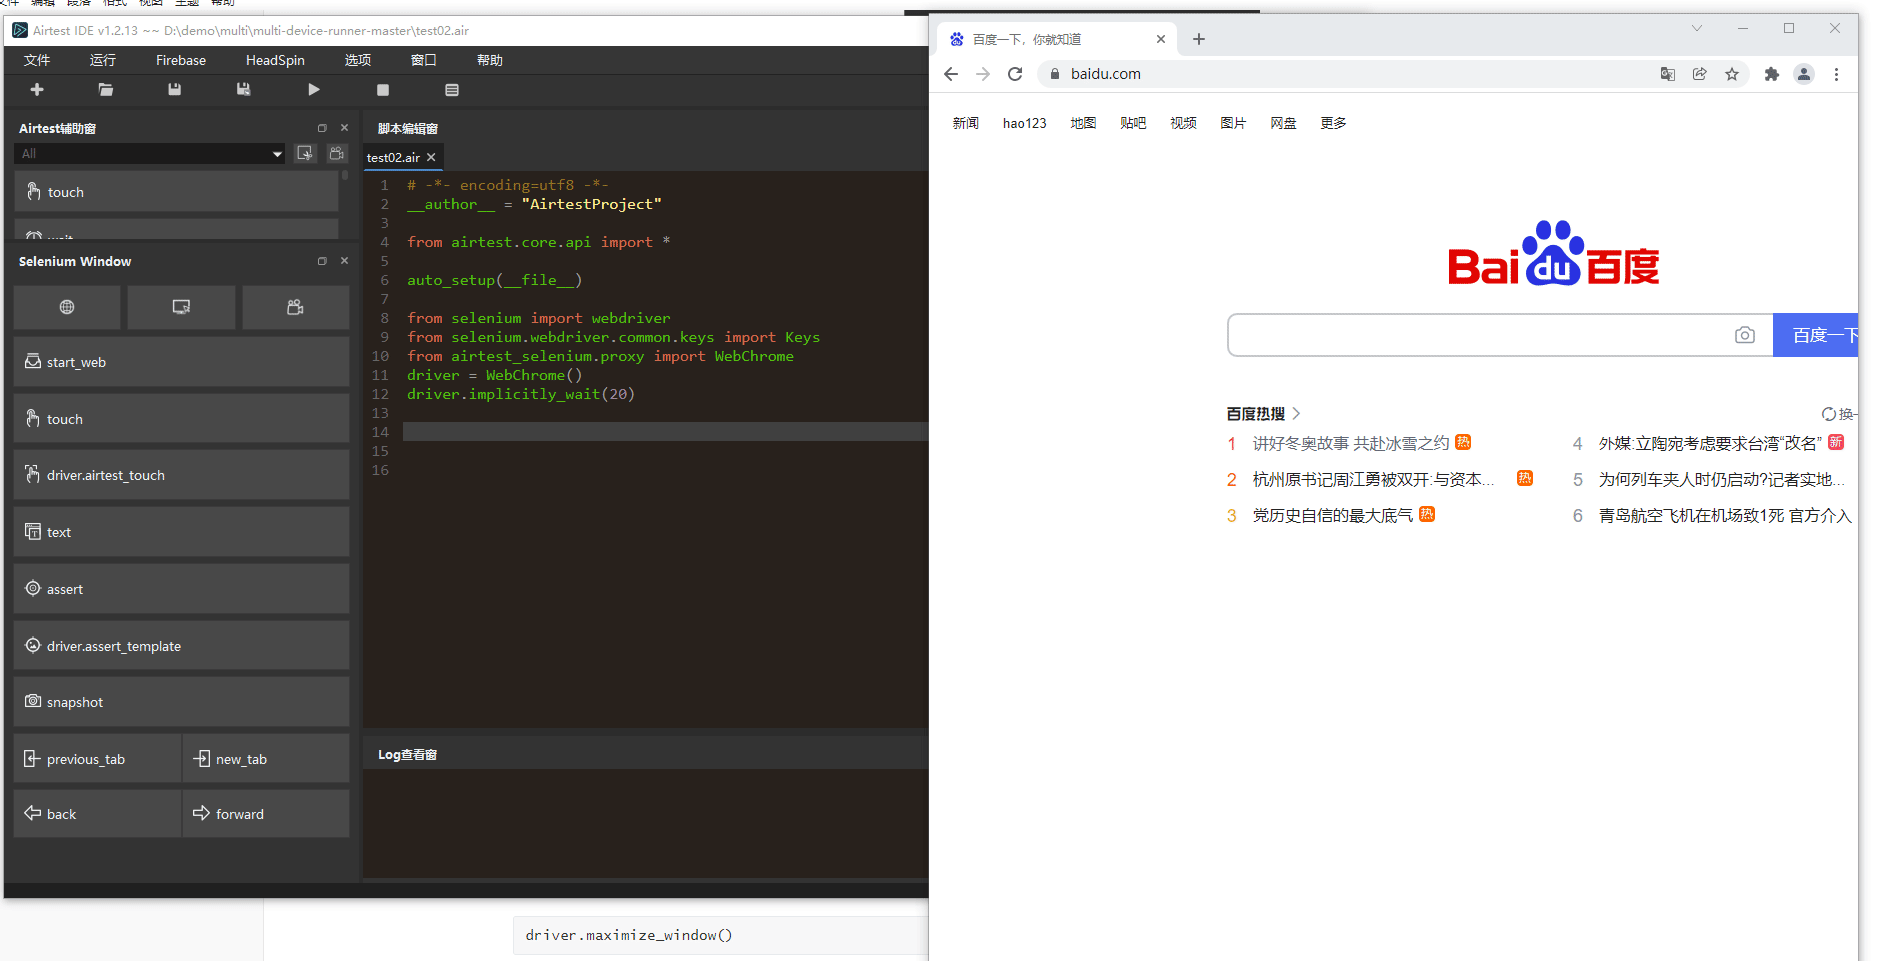
Selenium Window provides some commonly used buttons. For example, clicking the button resembling the globe in the Selenium window will automatically insert the initialization code in the script editor:
Before inserting the code, we need to select "Yes" in the yellow prompt box that pops up in the script editor window to allow code insertion:
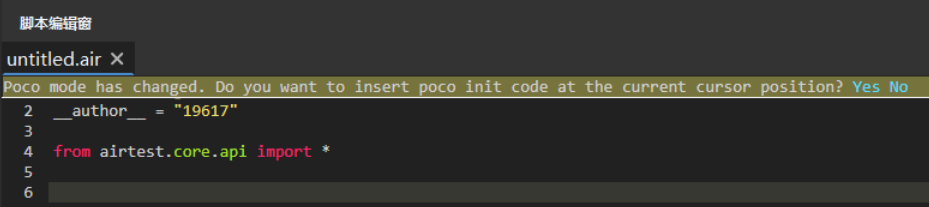
Then the script editor window will automatically insert the following code:
# Import the webdriver module of Selenium

from selenium import webdriver
from selenium.webdriver.common.keys import Keys
from airtest_selenium.proxy import WebChrome

# Create an instance. When the code runs to this line, it will open a Chrome browser.
driver = WebChrome()
driver.implicitly_wait(20)
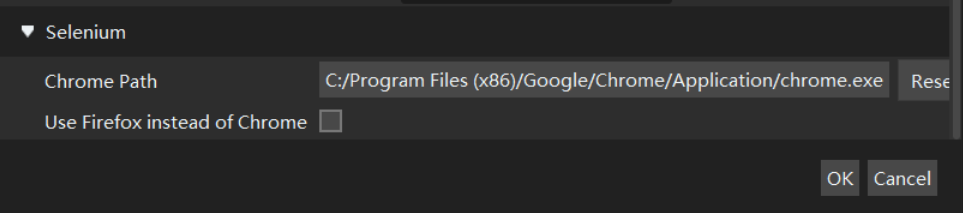
Please note that if this button is used for the first time, the IDE will pop up a window prompting you to set the path of the Google Chrome browser:
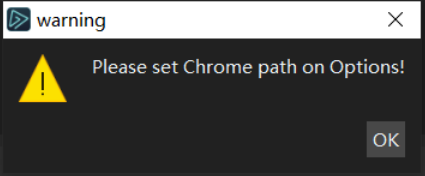
In this case, we need to go to Options-Settings, find the section on Selenium, and set the path of Chrome before we can insert the above code properly. Note that it is the path of chrome.exe, not chromedriver.exe!
3) Shortcut button for element retrieval
After clicking the shortcut button for initialization and opening a Chrome window, we can click the shortcut button for element retrieval in the Selenium window to retrieve detailed information about the elements. In addition, clicking it can generate an element location script (using the xpath location method):
4) Shortcut button for script recording
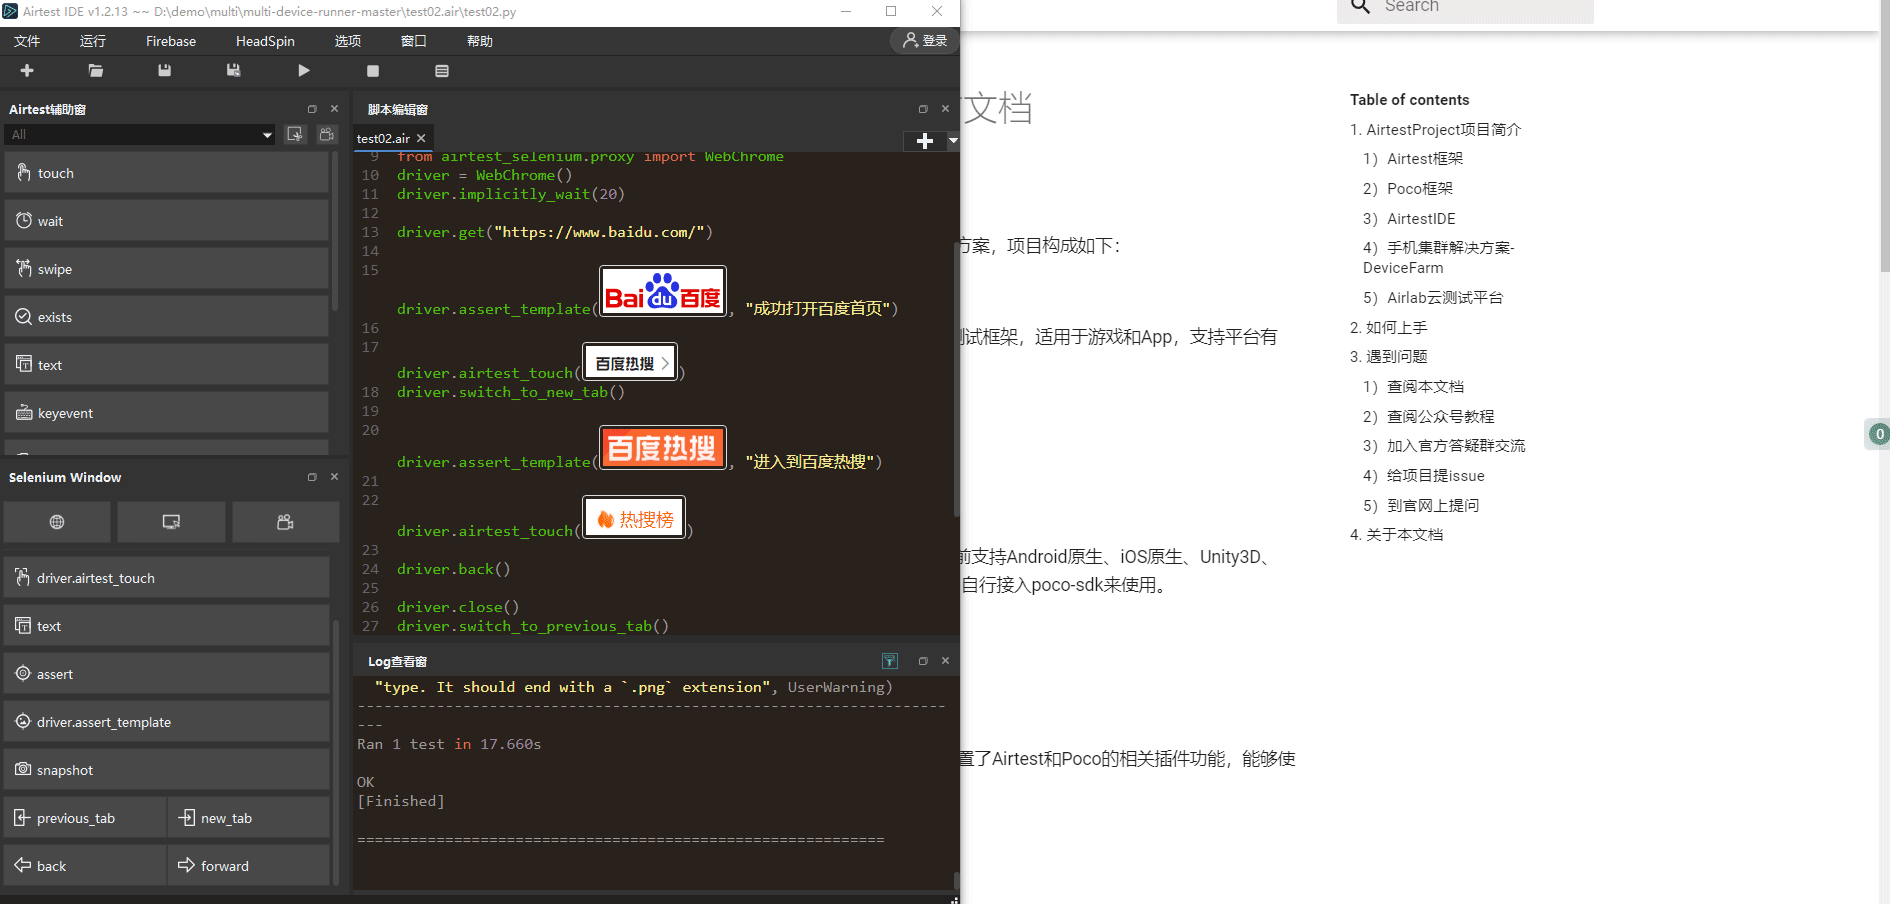
After clicking on the shortcut button for initialization and opening a Chrome window, we can then click on the script recording button in the Selenium window to quickly generate web automation test scripts:
After recording the script, we can directly click the Run Script button and Report Generation button in AirtestIDE to play back the script and generate a report with just one click (since we cannot record the operation of opening the Baidu website, we manually add a script to open it).
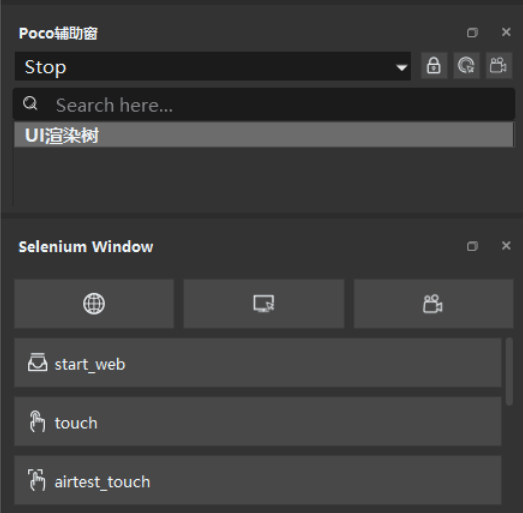
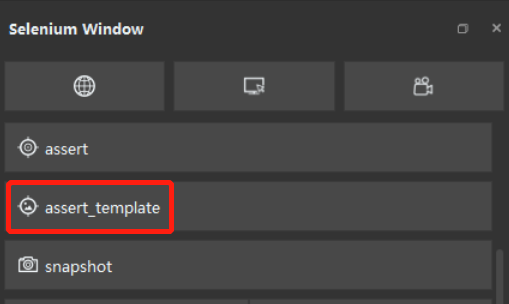
5) Shortcut buttons for commonly used APIs
Apart from the aforementioned functions, the Selenium window offers shortcut buttons for frequently used APIs to aid users in familiarizing themselves with these APIs and creating web automation testing scripts more efficiently.
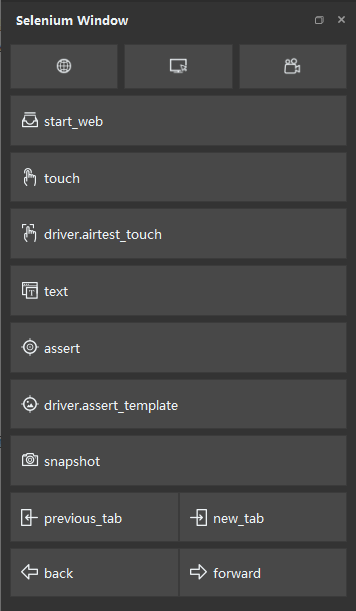
- start_Web: This equivalent to
driver.get(""), which opens the specified website. - touch: This is equivalent to
driver.find_element_by_xpath("").click(), which is a standard Selenium method for clicking on an element. - driver.airtest_touch: This represents
driver.airtest_touch(Template(...)), which is a graphic click encapsulated by Airtest-Selenium. - text: This represents
driver.find_element_by_id("").send_keys(""), which is a standard Selenium method for inputting an element. - assert: This represents
driver.assert_exist("", "xpath", "Please fill in the test point."), a standard Selenium method for asserting the existence of an element. - driver.assert_template: This represents
driver.assert_template(Template(…), "Please fill in the test point"), an image existence assertion encapsulated by Artest-Selenium. - snapshot: This represents
driver.snapshot(), a page snapshot operation encapsulated by Airtest-Selenium. - previous_tab:
This represents driver.switch_to_previous_tab(), an operation encapsulated by Airtest-Selenium for switching to the previous tab page. - new_tab: This is equivalent to driver.switch_to_new_tab(), an operation encapsulated by Airtest-Selenium for switching to a newly opened tab.
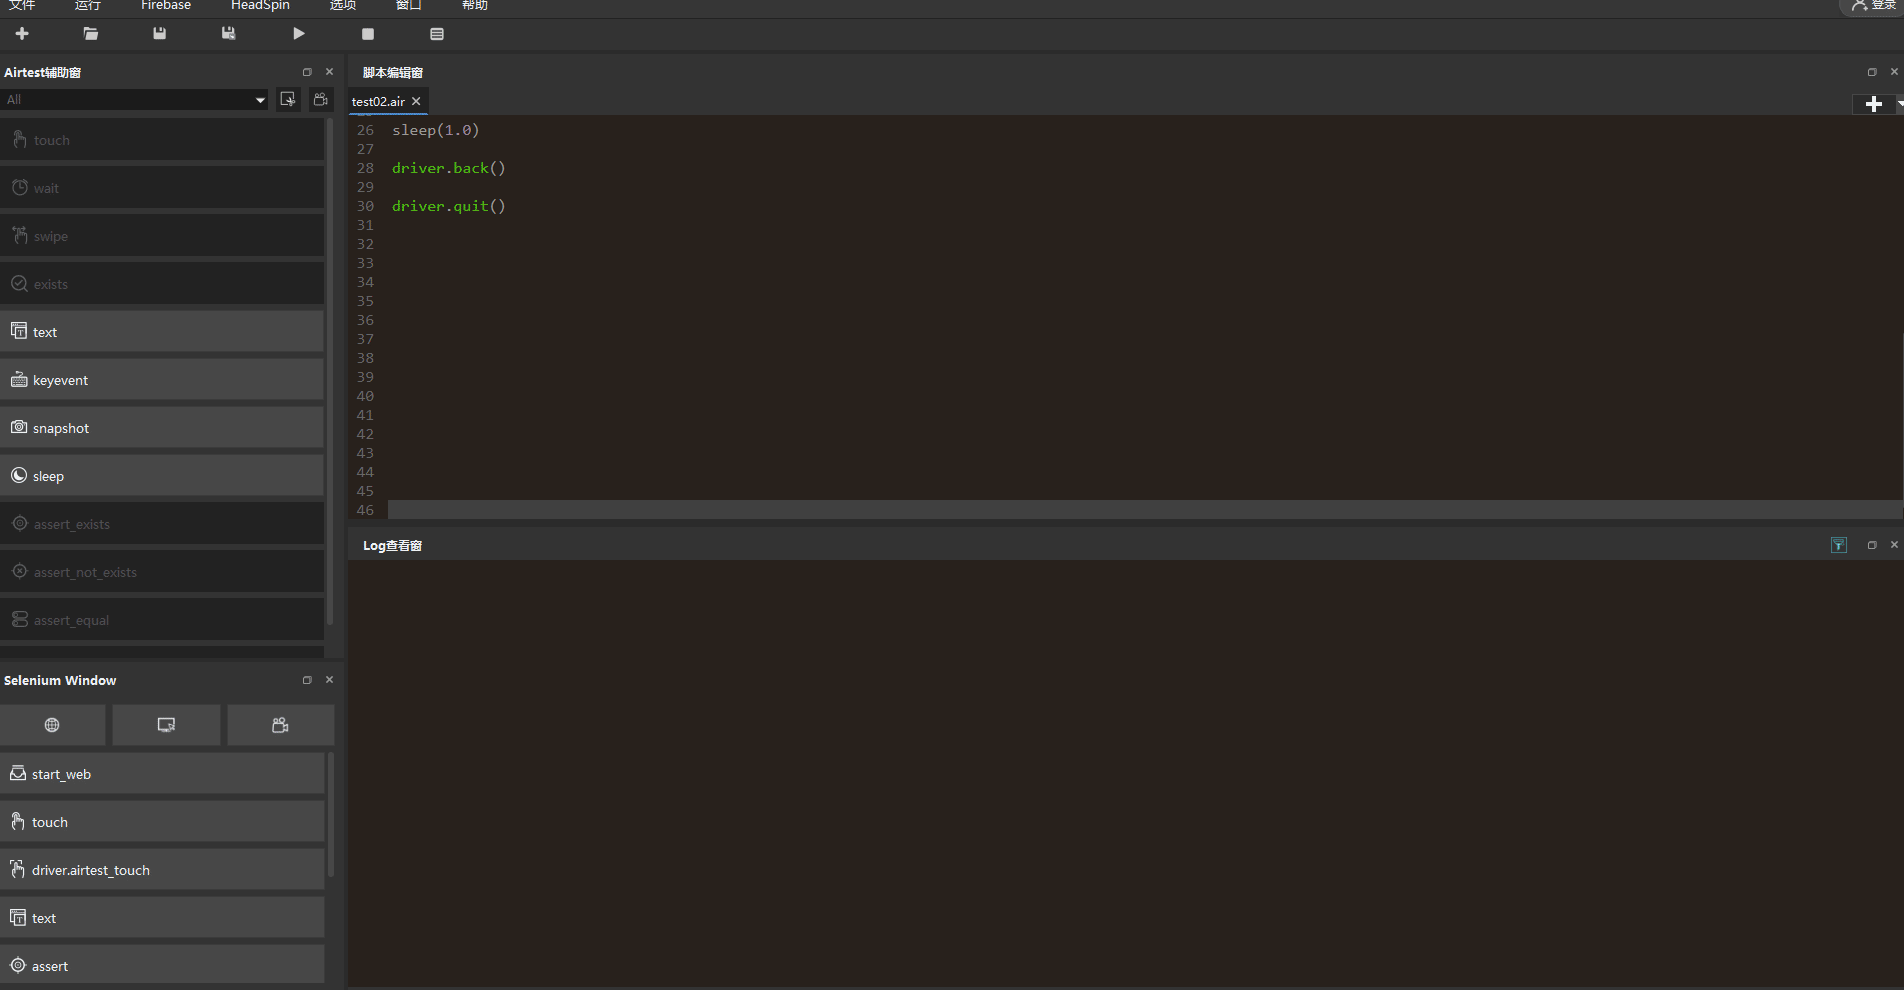
- back: This represents
driver.back(), a standard Selenium method for navigating back to the previous page. - forward: This represents
driver.forward(), the standard Selenium method for navigating forward to the next page.
3.Introduction to the Airtest-Selenium Encapsulated APIs
1) APIs for image recognition
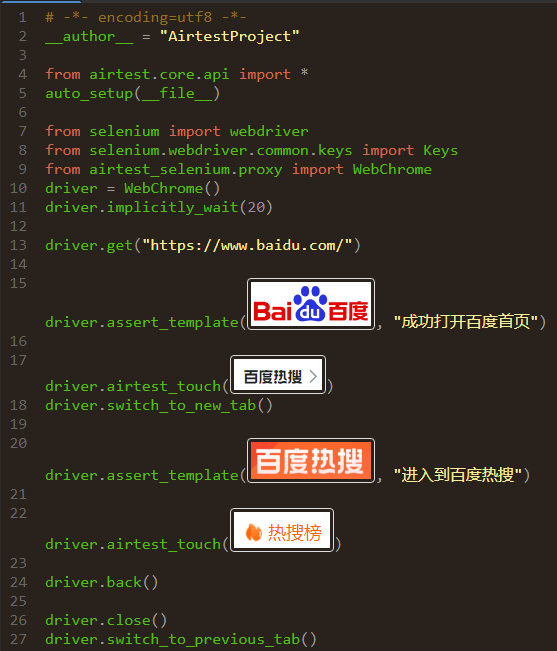
The Airtest-Selenium has encapsulated two APIs for image recognition: image recognition touch and image recognition assertion. ① Clicking the airtest_touch button in the Selenium window
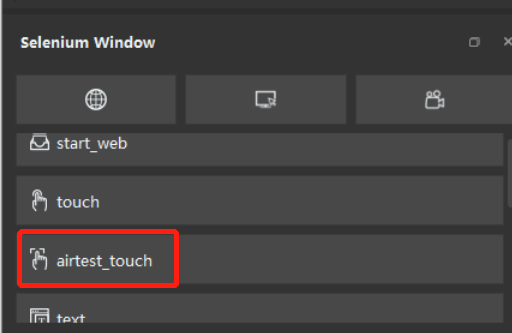
Capture an image of the desired click location on the browser page by dragging, release the mouse to complete the snapshot, and the script editor window will automatically generate a script for image recognition touch.
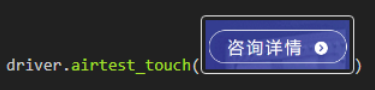
driver.airtest_touch(Template(r"tpl1582031994893.png", record_pos=(8.99, 5.23), resolution=(100, 100)))
② Clicking the airtest_touch button in the Selenium window
Capture an image of the element you want to assert on the browser page by dragging, release the mouse to complete the snapshot, and the script editor window will automatically generate a script for image recognition assertion.

driver.assert_template(Template(r"tpl1582032716811.png", record_pos=(0.51, 1.315), resolution=(100, 100)), "Successfully opened Airlab official website")
For more examples of Selenium assertions, please refer to our previous article "Assertion Knowledge That All Testers Should Know."
It is worth noting that these two APIs are encapsulated based on the image recognition of the Airtest framework. If the corresponding image cannot be found on the webpage during the image script running, an error of "Target not found on screen" will be thrown.
2) Switching between multiple tabs
Selenium provides an API for switching between tabs.
driver.switch_to.window(driver.window_handles[number])
After executing this statement, you can switch to the number-th opened tab. However, this API is not easy for users to understand and call, as it requires remembering the order the opened tabs. In most cases, switching between tabs usually involves two operations: opening a new tab and closing a tab. Therefore, Airtset-Selenium encapsulates two APIs:
driver.switch_to_new_tab()
driver.switch_to_previous_tab()
Within this API, Airtest-Selenium maintains the organizational structure of the tabs. You only need to call switch_to_new_tab when switching to the latest opened tab. And when closing the current tab and switching to the previously opened tab, just call switch_to_previous_tab(), without the need to consider the order of the tabs.
3) API for page snapshot
Airtest-Selenium provides a snapshot API, which can capture a snapshot of the current web page and save it to a specified local path.
# Capture a snapshot and save it to the specified local path.
driver.snapshot(r"D:/baidu.png")

# Take a snapshot and save it to the default log path.
driver.snapshot()
4) Report for encapsulated APIs
After running the APIs encapsulated by Airtest-Selenium, corresponding reports will be generated. You can directly click the "Generate Report" button in AirtestIDE to view the report.
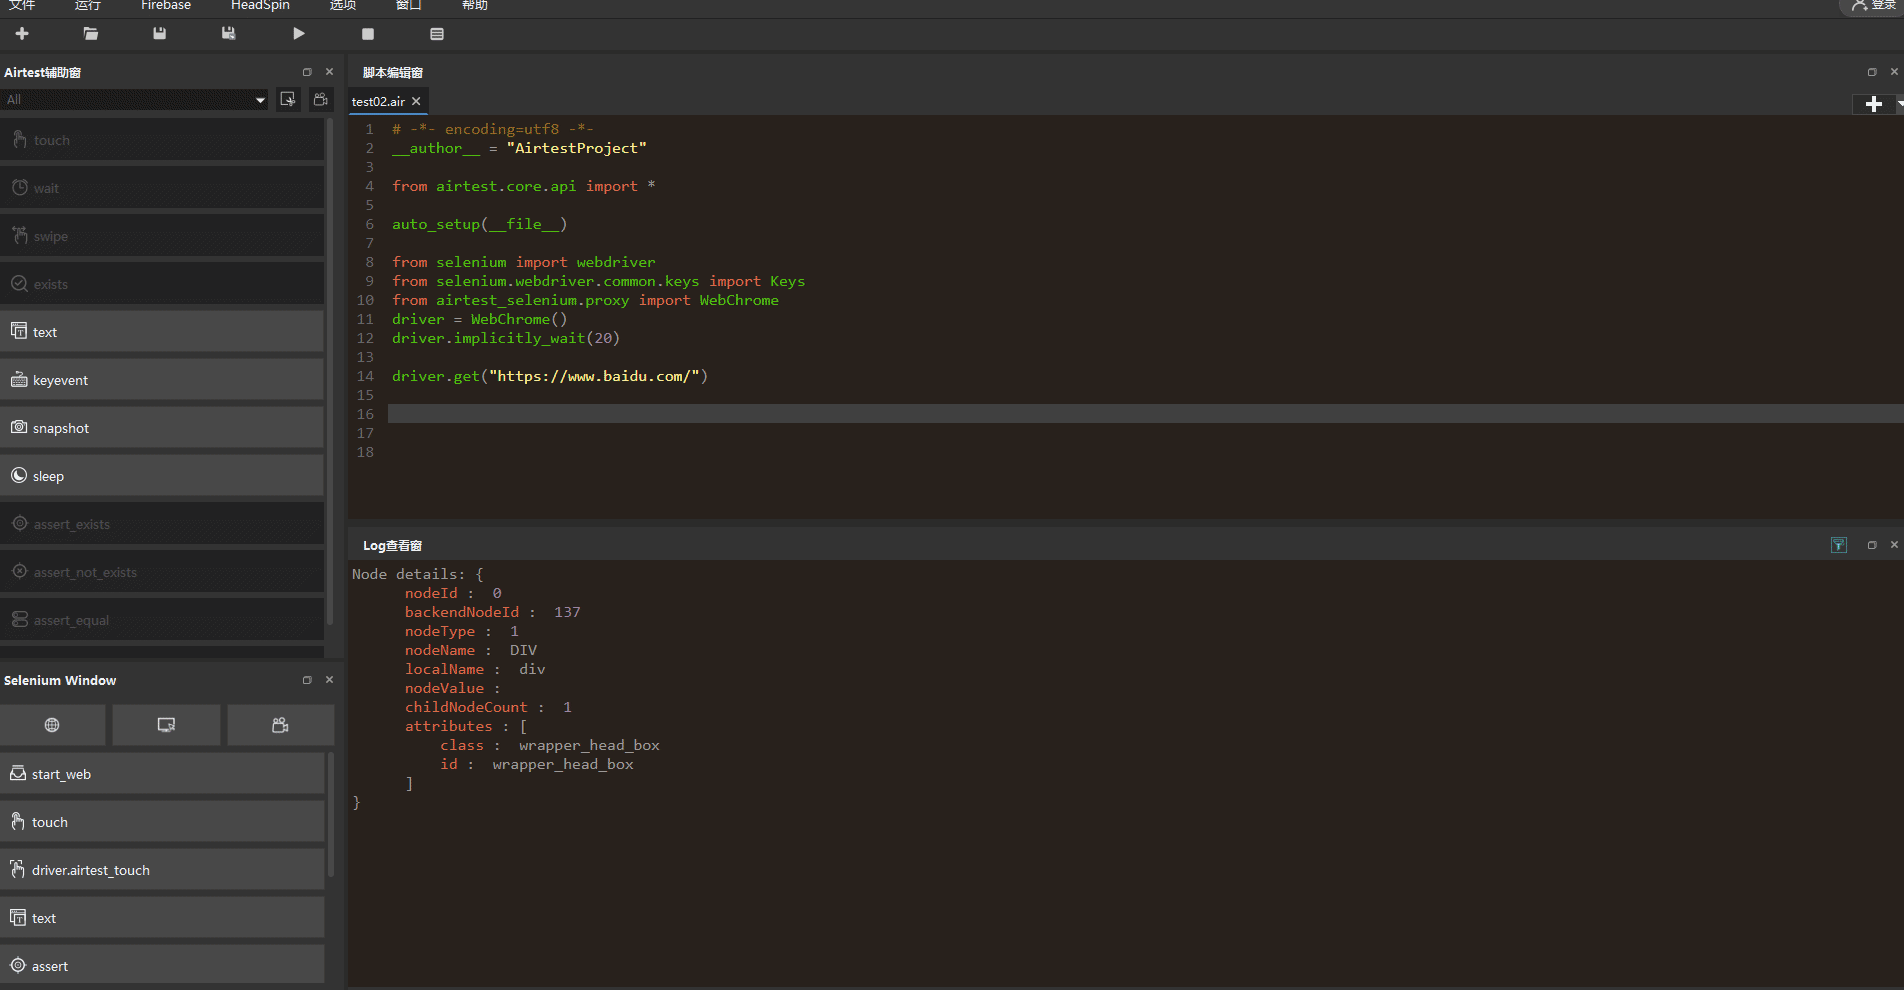
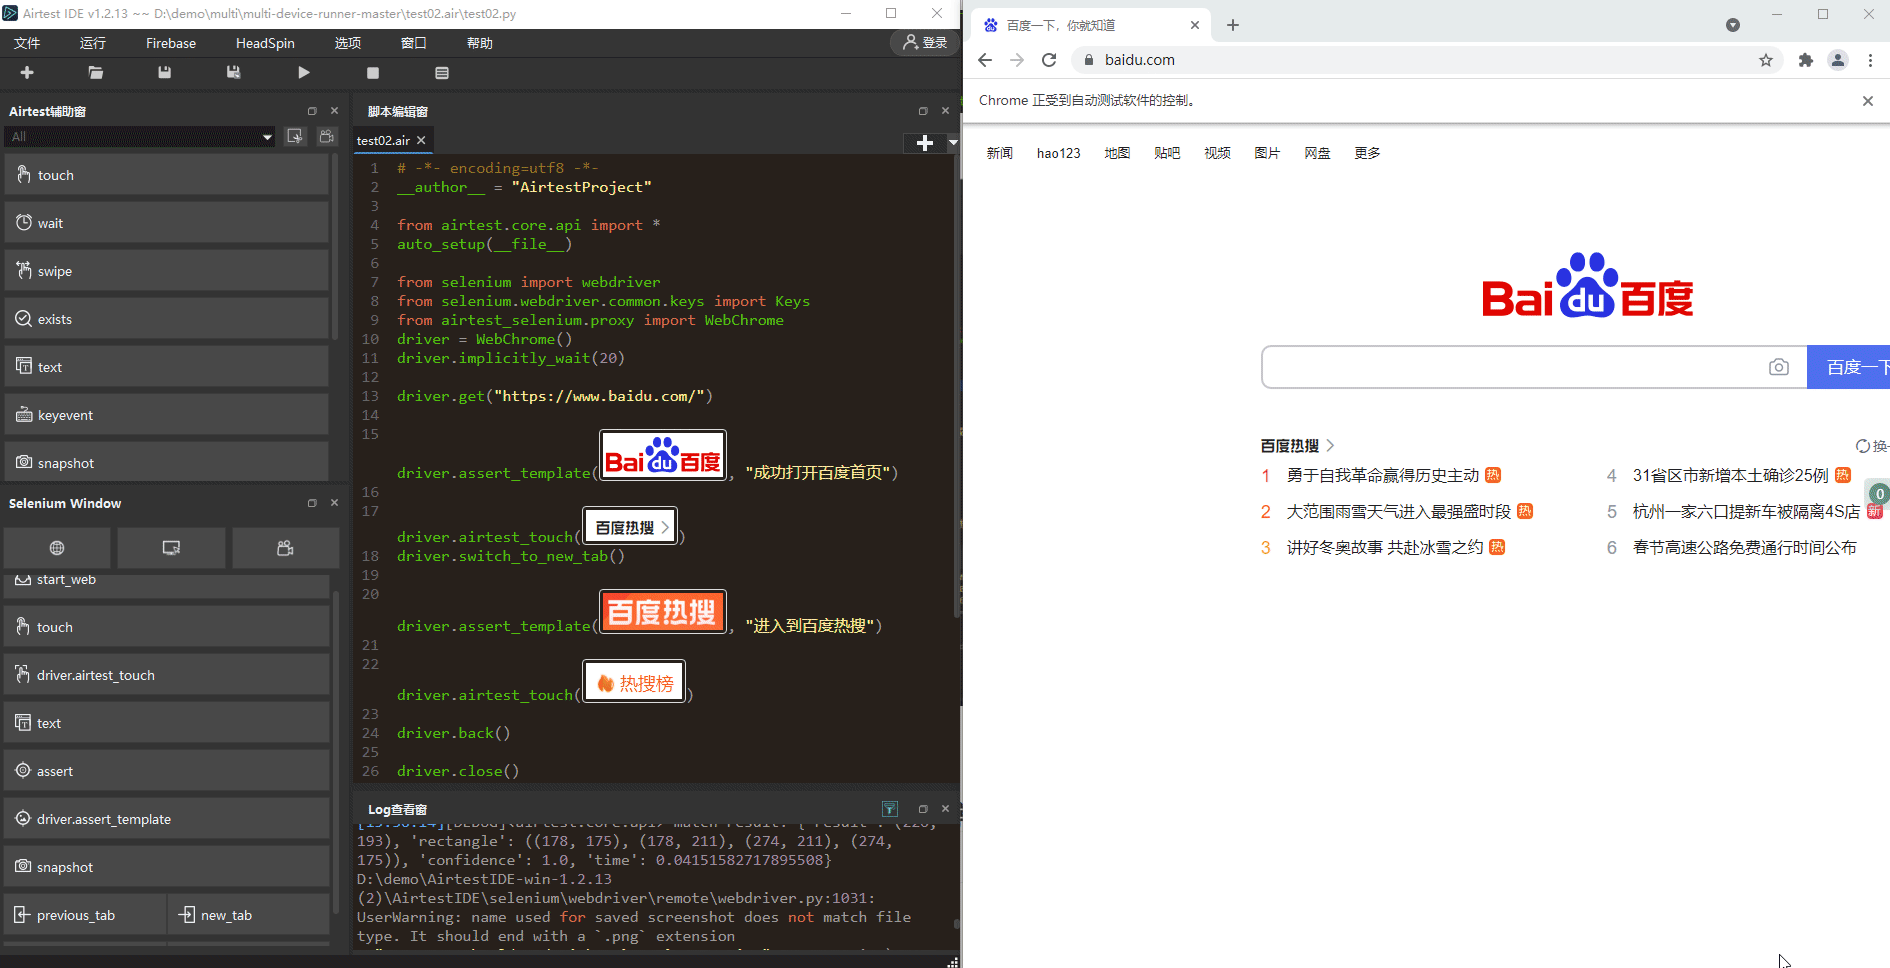
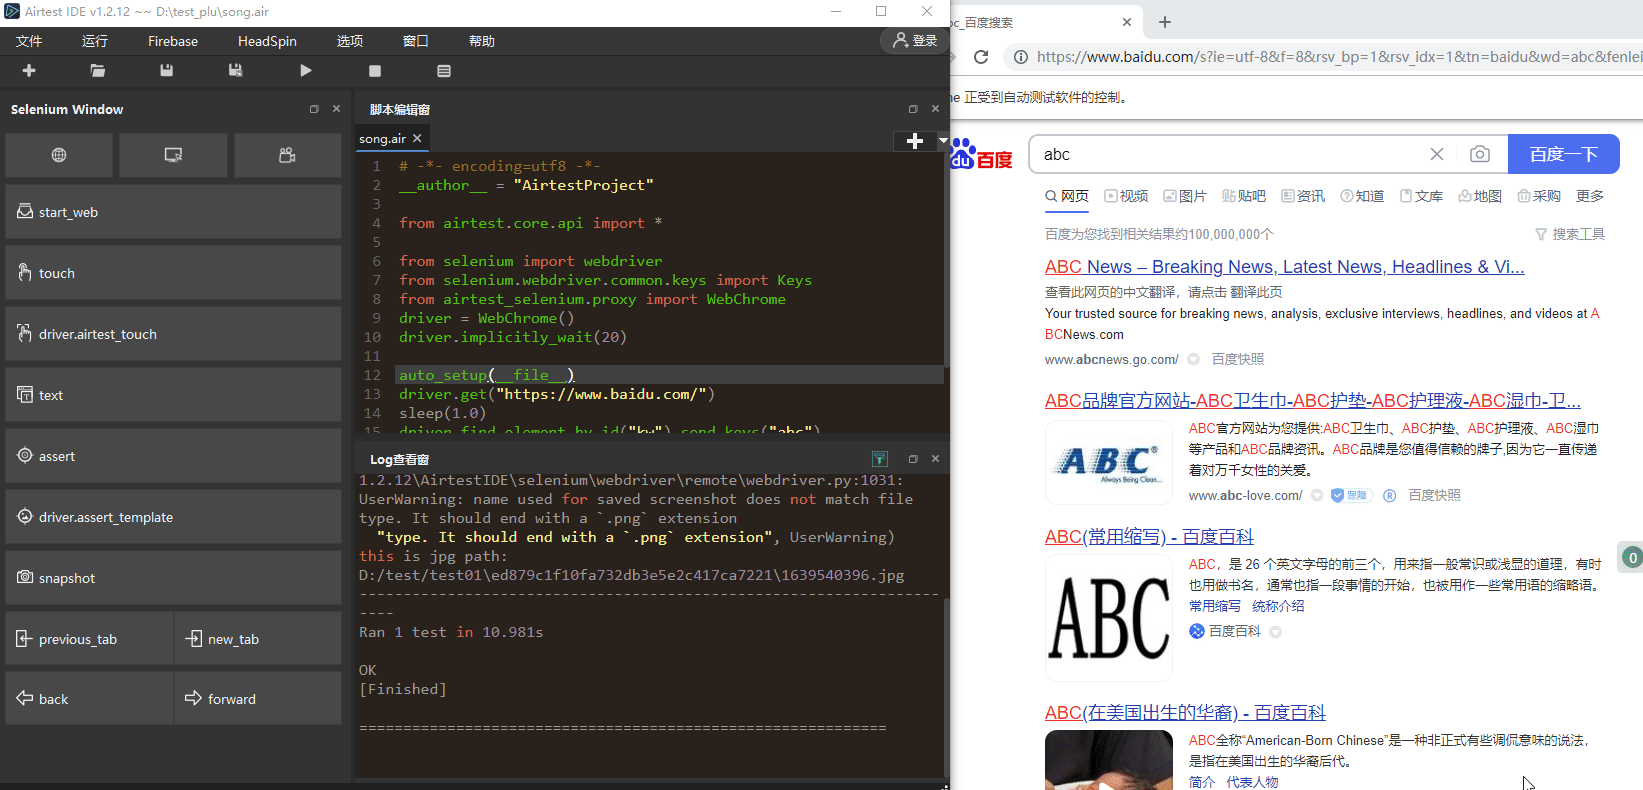
4.An Example of Web Automation in IDE
This example will accomplish the following tasks:
- Open a new Chrome browser.
- Enter Baidu homepage.
- Perform image assertion.
- Perform image touch.
- Switch between tabs.
- Navigate back to the previous page.
- Close the tab.
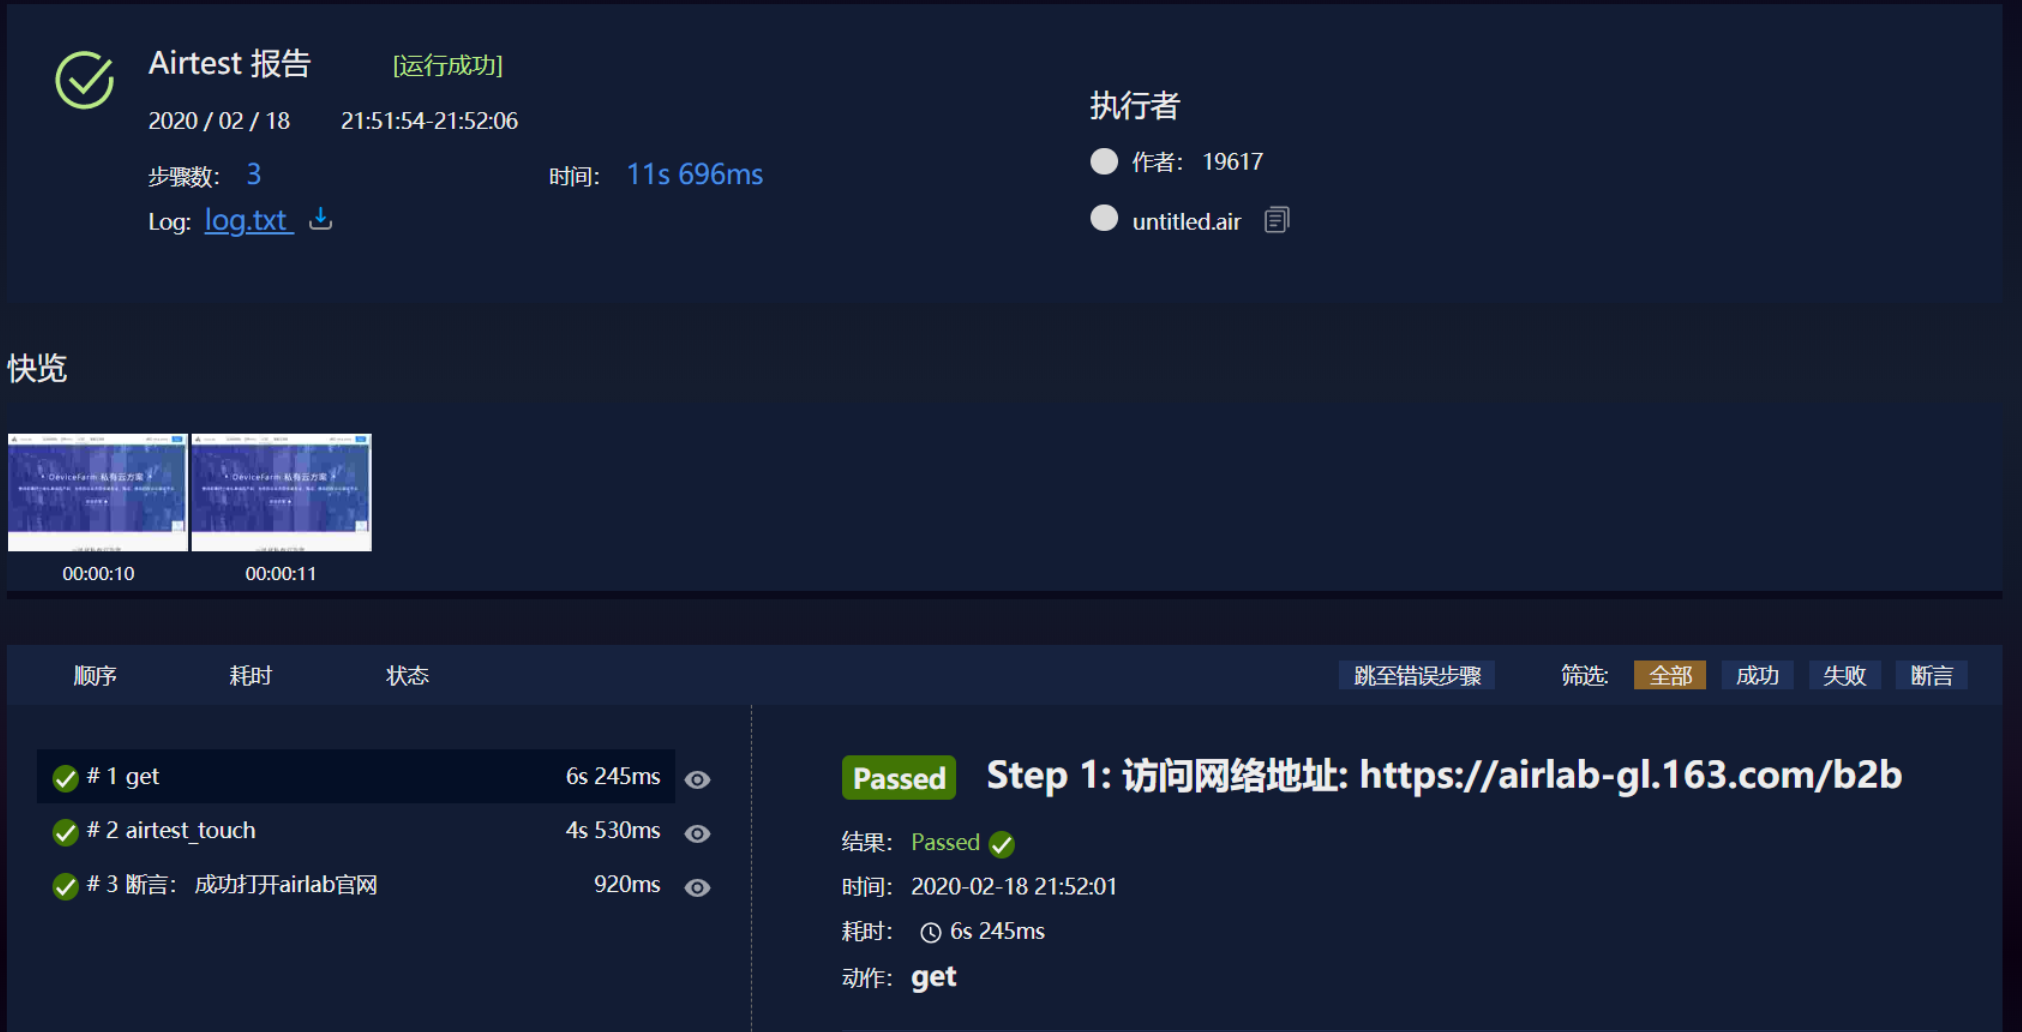
Script running effect:
Report viewing:
5.Common Issues with Web Automation
1) Error occurs when using image methods encapsulated by Airtest-Selenium
Some users encounter an error like "name 'Template' is not defined" while using certain image methods encapsulated by Airtest-Selenium:
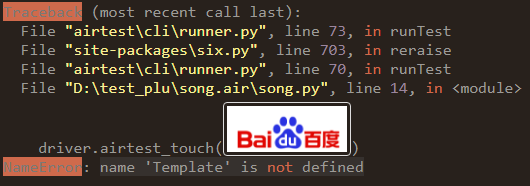
This is usually because of forgetting/accidentally deleting the method to import the Airtest library. You can solve it by adding the following at the beginning of the script:
from airtest.core.api import *
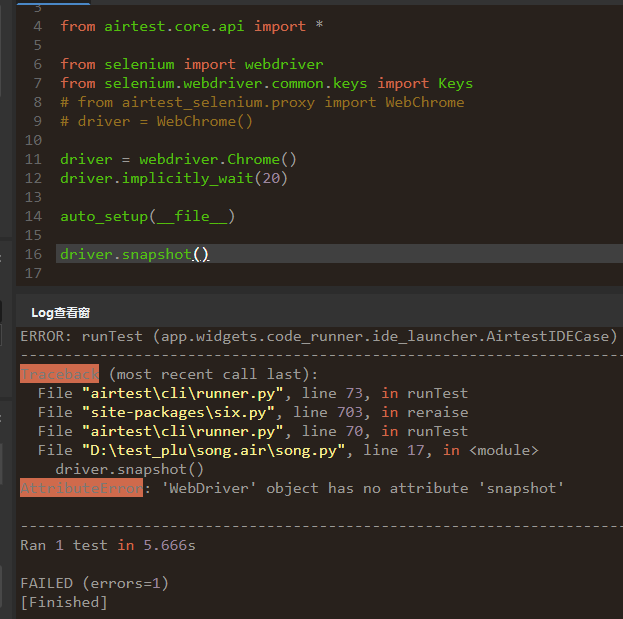
2) Confusing Airtest-Selenium's WebChrome() with Selenium's webdriver.Chrome()
In the Airtest-Selenium library, we can instantiate a chrome object in this way:
from airtest_selenium.proxy import WebChrome
driver = WebChrome()
While in the Selenium library, we instantiate Chrome through the following method:
from selenium import webdriver
driver = webdriver.Chrome()
To use the image methods encapsulated by Airtest-Selenium, such as airtest_touch, snapshot, and assert_template, you need to instantiate the WebChrome class provided by Airtest-Selenium.
Otherwise, there will be an error like "AttributeError: 'WebDriver' object has no attribute 'snapshot'":
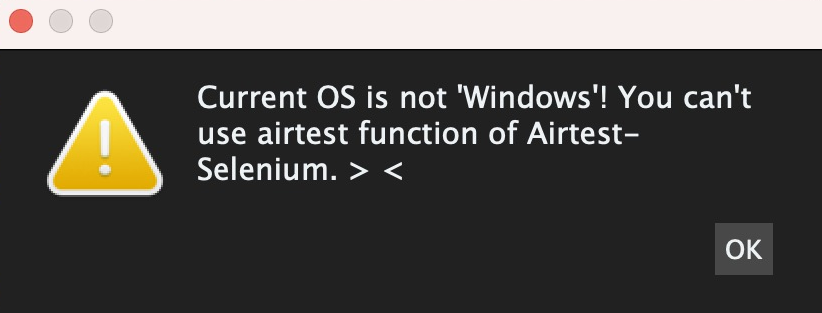
3) Airtest-Selenium is currently not supported on Mac
Airtest-Selenium is currently not supported on Mac. When you attempt to use it on Mac, you will receive the following prompt:
Current OS is not 'Windows'! You can't use airtest function of Airtest-Selenium. > <
4) Airtest-Selenium report plugin
When generating reports for Airtest-Selenium (Web automated testing), you need to load a dedicated report plugin. When you use the "View Report" button of AirtestIDE to generate a report, it will automatically load this plugin for you:
# Add the Airtest-Selenium report plugin via the command line

--plugin airtest_selenium.report
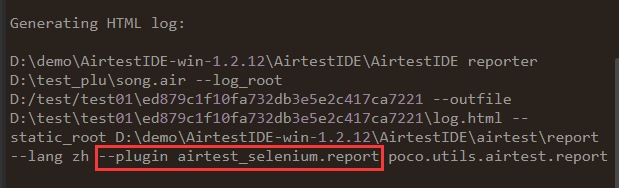 When you use scripts to generate test reports, you need to manually specify the plugins parameter:
from airtest.report.report import LogToHtml

h1 = LogToHtml(script_root=r'D:\test\report01.air', log_root=r"D:\test\report01.air\log", export_dir=r"D:\test\report02" , lang='en', plugins=["airtest_selenium.report"])
h1.report()
5) Unknown error: cannot find Chrome binary
This is the most common issue encountered by users when they use Airtest-Selenium for web testing. Usually, we can open a Chrome browser window by clicking the button in the Selenium window of AirtestIDE (because we have set the path of chrome.exe in Options-Settings beforehand):

However, when executing the Airtest-Selenium script and running the code to open the browser window, an error similar to the following will be reported:
selenium.common.exceptions.WebDriverException: Message: unknown error: cannot find Chrome binary
  (Driver info: chromedriver=2.37.544315 (730aa6a5fdba159ac9f4c1e8cbc59bf1b5ce12b7),platform=Windows NT 10.0.19043 x86_64)
If your Chrome browser is installed in the default path (which we highly recommend, as it can prevent many issues), you need to check the following 2 points when the above error occurs:
- Is the matched driver (chromedriver) for the Chrome browser placed in the directory of environment variables?
- Do the Chrome browser version and the driver (chromedriver) version match?
If either of the answers to the above questions is No, you can download the matching chromedriver from this link after checking the installed version of Chrome browser: http://chromedriver.storage.googleapis.com/index.html.
If your Chrome browser is not installed in the default path, the above error may also occur when Selenium cannot find the binary chrome.exe file. Usually, you can solve it in the following way:
-
Uninstall the Chrome browser, and then reinstall it to the default path.
-
If you don't want to reinstall it, you can directly configure the installation directory
of Chrome browser to the environment variable.
Of course, you can also use code to specify the path of chrome.exe or chromedriver (the versions of the two must match):
# -*- encoding=utf8 -*-

__author__ = "AirtestProject"
from airtest.core.api import *
from selenium import webdriver
from selenium.webdriver.common.keys import Keys
from airtest_selenium.proxy import WebChrome
from selenium.webdriver.chrome.options import Options
opt = Options()
opt.binary_location = r"C:\Program Files (x86)\Google\Chrome\Application\chrome.exe"
driver = WebChrome(options=opt,executable_path=r"C:\Program Files (x86)\Google\Chrome\Application\chromedriver.exe")
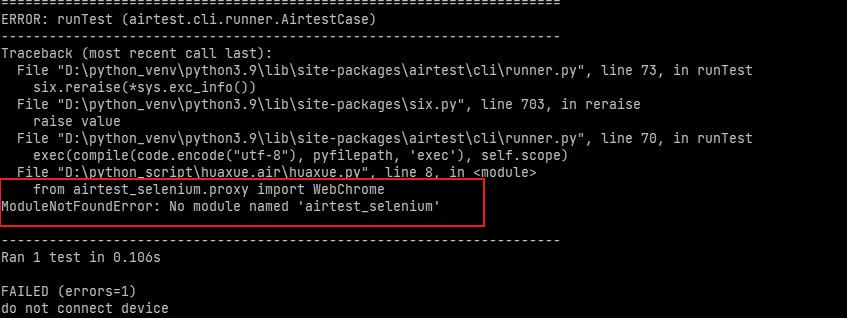
6) Library is not installed when running Airtest-Selenium scripts outside of AirtestIDE
If you use the environment provided by AirtestIDE to run Web automation scripts, you can run them directly because the embedded Python environment has already installed the Airtest-Selenium library in advance. But if you specify to use the local Python environment or run Web automation scripts outside of AirtestIDE, you need to install the Airtest-Selenium library in the corresponding Python environment:
pip install airtest-selenium
Otherwise, an error of "no module named 'airtest_selenium'" will appear:
Also, some users may encounter an error message saying "no module named 'pynput'" when installing this library. In this case, you need to install the pynput library before installing Airtest-Selenium:
pip install pynput
pip install airtest-selenium
7) Input and keyboard operations for Web automation
Unlike Android, iOS and Windows platforms, in web automation scripts, we do not use "text" for text input operations, nor do we use "keyevent" to simulate keyboard operations. Instead, we use send_keys. Here's a simple example: After opening the Baidu homepage, locate the search text input box, enter some text, and then perform an Enter key operation.
# -*- encoding=utf8 -*-

__author__ = "AirtestProject"
from airtest.core.api import *
from selenium import webdriver
from selenium.webdriver.common.keys import Keys
from airtest_selenium.proxy import WebChrome
driver = WebChrome()
driver.implicitly_wait(20)
auto_setup(__file__)
driver.get("https://www.baidu.com/")
sleep(1.0)

# Enter text
driver.find_element_by_id("kw").send_keys("abc")

# Perform Enter key operation
driver.find_element_by_id("kw").send_keys(Keys.ENTER)
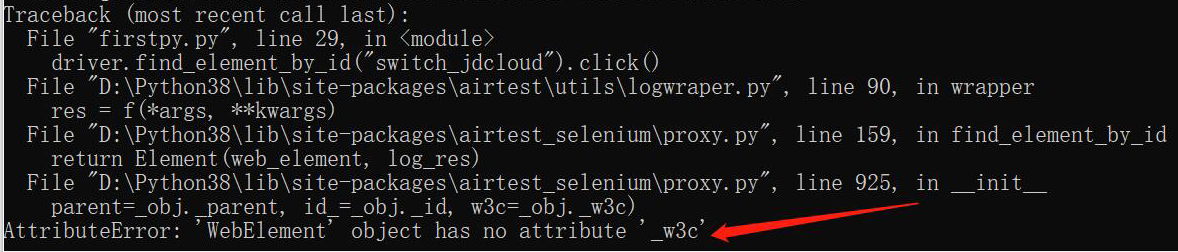
8) AttributeError: 'WebElement' object has no attribute '_w3c'
This is usually because a local Python environment with Selenium 4 installed is being used. Since AirtestIDE is not yet compatible with Selenium 4, please uninstall Selenium 4 and install Selenium 3 instead.