III. FAQ Summary
1.FAQ About AirtestIDE
1) How to interpret the optional connection parameters provided by IDE?
IDE offers 3 optional connection parameters: Use javacap, Use ADB orientation, and Use ADB touch.
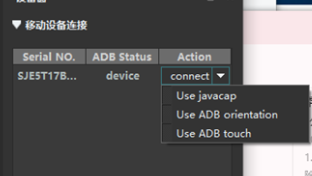
① Use javacap is intended for phones or devices that cannot display their screen properly or have failed minicap initialization. Therefore, for emulators with a black screen and some special tablets, you can consider checking this option. ② Use ADB orientation is for screen rotation. When the program fails to detect the screen orientation on an Android phone or on some special tablets, you can consider checking this option. ③ Use ADB touch is for sending ADB commands to click on the screen, but it has a poor effect and slow speed. You are only recommended to check this option when you can't click on some special Android devices (such as smart rearview mirrors and special tablet models). Normally, you can click on most phones. If you fail, it is generally because a certain setting option is not turned on. For example, on a Xiaomi device, you should check if the "Allow Simulation of Clicks" option is enabled.
About Connection Parameters
We generally do not recommend adding these optional connection parameters, unless the device connected has a black screen and you need to make the problem device compatible.
①How to add optional parameters in a script?
If some optional parameters are added when the IDE connects to the device, they should also be added to the script. Especially when running the script from the command line on the device, remember to add these parameters to the device string.
# One Android device with three additional optional parameters added

Android://127.0.0.1:5037/79d03fa?cap_method=JAVACAP&&ori_method=ADBORI&&touch_metho
2) How to completely uninstall AirtestIDE?
When AirtestIDE starts, there is a log at the top of the black terminal window, similar to:
loading config from : ['C:\\Users\\xxx\\AppData\\Local\\AirtestIDE\\AirtestIDE\\user.json']
We can go to this directory to delete the AirtestIDE directory, which includes configuration files, possible log files, etc. However, if you have set a custom log path in the IDE, you need to delete the files under the log directory separately.
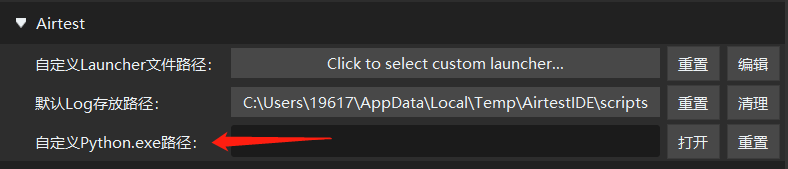
3) How to import third-party libraries in IDE?
AirtestIDE has a built-in Python environment that lacks many third-party libraries. If you want to import various third-party libraries in the IDE, you can install them in your local Python environment and then set the IDE to use the local Python environment. The specific steps are as follows: ① Please install Python (3<=python<=3.9, 3.10 is not supported yet) on your computer and then install the corresponding dependent library. You can manage your Python environment with some environment management solutions, such as virtualenv. ② Install the dependencies for Airtest in the newly installed local Python environment. For more details, please refer to this document: https://airtest.doc.io.netease.com/IDEdocs/3.4run_script/0_run_script/#4. ③ After installing the local Python environment, set the path to your local python.exe in the IDE settings.
4) How to fix the black screen on emulators?
Please make sure AirtestIDE is updated to the latest version before attempting the following operations. ① Before connecting to the emulator, try selecting the Use javacap option and then click on the connect button to connect to the emulator. ② If there is still a black screen, disconnect the emulator and select the options Use javacap and Use ADB orientation from the dropdown menu. Then connect to the emulator again. ③ If both methods don't work, you can submit an issue on GitHub with details on the IDE and emulator versions used (GitHub address: https://github.com/AirtestProject/AirtestIDE/issues).
5) How to fix an error generated when executing the command copied from the log window in IDE resulted
Common situations may include: ① The copied command path contains spaces, causing the program to generate an error message of "file or path not found". In this case, you can fix it by enclosing the path with English double quotes marks. ② The command line may be interrupted by characters such as &, which is common after selecting the use javacap option. However, the character & needs to be escaped to be effective: rewritten as ^& in Windows and /& in MAC.
6) The built-in feature of the IDE to view the package name
To launch the app for testing, we often use start_app("package name") which requires us to get the package name with a command beforehand.
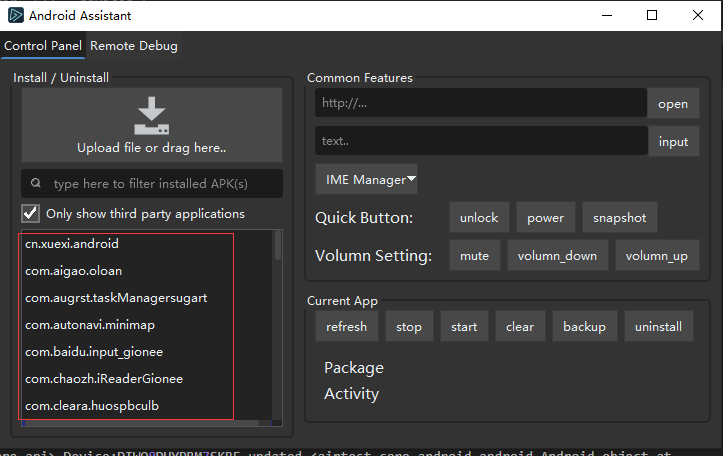
In fact, we can quickly get the package name of the app on the connected device through the Android Assistant feature of the IDE.
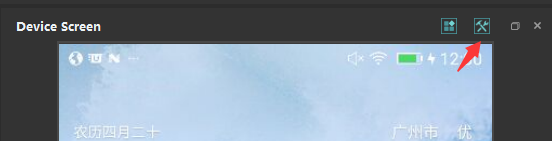
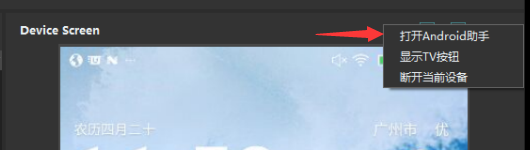
After connecting to the Android device to be tested, click on the Phone Assistant in the upper right corner, and then select the Open Android Assistant option.
Then we can view in the pop-up window the package name of the applications on the device.
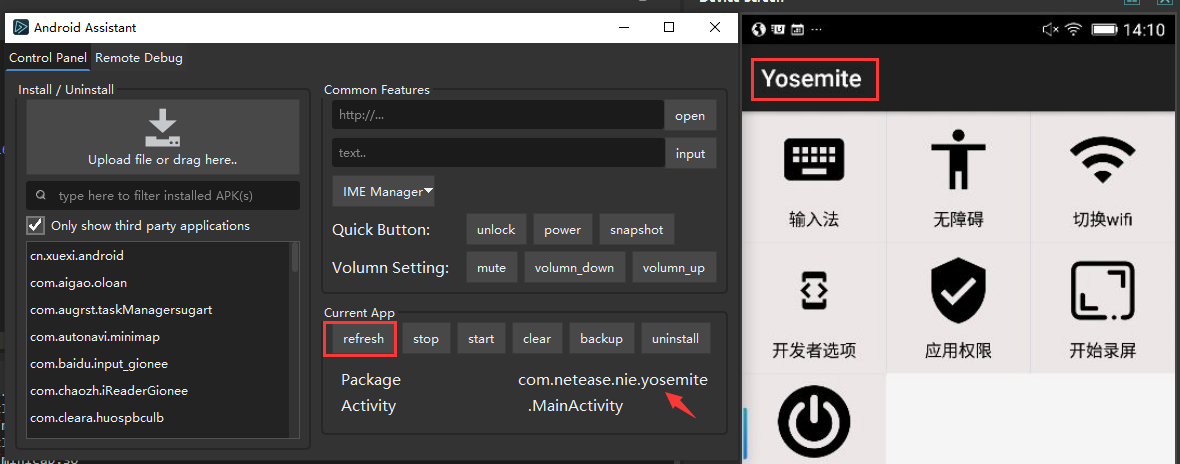
 Additionally, we can start the desired application on the device, then click on the refresh button on the bottom right of the Android Assistant to view the package and activity of the application.
7) How to fix the blank script editor and log viewer windows in the IDE?
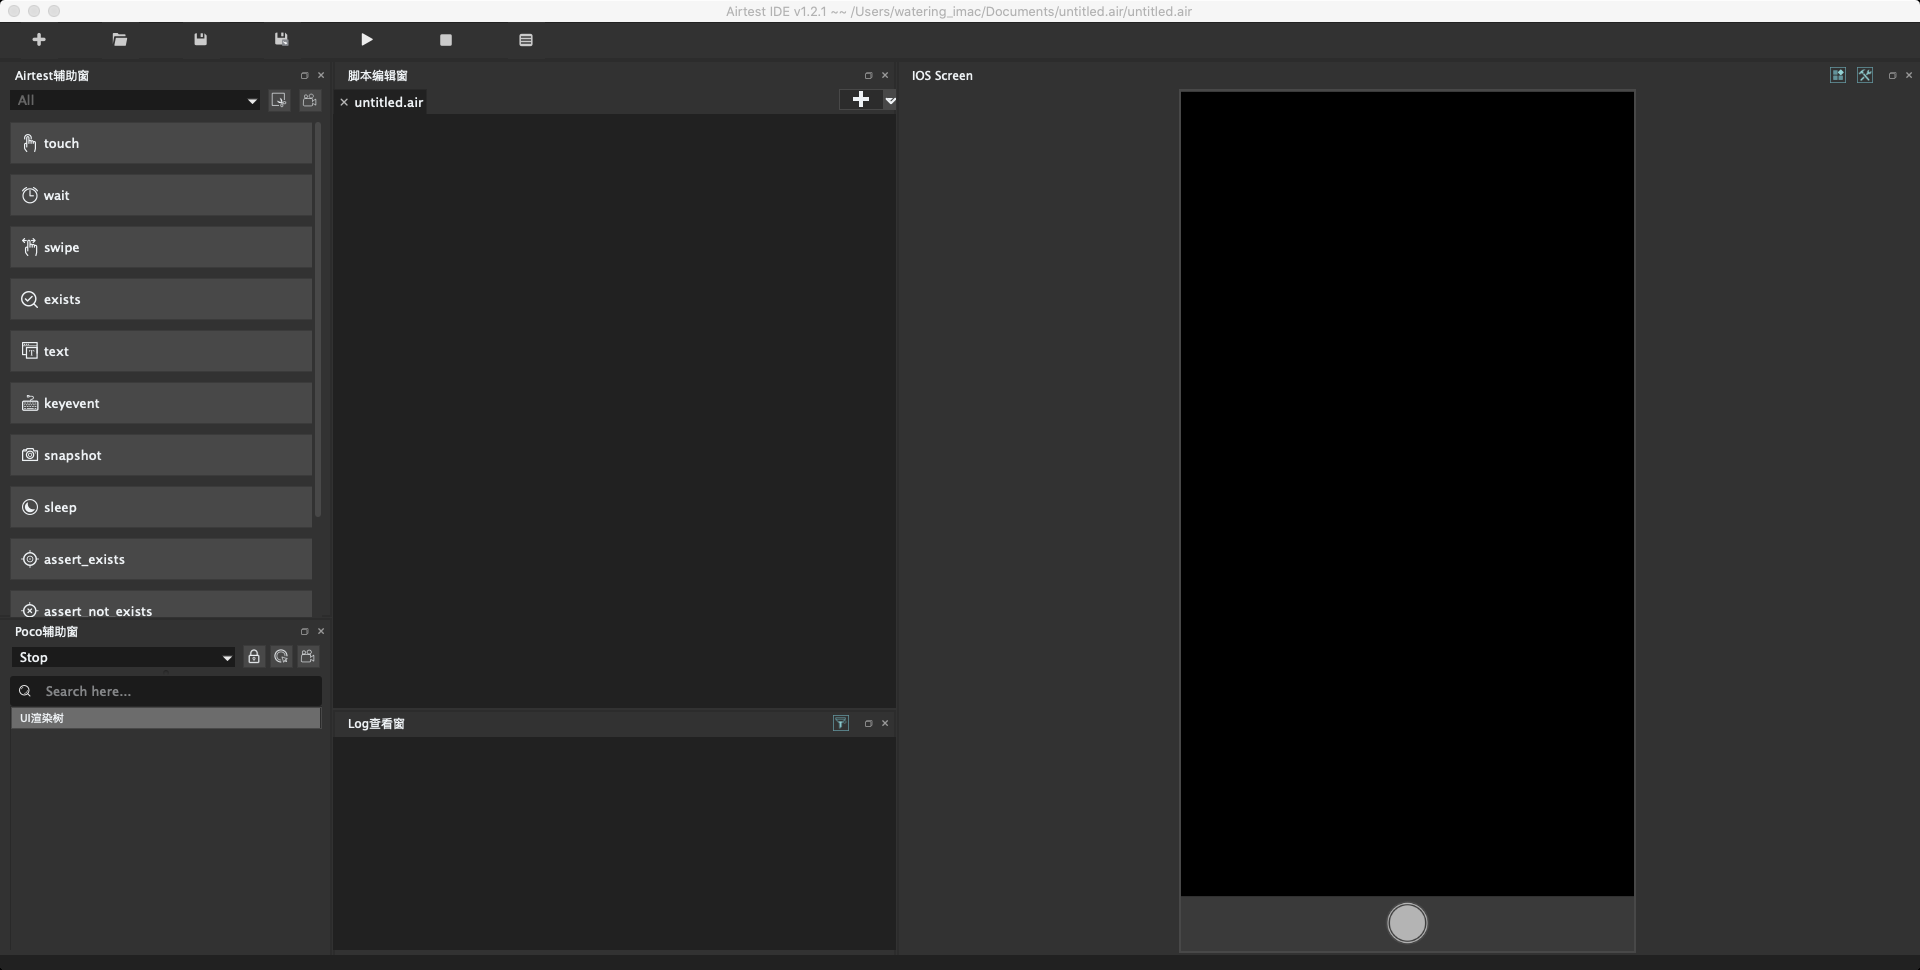
Some of you may find the blank script editor and log viewer windows after launching the IDE, as shown in the picture below:
 These issues, including crashes after startup as well, are probably caused by graphics card incompatibility. You can double-click on Start .bat Script in Compatibility Mode in the folder to launch AirtestIDE normally.
Furthermore, in IDE versions 1.2.3 and higher, we have added a new option in the settings:
These issues, including crashes after startup as well, are probably caused by graphics card incompatibility. You can double-click on Start .bat Script in Compatibility Mode in the folder to launch AirtestIDE normally.
Furthermore, in IDE versions 1.2.3 and higher, we have added a new option in the settings:
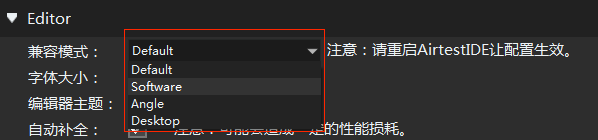
By default, the default mode will be selected. If encountering problems during startup, you can try selecting the other three options in the drop-down menu, then restart AirtestIDE to see if the script editor window and the log viewer window can work properly.
If it works, AirtestIDE will be launched with this configuration without the need to manually double-click on Start .bat Script in Compatibility Mode every time you start the program.
8) Unable to enter password? Or the password interface goes black?
The login or password page of most applications does not allow screenshots or screen recording. You can go to the settings of the device and turn off the secure keyboard or any settings that prevent malicious screenshots or screen recording. (For Android devices, you need to install the specialized input method for Airtest: Yosemite.apk)
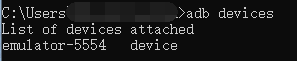
9) Three states of the device: device, unauthorized, and offline
① DEVICE: The device can be connected.
Normally, when you use the command adb devices in the command line to check the list of devices attached in Airtest IDE's device connection window, only devices with the status of the device are connectable and communicable.
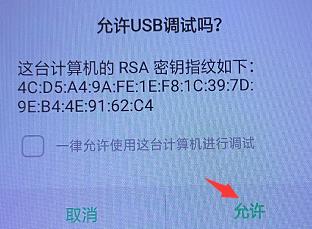
② UNAUTHORIZED: USB debugging is not enabled.
If you have turned on the USB debugging option on your phone and connected the device to your computer via USB, but find that the device status is unauthorized, it means that you have not responded to the prompt to enable USB debugging. Simply enable it to proceed.
③ OFFLINE: The device is disconnected and unavailable.
This usually happens in two scenarios: The first scenario is when the device is an emulator. If the adb connect command is used before the emulator is not fully launched, or if the emulator crashes during the connection process, the emulator status will appear as offline. In this case, you only need to use the adb connect command to connect to the emulator again. Additionally, if the built-in ADB version of the emulator is different from that of Airtest, it will result in connection issues and turn the emulator into an offline state. In this case, you need to unify the two different versions of ADB into the same one. The second scenario often occurs in wireless connection to real devices. If the device goes offline due to Wi-Fi fluctuations, then execute "adb connect ip:port" again. If the issue persists, start over with all the steps for the wireless connection. For a tutorial on real device wireless connection, please refer to: https://airtest.doc.io.netease.com/IDEdocs/3.2device_connection/1_android_phone_connection/#4.
10) How to obtain the handle of a Windows window?
① In the log viewer window of the IDE
Connect to the Windows window in the IDE, then run any automation script. In the log viewer, we can see the command that ran the script, which contains the handle of the Windows window.

② Using online tools
With the SPY++ tool in VC or VS, you can view the handle, name, class, type, size, and position of a window. There are also other methods and tools that can help, just Google them.
11) IDE does not respond when connecting to iOS
Many students encounter the issue of no response or error messages when clicking on the connect button in the device connection window of the IDE after deploying an iOS device. In such cases, you can: Check if AirtestIDE is updated to the latest version. If not, update it. Check the version of xcode and iOS system being used. If using a version below xcode12.1 and iOS13.5, you can prioritize using the Netease iOS-tagent. For Xcode 12.1 and iOS 13.5 and above, iOS-tagent is not supported and you need to use the latest version of Appium's WebDriverAgent (WDA). Check if http://127.0.0.1:8100/status is under the state of success; if not, please redeploy it. Check if the iOS strings are correctly filled in.
12) How to deal with blurry IDE snapshots?
If you find that the images captured by the IDE are blurry, you can try adjusting the device resolution to 2000 in the Options - Settings of AirtestIDE, then reconnect the device and check if the snapshots are clearer. If the issue is not resolved, you can check if the device screen in the device connection window is clear. If it is still very blurry, you can disconnect it and select use javacap before reconnecting, and then take a snapshot again.
13) How to display coordinates?
In Options-Settings in the top menu bar, if only "real-time coordinate" is selected, absolute coordinates will be displayed. If both "real-time coordinate" and "relative coordinate" are selected, then relative coordinates will be displayed. (Airtest uses absolute coordinates, while Poco uses relative coordinates.)
# Click on the position at coordinate [100,100].
touch([100,100])
# Click on the center of the screen at [0.5,0.5]
poco.click([0.5,0.5])
!!! warning "Display Coordinates" This feature is currently only available for Android and iOS devices, and not for Windows desktop/applications.
2.FAQ About Airtest
1) Is macOS necessary for testing iOS with Airtest?
① You need to deploy iOS-Tagent/appium's wda with xcode on macOS. ② After the deployment, you can connect to an iOS phone for testing on macOS, Windows, or Linux computers. A recommended tool for deploying wda without Mac: tidevice.
2) Can Airtest reports be exported and shared with others?
The default generated Airtest report is for local use only. If packaged and shared with others, some image and static resource files might be lost, resulting in an inability to view the report properly. However, you can export the report and send it to others.
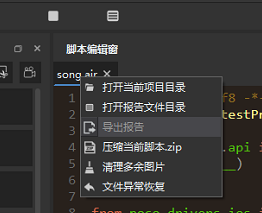
① Export Airtest report with one click in IDE
After generating a report in HTML format by clicking on the View Report button in the IDE, you can right-click on the script name and easily export the report.
② Export Airtest report with --export parameter in the command line
If the script is executed via the command line, you can pass the --export parameter in the command to generate a report with static resources and image files included, and export it to a specified folder. Then, you can directly send the entire folder to others. If the --export parameter is not passed when generating the report, the static resource files and image files in the report will be accessed using absolute paths. In this case, even if you send the entire folder to someone else to view, they will not be able to view it correctly.
③ Adding the export_dir parameter when generating the report
You can also add statements in the script to generate reports and add the export_dir parameter to export the test reports.
h1 = LogToHtml(script_root=r'D:\test\report01.air', log_root=r"D:\test\report01.air\log", export_dir=r"D:\test\report02" ,logfile=r'D:\test\report01.air\log\log.txt', lang='en', plugins=None)
h1.report()
3) Error/Infinite timeout occurs when running "pip install -U airtest"
If an error occurs when installing Airtest with the pip command, check the current version of Python. Currently, only 3≤python≤3.9 is supported, with Python 3.10 not included. If you encounter the error ImportError: numpy.core.multiarray failed to import while using Python 3.9, you can manually downgrade the numpy version to 1.19.3 before installing the Airtest library.
pip install -U numpy==1.19.3
If you encounter infinite timeout issues when installing Airtest, you can consider configuring Tsinghua source (or other domestic sources) as a solution.

pip install -i https://pypi.tuna.tsinghua.edu.cn/simple airtest
4) Inaccurate image recognition
Please refer to the articles on our official WeChat public account "AirtestProject".
- To understand the principles and algorithms of image recognition: Learn how to choose the appropriate image recognition algorithm in 3 minutes.
- To improve image recognition compatibility (part 1): Experience based on 10,000 Airtest snapshot scripts.
- To improve image recognition compatibility (part 2): How to remedy the low success rate of snapshot recognition?
3.FAQ About Poco
1) Solutions to Poco infinite restart
① If a network proxy is used, please make sure to disable all other proxies and VPNs beforehand, otherwise it may affect Poco communication. ② Check if there are restrictions on pocoservice.apk in the phone assistant. For example, certain models of Huawei phones need to enable Self-Start and Background Activity. Here are the ways to enable the settings for several common phone brands: Huawei: Phone Manager - App Startup Management - PocoService.apk - Manual Management - Enable Self-Start and Background Activity. OPPO: Settings - Battery - App Power Consumption Management - PocoService.apk - Enable App Self-Start and Full Background Activity. VIVO: Battery - Background Activity - Enable PocoService. OnePlus: Settings - Battery Optimization - PocoService - Do Not Optimize. Of course, the settings for different mobile phone brands, and even different models of the same brand, may vary. You can adjust the settings related to battery optimization and background activity on your phone and ensure the pocoservice.apk has sufficient activity permissions and is exempt from battery optimization. ③ Cannot be started simultaneously with uiautomator, otherwise they will conflict with each other. ④ You can try restarting your phone or reinstalling pocoservice to see if the problem is fixed by itself.
2) Solutions to the slow run of Poco scripts
Please update pocoui to the latest version for better runtime efficiency, as we will continue to optimize it in future releases. If using the built-in environment of AirtestIDE, please update AirtestIDE to the latest version. IF using the local Python environment, use the following command to update it to the latest version: pip install -U pocoui
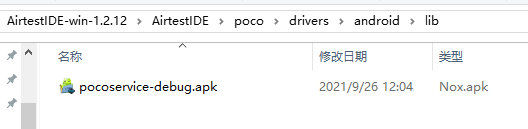
3) Where to find pocoservice.apk?
Inside the unzipped AirtestIDE folder, you can find the pocoservice.apk file:
In the local Python environment with pocoui installed, you can also find the pocoservice.apk file in the following path:

4) Poco positioning error: cannot be found
Sometimes, the automatically generated POCO location script in IDE can be very long and deeply hidden, which may result in failure to locate controls during playback. In this case, do not use the automatically generated location script. Instead, write a more concise location script based on the UI element tree details. You are also recommended to use regular expression matching for script location. If the localization script is written manually, please check the corresponding attributes or hierarchical relationships to see if the failure to locate controls is caused by an incorrect script. If the control can be located when the debugging script is selected alone, but can't be located during actual script execution, it is recommended to add sufficient sleep() before the positioning script to ensure a stable screen before searching for controls.
5) Unable to obtain controls in Poco and Poco's support status
Currently, only native Android and iOS apps can directly use Poco (without integrating Poco-SDK). Non-native apps such as various game applications, H5 mini programs, and hybrid development apps cannot directly use Poco to obtain controls. However, most game engines can do it after integrating the corresponding Poco-SDK.
6) The UI element tree is not generated in the auxiliary window
Except for native apps, all applications rendered with other engines need to integrate the Poco-SDK in order to view the UI element tree. Check if the pocoservice.apk for Poco initialization has been automatically installed on the phone. If not, manually install it. Install Yosemite input method and set it as default. Some phone brands require additional settings. Please refer to the official documentation: AirtestIDE User Manual - Device Connection - FAQ About Android Connection.
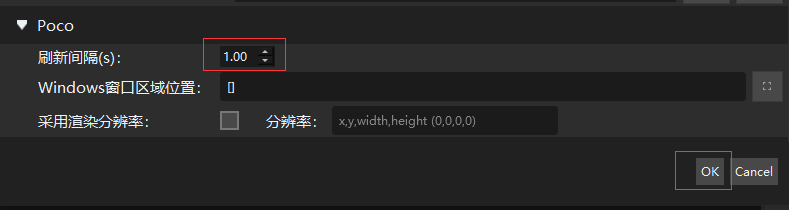
7) Refresh time of the Poco tree in the Poco window
The default refresh time for the UI element tree is 2 seconds. You can reset it in Options - Settings - Poco. Remember to click OK to save the new settings.
8) The positioning method of Poco controls
Poco supports writing location scripts with basic selectors, relative selectors, and spatial selectors. It also supports using regular expressions to match controls. For detailed tutorials and examples, please refer to the tutorial article on our official WeChat public account: "Can't get poco element positioning right? Check out these 3 selectors; they're really helpful!" Learned how to quickly locate various Poco controls using regular expressions instead of selectors.
9) no module named 'poco.drivers'
If you encounter the error of no module named 'poco.drivers' during script execution, it indicates that the current Python environment has installed the Poco library instead of the Pocoui library. Note that the library name for the Poco framework is pocoui, not poco. Make sure to uninstall the poco library and install the correct pocoui library.
pip uninstall poco
pip install pocoui
10) How to determine which POCO mode to use?
The Poco Window of IDE offers various Poco modes:
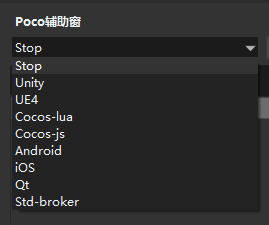
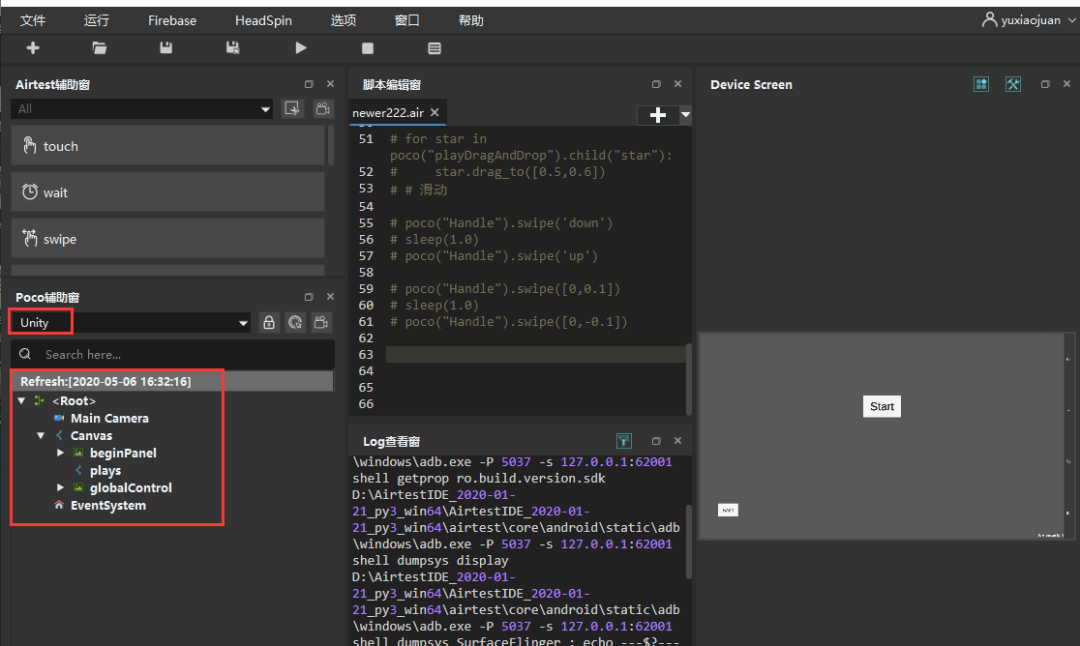
If you are testing a native Android app or a WeChat mini program on Android, you can select the Android mode without the need for the app to integrate Poco-SDK. If you are testing a native iOS app, you can select the iOS mode without the need for the app to integrate Poco-SDK. However, the iOS mode is currently not supported for testing WeChat mini programs on iOS. The other modes, such as Unity, UE4, Cocos-lua, etc., refer to the engines of the tested game project. Before using these modes, you need to integrate the corresponding Poco SDK into the game project and install the project package on the device. For example, to obtain the control tree of a Unity game project using the Unity mode:
4.Other Common Issues/Errors
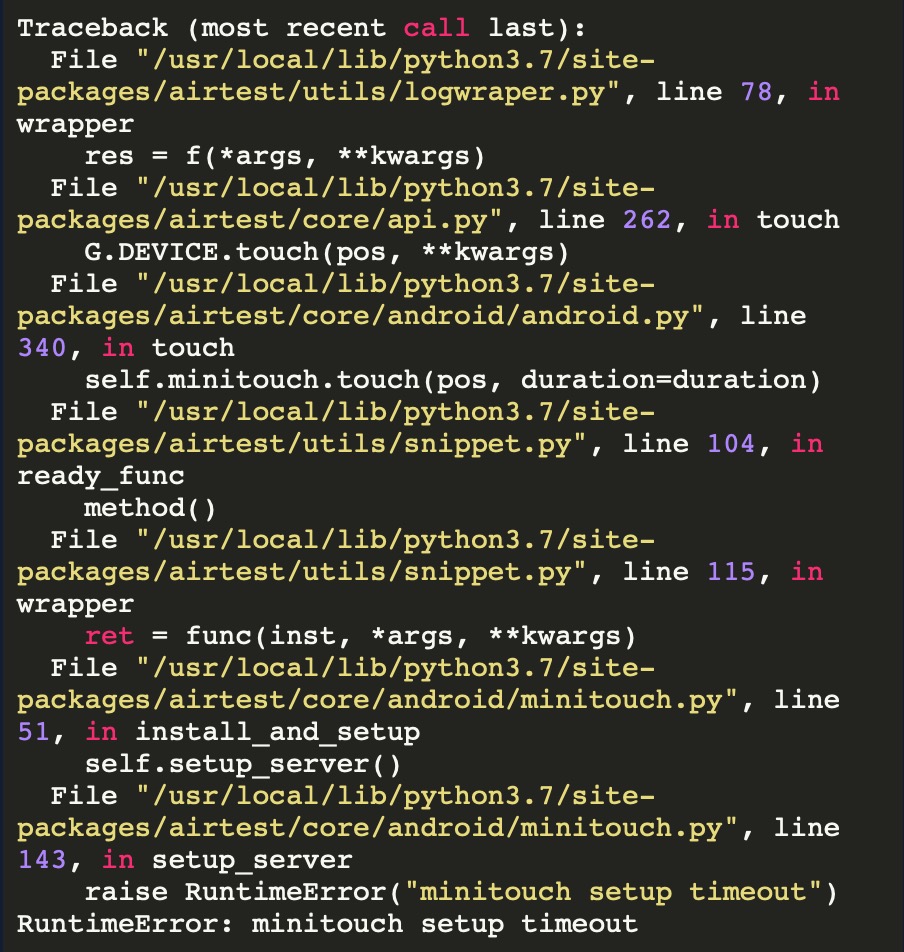
1)RuntimeError:minitouch setup timeout
This error usually occurs in the following scenarios:
① The mobile system is MIUI11. In this case, you need to check the options of use Javacap and use orientation before clicking on the connect button.
② The Android version of the mobile phone is Android 10. In this case, you only need to update the IDE to the latest version. If the IDE is using a local Python environment, then you also need to update the Airtest in the local Python environment to the latest version.
2) minicap serve setup time out
Screen initialization failure is common on high-version MIUI devices and emulators, etc. First, check if the current IDE is the latest version. If not, update it to the latest version. Then, try selecting use javacap before connecting the device.
3) Javacap server setup timed out
The device is not compatible with javacap. Please do not select use javacap before connecting the device in the IDE, and do not include ?cap_method=JAVACAP in the string for connecting the device via the script. Finally, make sure to use the latest version of Airtest.
4) Error of "import win32api" on Windows
If certain versions of the local Python environment are used on the Windows platform, the following error message may appear:
5)'NoneType' object has no attribute xxxx
This error may occur in different methods, such as: AttributeError: 'NoneType' object has no attribute 'snapshot' AttributeError: 'NoneType' object has no attribute 'start_app' These error messages occur because you have not connected your devices to the script. So, you can fix it by simply adding a script for device connection at the beginning of the script.
6) How to install a third-party library in a specified Python environment?
In many cases, you may have more than one Python environment installed on your computers, such as Python 2 and Python 3. To install a third-party library in a specified Python environment, you can use the following command: python3 -m pip install airtest # Install the Airtest library in the Python3 environment python2 -m pip install airtest # Install the Airtest library in Python 2 environment Apart from specifying the environment via a command, you can directly go to the corresponding Python directory and use the pip.exe in that directory for installation.
7) Invalid syntax
A typical python syntax error often occurs when scripts do not have proper line breaks or indentation or there is a missing quotation mark or parenthesis.