IV. Airtest Image Scripts
1.Essence of Airtest Image Scripts
Image script like this is the most common type of script in AirtestIDE.
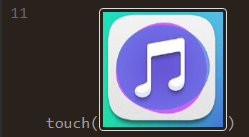
In fact, it is essentially a Python script, only that Airtest encapsulates and displays the images, making it to read.
touch(Template(r"tpl1635489343794.png", record_pos=(-0.365, 0.228), resolution=(1080, 2280)))
The Template(r"tpl1635489343794.png", record_pos=(-0.365, 0.228), resolution=(1080, 2280)) is the image class encapsulated by Airtest.
2.Configuration Options for Image Recognition
We can directly search for "template" in the Airtest API documentation to view the configuration options for this image class.
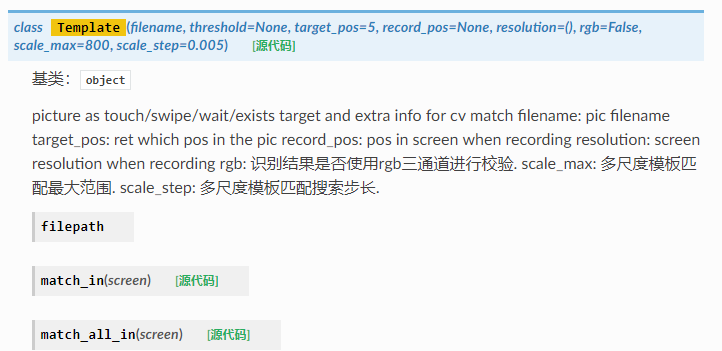
filename: This is the required parameter for building a Template instance, can be a relative or absolute path. (When taking screenshots using AirtestIDE, they will be saved in the default path.)threshold: This refers to the image recognition threshold, the minimum level of confidence required for an image recognition result to be considered valid. The higher the threshold, the more precise the image matching needs to be.target_pos: This is for setting the clicking position of the image. It requires to fill in an integer ranging from 1 to 9, with 5 as the default value, which represents the center of the image. (1 represents the upper left corner, and 9 represents the lower right corner.)record_pos: It calculates the percentage of midpoint deviation relative to resolution for a given coordinate. Images nearby will be prioritized during image recognition. (This parameter value is automatically recorded when taking a snapshot using AirtestIDE.)resolution: This records the phone's resolution when the snapshot is taken. (AirtestIDE automatically records the phone's resolution when taking a snapshot.)rgb: It forces the use of color image recognition. (When the rbg parameter is not set, Airtest will convert the image to grayscale before performing image recognition.)scale_max: This is a dedicated parameter for the mstpl algorithm added in Airtest 1.2.0, used to adjust the maximum range of matching. The default value is 800, with a range of [700, 2000] and recommended values of 740, 800, and 1000.scale_step: This is a dedicated parameter for the mstpl algorithm added in Airtest 1.2.0, used to control the search ratio step size, representing the refinement level of the search during matching. When performing image matching, it will search within a certain scaling range of the original snapshot with a step size of snapshot's longest edge * scale_step. The default value is 0.01, with a value range of [0.001, 0.1], and recommended values of 0.02, 0.005, and 0.001.
Adjusting all parameters except for the filename will more or less affect the image recognition results, so if you can understand and utilize these parameters, you can achieve a more desirable result for image recognition.
3.Airtest's Image Recognition Algorithm
The Airtest image script is not difficult to learn. Anyone with a basic knowledge of Python scripting can quickly get started. However, as the number of generated script codes increases, you may encounter a serious problem: the results of your script sometimes seem to be out of your control. For example, you want to first determine whether an icon exists on the current screen, and only then perform the next operation if it exists. Airtest thinks the icon exists even though it is not on the screen. Upon checking the report, you realize that it has identified another icon on the screen as the one you have set. Another more common example is when you select several characters on the screen and want it to recognize them, but the results are always satisfying. Airtest often assumes that the selected content does not exist, although sometimes it runs successfully.
The is caused by the operation principle of Airtest. It uses image recognition technology to locate matching images in the current device screen. However, this technology is not as sharp as human eyes and can only try to find the most expected result. This often leads to Airtest recognizing images that do not exist, or failing to recognize the content that we can easily spot on the screen.
1) Introduction to Airtest's image recognition algorithm
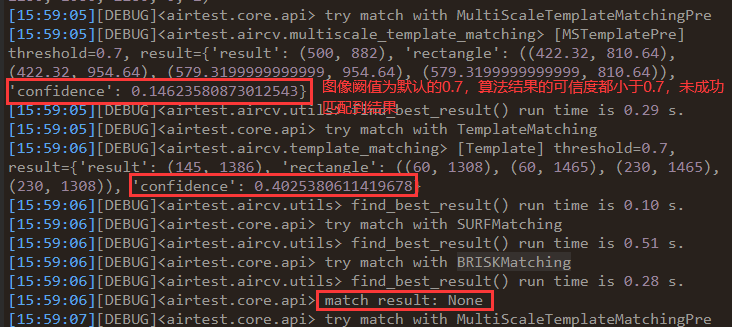
What image recognition algorithms are involved in the image recognition process of Airtest? To answer this question, let's take a look at the log of executing a touch script:
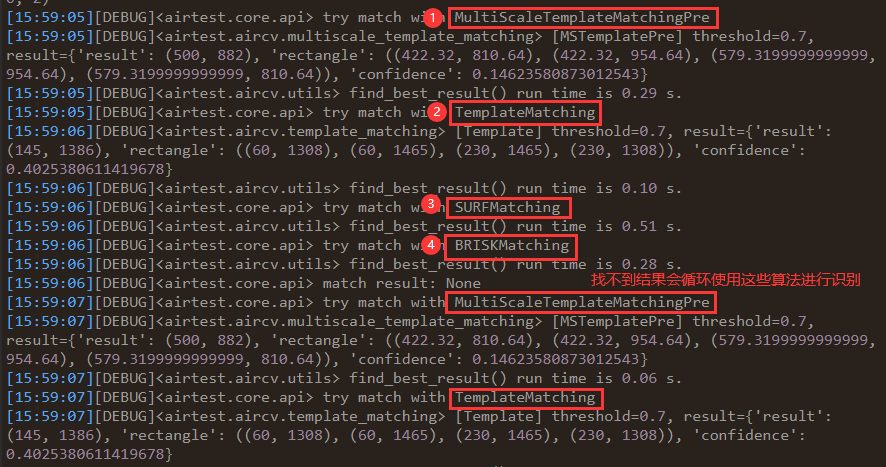
Airtest of version 1.2.0 or greater uses the MultiScaleTemplateMatchingPre, TemplateMatching, SURFMatching, and BRISKMatching algorithms in sequence to recognize images. Once a result is found, the recognition will stop. If no result is found, the recognition will continue in the above order until timeout.
The algorithms include template matching and feature point matching. For a detailed introduction to the image recognition algorithm used in Airtest, you can refer to the following two articles:
Learn to Choose the Right Image Recognition Algorithm in 3 Minutes Guide to Using Airtest's New "mstpl" Image Recognition Algorithm
2) How does the program determine a successful image recognition?
After the image recognition algorithm finds a matching result, how does the program determine whether this matching result is successful or not?
To answer this question, we will introduce two important terms: threshold (mentioned above as a configuration option) and confidence, both of which have a value range of [0,1]. In each image recognition script, there is a threshold used for result filtering, with a default value of 0.7.
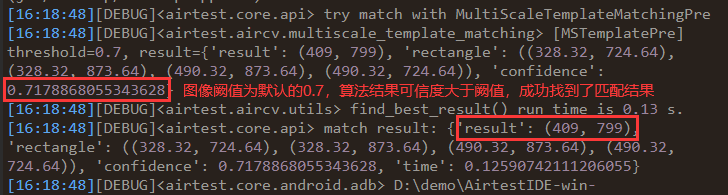
When the above algorithms identify the initial result, they will calculate its confidence. When the confidence is greater than the threshold, the program will consider that the best matching result has been found. When the confidence is less than the threshold, the program will consider that the best matching result has not been found. During the execution of the snapshot script, we can check the log window to observe the confidence of the algorithmic recognition results. ① If the confidence > the threshold, the program will determine that a matching result has been found.
② If the confidence < the threshold, the program will judge that no matching result has been found and continues to search using three algorithms in a loop until timeout.
3) How to modify the default image recognition algorithm?
To modify the default algorithm search order or specify certain algorithms for image recognition, you can apply the following method.
from airtest.core.settings import Settings as ST
ST.CVSTRATEGY = ["tpl", "sift","brisk"]
4.Advanced: How to Improve the Compatibility of Image Scripts?
From the previous content, you must have noticed one thing: image recognition is not omnipotent!!! It has a success rate. Assuming a script has 10 images, each with a recognition success rate of up to 95%, the probability of correctly recognizing all the 10 images is only 60%, not to mention that the success rate for most images is far below 95% due to various reasons, making it even more difficult for the script to run 100% correctly.
Therefore, after writing the script, you are recommended to run it multiple times and modify the images with low success rates to increase the compatibility of the image script. Here are some tips for writing image scripts:
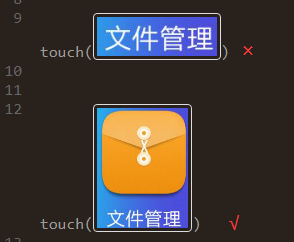
1) Not to include too much background content in the snapshot
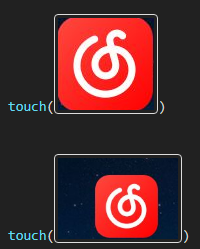
Here is an example. We want to open the NetEase Cloud Music app by clicking on the icon. For better recognition results on different devices, we should choose the first snapshot in the image below, which has less background, rather than the second one.
To illustrate the differences, we captured the two snapshots on device 1 and then executed them separately on device 2. The results are as follows:
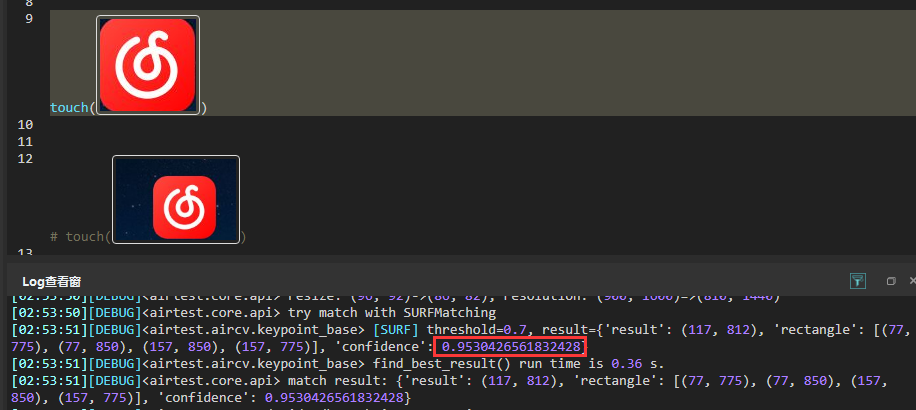
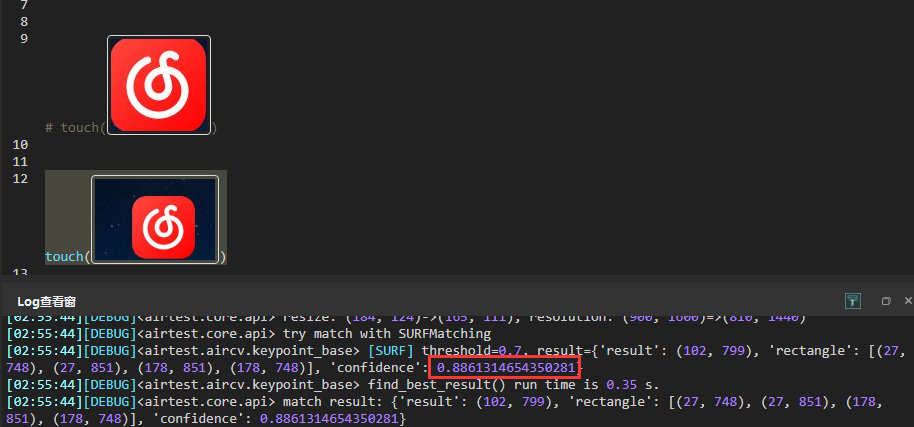
As you can see, the confidence of recognition reaches 0.95 for the snapshot without too much background content, while the confidence drops to 0.88 when the background is included. Therefore, when taking these specific icon snapshots, try to minimize the background content, so that you can effectively improve the compatibility of such snapshot scripts.
2) Not to capture snapshots of plain text
The algorithms of Airtest image recognition are more applicable to identifying images of buttons (with borders) and icons. Simply capturing a few words alone can easily result in a lower success rate of recognition. Please include contents other than plain text in the snapshot to achieve better recognition results.
As shown in the picture, the snapshot below is much better than the plain text snapshot above.
3) Adjusting the threshold reasonably
As mentioned earlier, the threshold plays a role in result screening. If the threshold is set too low, it is easier for incorrect results to pass through; if the threshold is set too high, it may filter out correct results that do not reach the required confidence, making it difficult to produce effective recognition results.
Therefore, you can better filter out the recognition results by adjusting the threshold reasonably. For example, a certain snapshot has a default threshold of 0.7, but after running it multiple times, you find that there is a certain probability of recognizing incorrect results. In this case, you can try to increase the threshold to see if you can improve the probability of correct recognition. If so, it means that you made an effective threshold adjustment.
In the IDE, you can double-click on the snapshot to open the image editor and modify the threshold on the right side.

After setting the threshold and closing the image editor, right-click in the script editor window to switch to the code mode. Then you will see the snapshot script now has an additional parameter of threshold=0.8:
touch(Template(r"tpl1598952570968.png", threshold=0.8, record_pos=(-0.021, 0.121), resolution=(900.0, 1600.0)))
Of course, you can also set a global threshold:
from airtest.core.setting import Settings as ST
ST.THRESHOLD = 0.7 # Default threshold for other statements
However, the above modification method only applies to snapshot statements other than assertion statements. If you double-click to enter the image editor and modify the threshold in an assertion statement snapshot, it will not take effect. This is because the threshold of the assertion statement is different from that of other snapshot statements and can only be set in the following way:
from airtest.core.setting import Settings as ST
ST.THRESHOLD_STRICT = 0.7
4) Enabling RGB color recognition
Airtest usually converts images to grayscale images before recognizing them. Therefore, if two buttons are with the same shape but different colors, Airtest will consider them to be the same. In the figure below, if only the red Delete button is captured, Airtest will consider the other two dark gray Delete buttons to be the same as the red one. 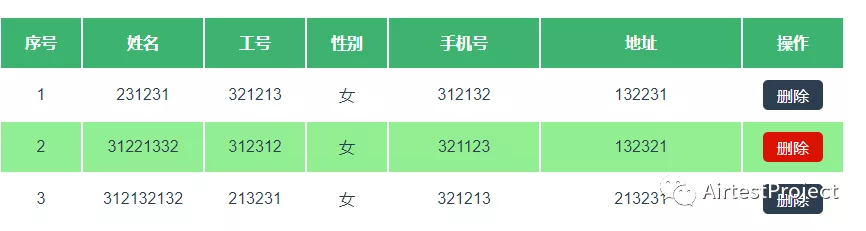 By selecting the RGB option (double-click the image to open the image manager and select it) or adding rgb=True in the code, you can force the use of color images for recognition. This way, the red Delete button can be distinguished from the dark gray ones and recognized more accurately.
touch(Template(r"tpl1637052349130.png", rgb=True, record_pos=(-0.38, -0.11), resolution=(850, 909)))
5) Utilizing target_pos to click on different positions for snapshots
Let's first take a look at what target_pos is. By default, a snapshot script clicks on the center position of the snapshot, represented by target_pos=5. For each snapshot, there are a total of 9 target_pos values. When we set the target_pos value to different numbers, the script will click on different positions of the snapshot.
Double-click the snapshot in the IDE, then you can open the image editor and modify the value of target_pos on the right side.
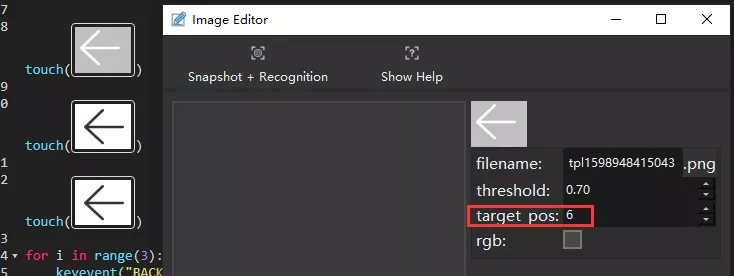
After the modification is completed, switch the snapshot script to code mode, and you will see that the target_pos parameter is now added to the snapshot script.
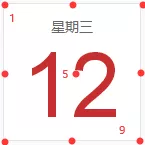
touch(Template(r"tpl1598948415043.png", target_pos=6, record_pos=(-0.434, -0.773), resolution=(900, 1600)))
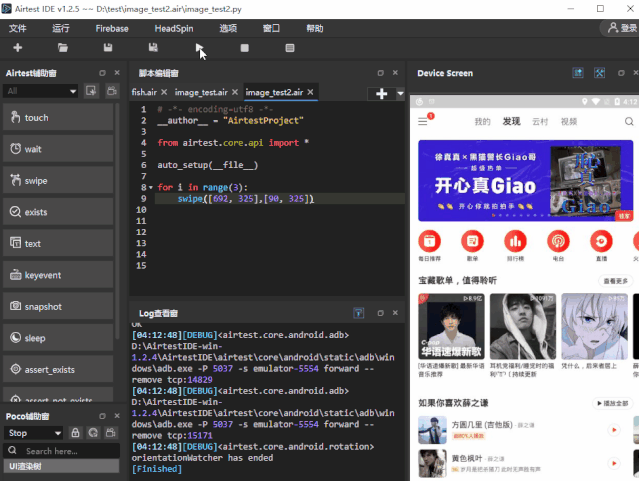
When doing automated testing, we often encounter situations where certain icons are stacked. For example, in a song list on NetEase Cloud Music, three identical play buttons are listed on the right side.
If we want to click on the second play button, we can't make sure the other two buttons will not be mistaken if we solely capture an image of the play button.
In this case, we can fix it in two different ways. One is to expand the snapshot area vertically and position the middle button at target_pos=5.

The other method is to expand the snapshot area horizontally and capture the song title on the left together, so that the middle button is positioned at target_pos=6.

Both methods can ensure a click on the button we want (assuming the list of songs remains unchanged).
Therefore, when precise snapshot (only capturing a specific button/icon) cannot achieve a unique positioning, you can try expanding the snapshot area by including more feature points to ensure the accuracy of snapshot positioning.
6) Avoiding excessive reliance on the recording feature
The built-in recording function in IDE can help beginners quickly get started with Airtest, a testing framework based on image recognition. However, the automatically recorded snapshot statements may not always meet your actual needs, so please do not overly rely on it. After recording, you can check which snapshots are not captured well, then manually capture them again to improve the compatibility of the entire script.
7) Specifying the resolution adjusting method for the game
When performing image recognition on devices with different resolutions, it may result in a low success rate. Therefore, Airtest provides default resolution adjusting methods (based on the default scaling rules of the Cocos engine). The code can be found here. To improve the recognition accuracy for 2D games, the best way is to specify the resolution adjusting method. You can write the following code at the beginning of the .air script file:
from airtest.core.api import *
def custom_resize_method(w, h, sch_resolution, src_resolution):
return int(w), int(h)
# Replace the default RESIZE_METHOD
ST.RESIZE_METHOD = custom_resize_method
The above code specifies a custom scaling rule which directly returns the original value without any scaling of UI, regardless of screen resolution. (Some games employ this strategy.) The RESIZE_METHOD here, namely the custom_resize_method we define inputs the following parameters:
- w, h # The width and height of the UI image recorded
- sch_resolution # The screen resolution during recording
- src_resolution # The screen resolution during playback
Output:
- The width and height of the UI image during playback
To customize your RESIZE_METHOD, you only need to know the scaling rules of the game being tested and implement them through code in the custom_resize_method. This can greatly improve the success rate of image recognition on devices with different resolutions.
8) Improving image script compatibility via custom statements
You can use custom statements to improve compatibility for devices with different aspect ratios, resolutions, and multiple fonts. This method requires connecting to devices with script compatibility issues and including corresponding snapshots in the search list. The code script is as follows:
picList = [pic1, pic2, pic3]  # List of snapshot image objects
for pic in picList:
     pos = exists(pic)
     if pos:
         touch(pos)
         break  # Execute touch if any image in the list is found
Note: If the break statement is missing in the for loop, it will cause all images to be searched (and touched) when running this logic, instead of immediately returning when an appropriate result is found.
9) Utilizing coordinates to touch/swipe
Sometimes, when opening an app, you may encounter some transitional animations or several pages of app introductions, which may change with version updates. As a result, using snapshot to execute touch may require a considerable amount of effort to maintain these script snapshots. In this case, you can replace snapshot clicking with coordinate clicking, because any clicking action can make these transition animations or introduction pages skipped. For example, the slide show on the homepage of NetEase Cloud Music may change every day. If you use a snapshot script to swipe/touch, you will need to update these scripts every day. Therefore, we recommend using coordinates to swipe/touch, which is more convenient and effortless.
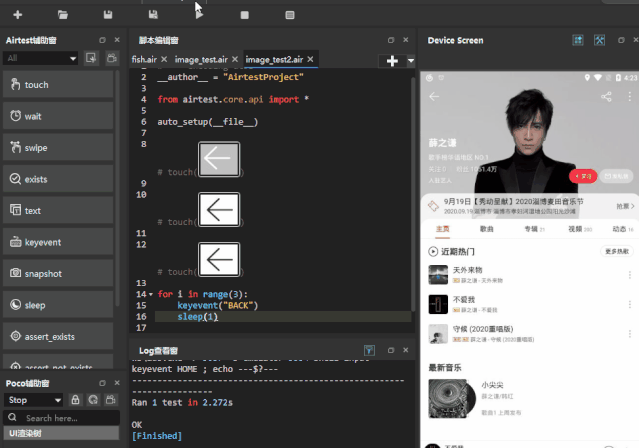
10) Using keyevent("BACK") instead of snapshot scripts to return
We often need to return from a certain page of an app to its homepage. Some users may use a string of snapshot statements with multiple return icons to achieve this operation.

In fact, if you are testing on an Android device, you can simply replace the snapshot statements with keyevent("BACK") for more stability and efficiency.
11) Using more wait and sleep when switching screens
Many beginners tend to make a common mistake of accidentally performing multiple consecutive touch operations. In fact, after each touch operation, the application interface is changing in real-time. If the next touch operation is executed while the interface is still loading, it may cause recognition errors or timeouts.
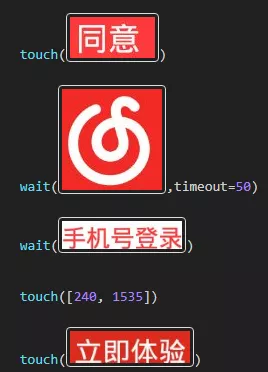
For example, when starting the NetEase Cloud Music app, after agreeing to the terms of service, there will be a very long startup animation. You can only click on the Experience Now button after the animation ends, otherwise the touch operation is likely to time when you are waiting for the startup animation.
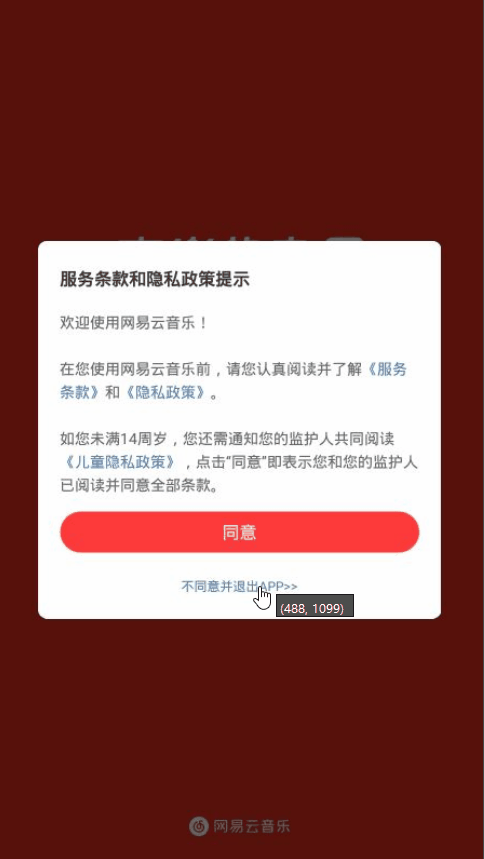
In addition, to ensure that consecutive touches can be executed properly, you can also use sleep(1.0) to buffer between consecutive touches and reduce the impact of screen switching on consecutive touch operations.
12) Opening the app using start_app instead of snapshot scripts whenever possible
The start_app() API supports both Android and iOS devices and more concise and compatible than snapshot scripts.
# Open NetEase Cloud Music

start_app("com.netease.cloudmusic")
13) Replacing snapshot scripts with Poco statements when Poco framework is available
If the Poco framework is available in the projects tested, you are recommended to flexibly use Airtest and Poco scripts in combination when creating automation scripts, which can help achieve better compatibility for the scripts.
For example, if you want to select the top 10 songs in a certain playlist on NetEase Cloud Music, you will need to write 10 snapshot scripts. However, if you use the Poco framework, only a few lines of node traversal scripts are needed. Taking the selection of the top 3 songs as an example:
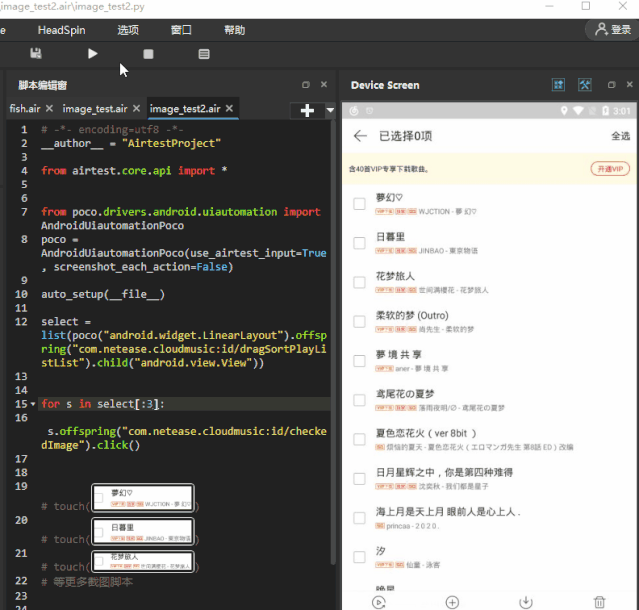
Furthermore, when the song title changes, the script snapshot also needs to be updated accordingly. In this case, choosing an unchanged node as the target object can significantly improve the compatibility of your script.