VI. Poco-SDK Integration Guide
1.Android Applications
Poco supports most Android native apps without the need to integrate the Poco-SDK. However, for hybrid development, or Android apps with WebView pages, there is a possibility of not being able to retrieve Poco controls.
So please try to use the latest version of pocoui and install the latest pocoservice.apk when testing such Android applications. We will strive to make Poco compatible with more Android applications.
2.iOS Native Apps
Similar to Android apps, Poco supports iOS native apps without the need to integrate the Poco-SDK.
3.Unity3D
PocoSDK supports Unity3D version 4 and above, as well as both NGUI and UGUI. The SDK is currently available only in C#. If your Unity3D game uses other GUI frameworks, please refer to the implementation guide. The integration steps are as follows:
1) Download the Poco-SDK package
This can be cloned directly from our GitHub: https://github.com/AirtestProject/Poco-SDK.
2) Place the Unity3D folder into the project script
Unzip the Poco-SDK-master.zip that you just cloned, and then place the Unity3D folder in any location of the Scripts of your Unity project:
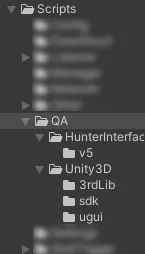
Please note that the term "Scripts" here refers to the source code of the Unity game project.
3) Choose according to the UI type
Inquire which UI method the program is using. There are three folders in the SDK: ugui, ngui, and fairygui. Keep the one you need and delete the other two. For example, in the picture above, ugui is selected. Please make sure to delete the other two you don't need, otherwise, Unity will report an error.
4) Load the script in Unity
Create an empty GameObject (right-click and select Create Empty), and add a script (Add Component):
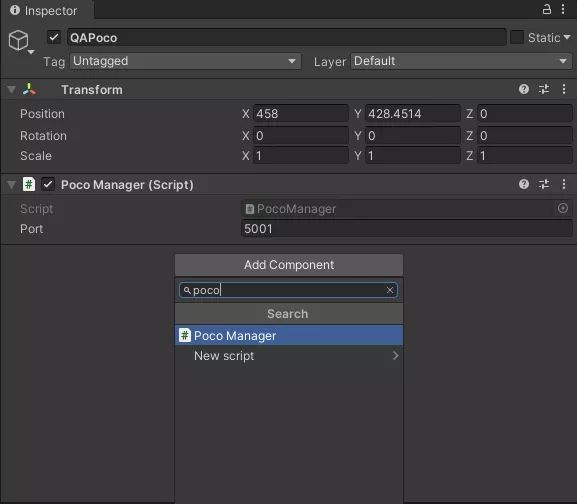
Other parameters can be left as default, and the GameObject name can be anything. Alternatively, you can also add the script (Add Component) Unity3D/PocoManager.cs to GameObjects such as root or main camera. Some of you may ask, why do we need to create an empty GameObject or select GameObjects such as root or main camera to add a script? It's all about attaching the script to a node that will not be destroyed during the game's lifecycle and starting the Poco service as soon as the game starts.
4.Cocos2dx-lua
Poco-SDK supports cocos2dx-lua version greater than or equal to 3.1 and the integration steps are as follows:
1) Download the Poco-SDK package
Clone or download the source code from the poco-sdk repo.
2) Place the cocos2dx-lua folder into the project script
Copy the cocos2dx-lua/poco folder to your game project's script folder. You can rename the folder if you want.
3) Copy the code to the game's initialization script
Copy the following code to your game's initialization script to initialize the Poco-SDK.
local poco = require('poco.poco_manager')
poco:init_server(15004)  -- default port number is 15004, change to another if you like
Note
Your cocos2dx-lua project should at least enable the socket or socket.core module. Poco requires this module to set up a TCP server at runtime.
Note
If the cocos2dx-lua project doesn't have the mime module, it can still work, but it's a bit slow.
4) Determine if the integration is successful
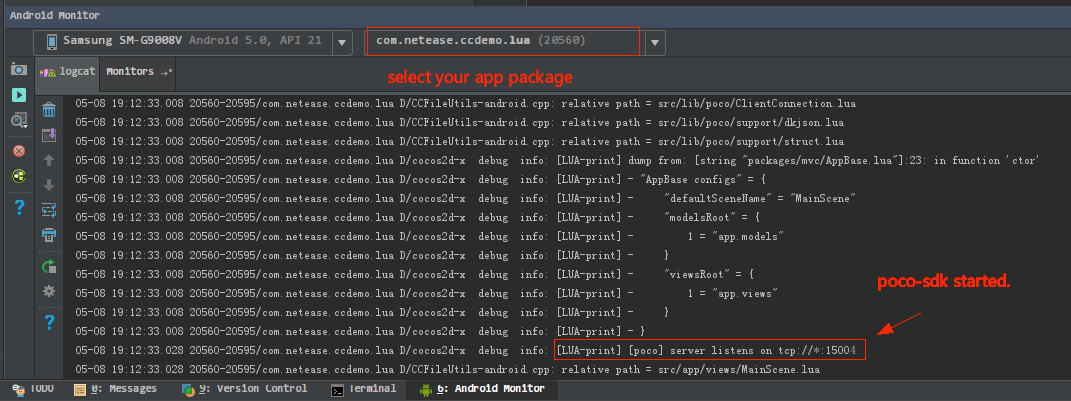
(For the Android platform) It is better to check the output of adb logcat (we suggest using logcat in Android Studio), select your application and see if there is the following output, if so, it means that the integration is successful.
5.Cocos2dx-js
PocoSDK supports Cocos2dx version between 3.1 and 3.13.1 (in theory). To ensure compatibility with each JavaScript engine, this JavaScript SDK is written in ES5. The cocos2d-x 3.13.1 has passed the compatibility testing. The integration steps are as follows:
1) Download the Poco-SDK package
Clone or download the source code from the poco-sdk repo.
2) Place the cocos2dx-js folder into the project script
Copy the cocos2dx-js/Poco folder to your cocos2dx-js project script directory, any path will do.
3) Build the WebSocketServer module and JS bindings
As the SDK requires WebSocketServer, we should build the WebSocketServer module and JS bindings using native code. WebSocketServer is part of the cocos2dx framework but is not included by default, so we need to manually build it through the following steps. Please also refer to the WebSocketServer reference. It is recommended to backup your original websockets folder before copying. The JS bindings for WebSocketServer require libwebsockets version == 1.6. If your cocos2d-x engine is not using libwebsockets version == 1.6, there may be some incompatibility issues within cocos2d-x itself.
cp -r cocos2dx-js/3rd/websockets <your-cocos-project>/frameworks/cocos2d-x/external/websockets
cp cocos2dx-js/3rd/src/* <your-cocos-project>/frameworks/runtime-src/Classes
- Edit
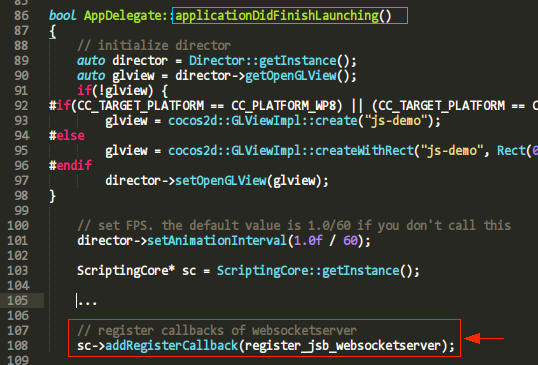
/frameworks/runtime-src/Classes/AppDelegate.cpp. Add the following two lines of code at the appropriate location.
``` // include it at top #include "jsb_websocketserver.h"
// register callbacks of websocketserver sc->addRegisterCallback(register_jsb_websocketserver); ```

- Edit
/frameworks/runtime-src/proj.android/jni/Android.mk. Add the following content to your makefile at the appropriate location. If you are using an Android Studio project, please edit proj.android-studio/jni/Android.mk and make sure the path is correct.
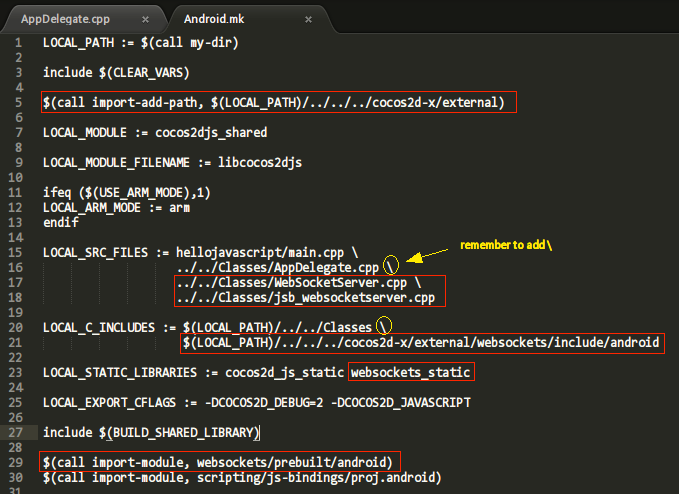
``` ...
$(call import-add-path, $(LOCAL_PATH)/../../../cocos2d-x/external)
LOCAL_SRC_FILES := hellojavascript/main.cpp \ ../../Classes/AppDelegate.cpp \ ../../Classes/WebSocketServer.cpp \ ../../Classes/jsb_websocketserver.cpp
LOCAL_C_INCLUDES := $(LOCAL_PATH)/../../Classes \ $(LOCAL_PATH)/../../../cocos2d-x/external/websockets/include/android
LOCAL_STATIC_LIBRARIES := cocos2d_js_static websockets_static
include $(BUILD_SHARED_LIBRARY) $(call import-module, websockets/prebuilt/android) $(call import-module, scripting/js-bindings/proj.android)
... ```
Edit your project.json, and add the SDK file name to the jsList in the following order.
{
   // ...
   jsList: [
       // ...
       "src/lib/Poco/sdk/AbstractDumper.js",
       "src/lib/Poco/sdk/AbstractNode.js",
       "src/lib/Poco/sdk/Attributor.js",
       "src/lib/Poco/sdk/DefaultMatcher.js",
       "src/lib/Poco/sdk/IScreen.js",
       "src/lib/Poco/sdk/Selector.js",
       "src/lib/Poco/Cocos2dxNode.js",
       "src/lib/Poco/Cocos2dxDumper.js",
       "src/lib/Poco/POCO_SDK_VERSION.js",
       "src/lib/Poco/Poco.js"
   ]
  }
4) Recompile the project
Recompile your project.
5) Start Poco-SDK
The require('Poco') will launch the PocoSDK in the first initialization script of the game. Do not destroy it during the game's lifecycle.
var PocoManager = window.PocoManager
var poco = new PocoManager()

// add poco on window object to persist
window.poco = poco
6.Cocos-Creator
1) Download the Poco-SDK package
Clone or download the source code from the poco-sdk repo.
2) Place the cocos-creator folder into the project script
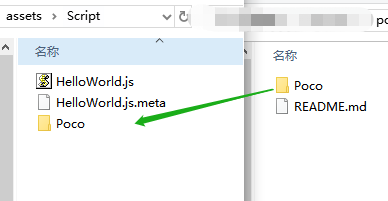
In the downloaded source code, open the Poco-SDK/cocos-creator directory, and then copy the entire Poco folder under this directory to the assets/scripts directory of the game project to be tested.
3) Edit the configuration file of the Cocos Js engine
Because the SDK requires WebSocketServer support, we need to enable the WebSocketServer module. It should be noted that WebSocketServer is supported by Cocos Creator 2.2.1 but is not enabled by default, so we need to follow the steps below to enable it: - Enter the engine directory and modify the ccConfig.h file as shown in the figure.

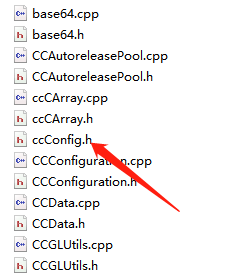
Edit line 62, and change #define USE_WEBSOCKET_SERVER 0 into `#define USE_WEBSOCKET_SERVER 1```

4) AAdd imported scripts in the editor
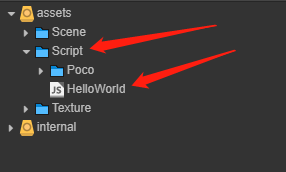
As shown in the above figure, in your game project, select asserts/Scripts/ a script that will not be destroyed, and in the onLoad function of the script, add the following script:
 onLoad:function(){
     var poco = require("Poco") // Add the path to your Poco.js file here.
     window.poco = new poco();
     cc.log(window.poco);

 },
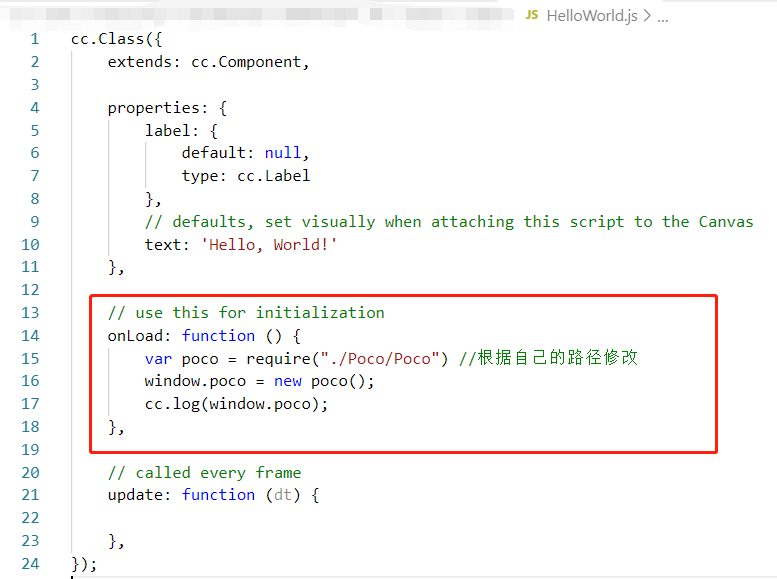
Note that the red boxed area should be filled in with the relative path to your Poco.js file.
5) Build-compile-run
Then you can start compiling your project. !!! Warning "Note" The current version only supports Android and Windows platforms. And Poco can only be used after being packaged and does not support usage in preview mode.
The require('Poco') will launch the PocoSDK in the first initialization script of the game. Do not destroy it during the game's lifecycle.
cc.Class({
 extends: cc.Component,

 ...

 //remember to put code in onLoad function
 onLoad: function () {
    .....

     var poco = require("./Poco") // use your own relative path
     window.poco = new poco(); // not destroy
     cc.log(window.poco);

 },

.....
});
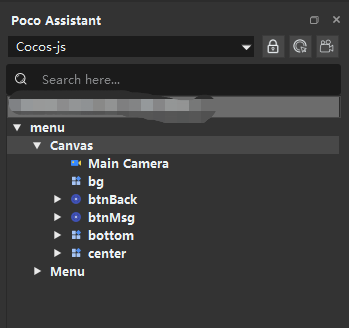
6) View the UI element tree in AirtestIDE after packaging
We can package it as an Android installation package and then use AirtestIDE to record the script. In the Poco window on the left side of the IDE panel, select Cocos-Js from the drop-down menu, and then you can see the generated UI tree.
7.Egret
1) Download the Poco-SDK package
Clone or download the source code from the poco-sdk repo.
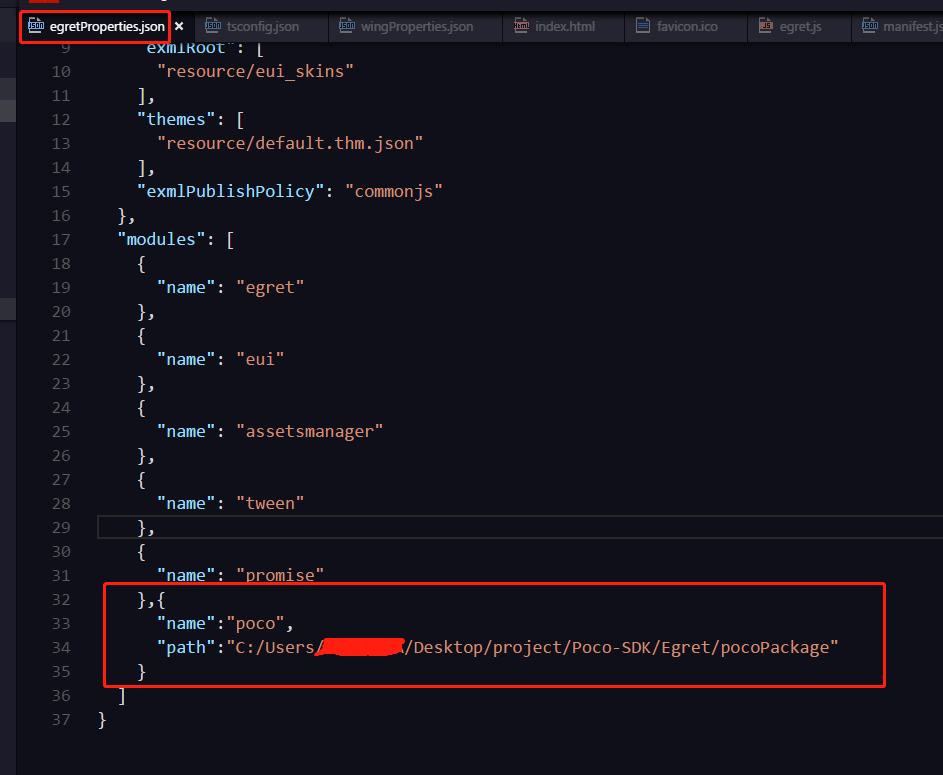
2) Modify the modules property
Modify the modules property in Poco-SDK/Egret/poco/egretProperties.json, and add the corresponding field in the red box, where the name property must be poco.
The path can be a relative path or an absolute path. For details, please refer to the instructions on the modules field in the Egret Engine documentation.
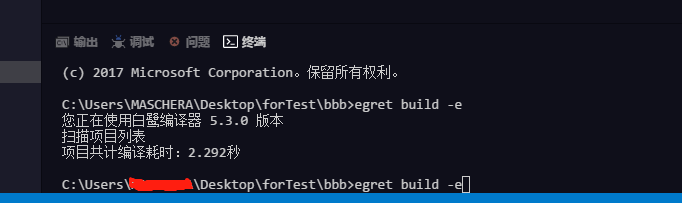
3) Execute the command egret build -e
Then use the shortcut key Ctrl+call out the terminal to execute the command egret build -e` in the terminal:
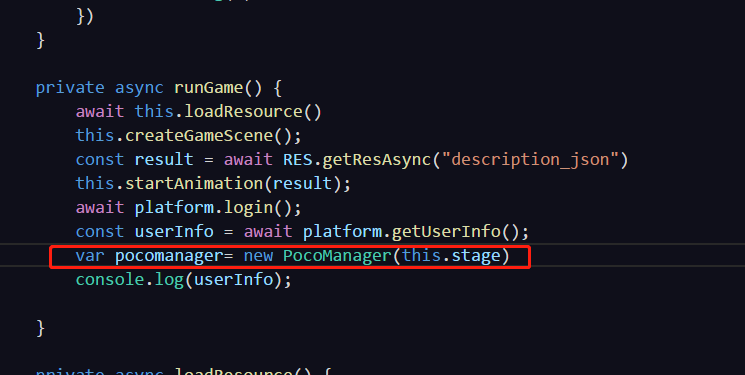
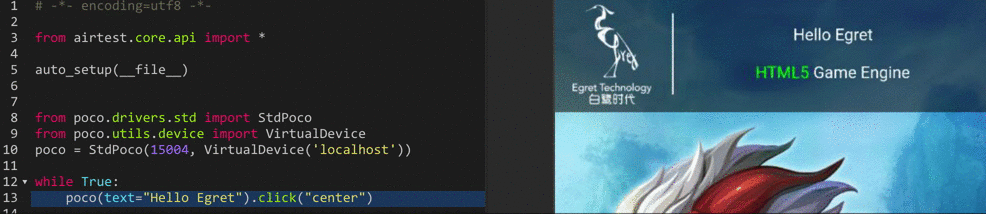
4) Create a new PocoManager object
Create a new PocoManager object in the rungame function of the entry file main.ts, and pass in this.stage as a parameter:
5) Open the proxy server
Finally, enter python -m poco.utils.net.stdbroker ws://:5003 tcp://:15004 in the terminal to open the proxy server.
The websocket port defaults to 5003. If you need to change it, you can pass in the port parameter when creating a new pocomanager.
6) Use AirtestIDE to connect
① Connect to the mobile browser
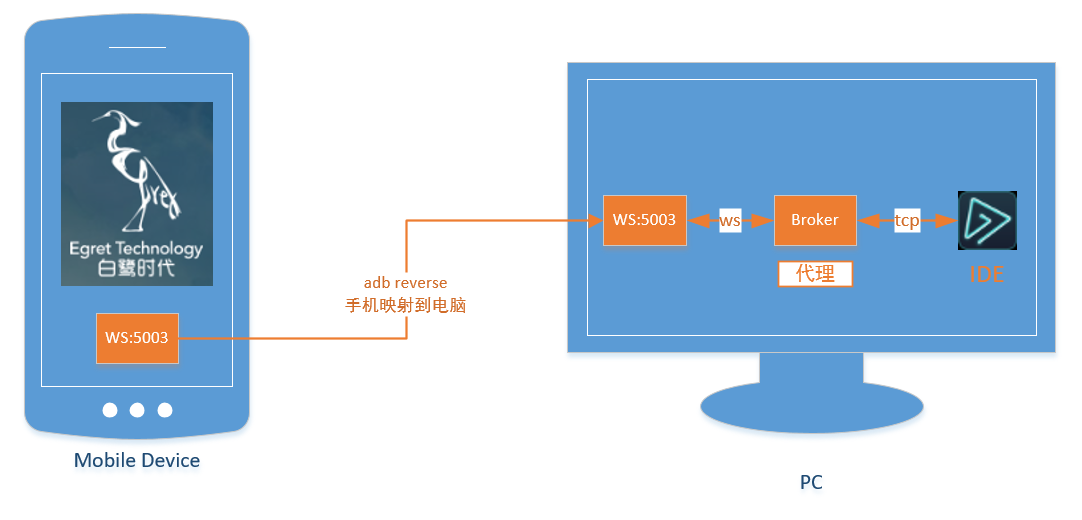
AirtestIDE supports connecting to Android and iOS phones. You can open an Egret page (or WeChat mini program/game) on the phone, and then connect it through AirtestIDE. Both the Windows and MacOS versions of the IDE can be used. The basic principle of the connection is:
The specific steps are as follows:
- Connect the Android phone via USB, confirm that adb devices is connected, and execute the following command on the computer:
adb reverse tcp:5003 tcp:5003
Mapp the phone's port 5003 to the computer's port 5003.
- Start broker on your computer:
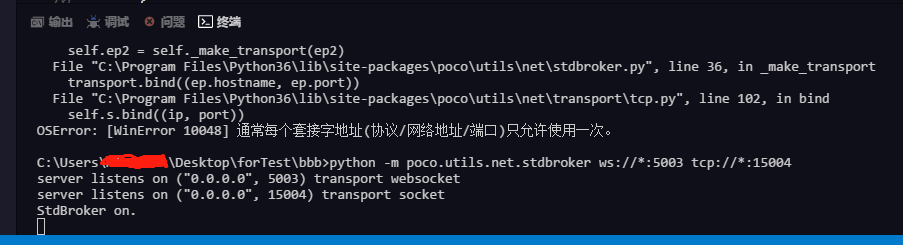
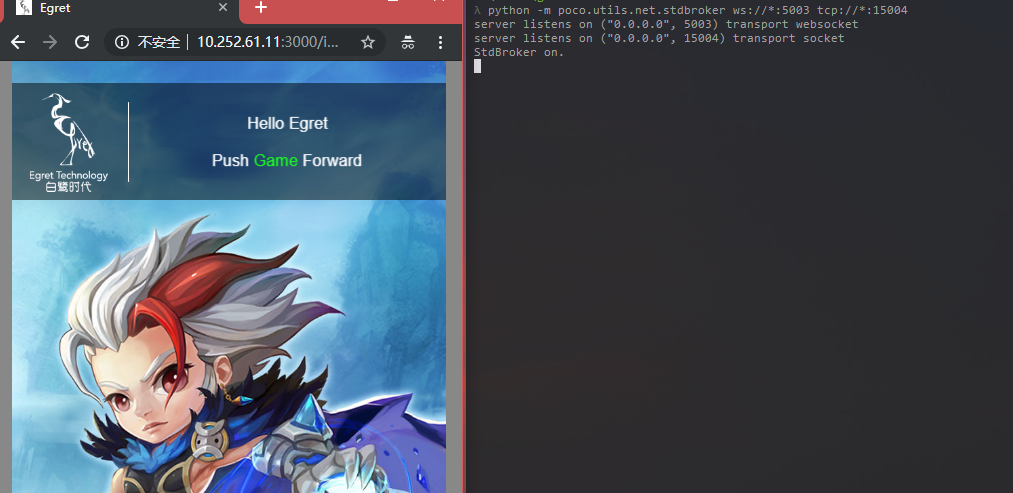
python -m poco.utils.net.stdbroker "ws://*:5003" "tcp://*:15004"
After starting the broker, access the Egret page on the phone (in full-screen mode to ensure accurate coordinates). When accessing, the broker will print the logs of the phone connection, as follows:
~ python -m poco.utils.net.stdbroker "ws://*:5003" "tcp://*:15004"
server listens on ("0.0.0.0", 5003) transport websocket
server listens on ("0.0.0.0", 15004) transport socket
StdBroker on.
server on accept. <poco.utils.net.transport.ws.MyWsApp object at 0x1100620d0>
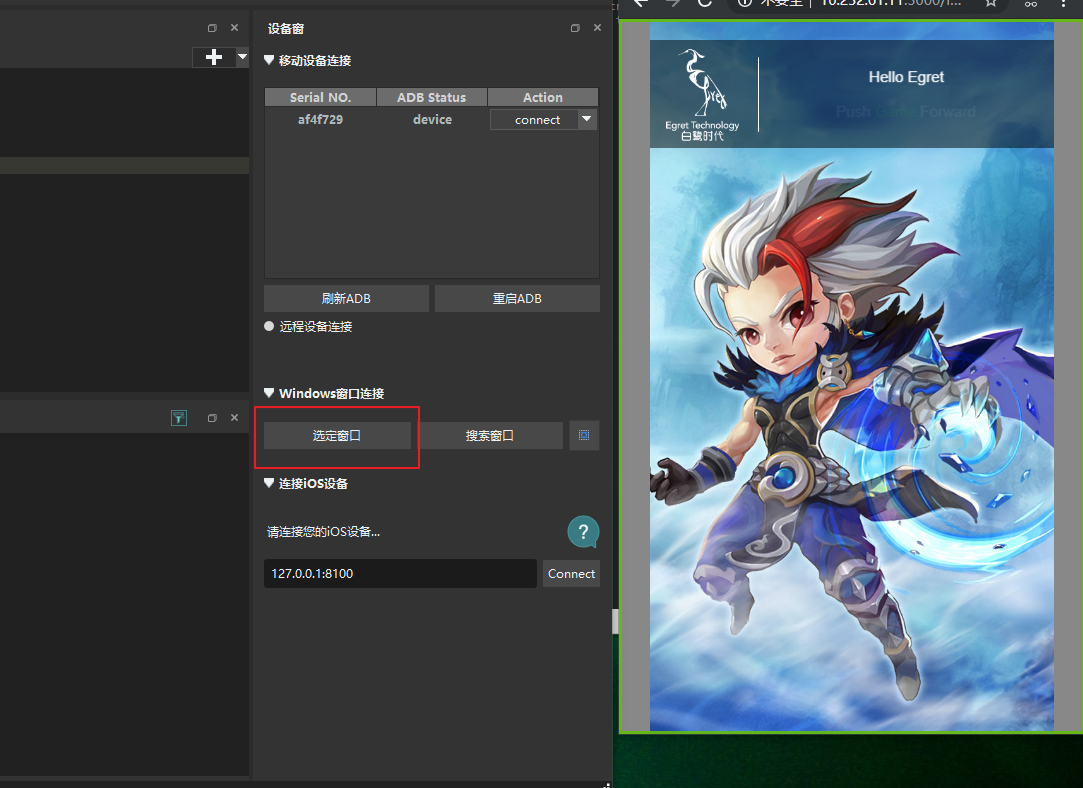
- Open AirtestIDE and connect to the phone, select the poco Std-broker mode, and you will be able to see the UI hierarchy. At the same time, the broker will print the connection logs:
server on accept. <poco.utils.net.transport.ws.MyWsApp object at 0x10d03d2d0>
accept from: ('127.0.0.1', 56872)
received_message from ('127.0.0.1', 56323) {"id":"2a0ce828-132e-4d15-a645-55493d7eaf4b","jsonrpc":"2.0","result":{"children"
- The AirtestIDE interface is as follows:
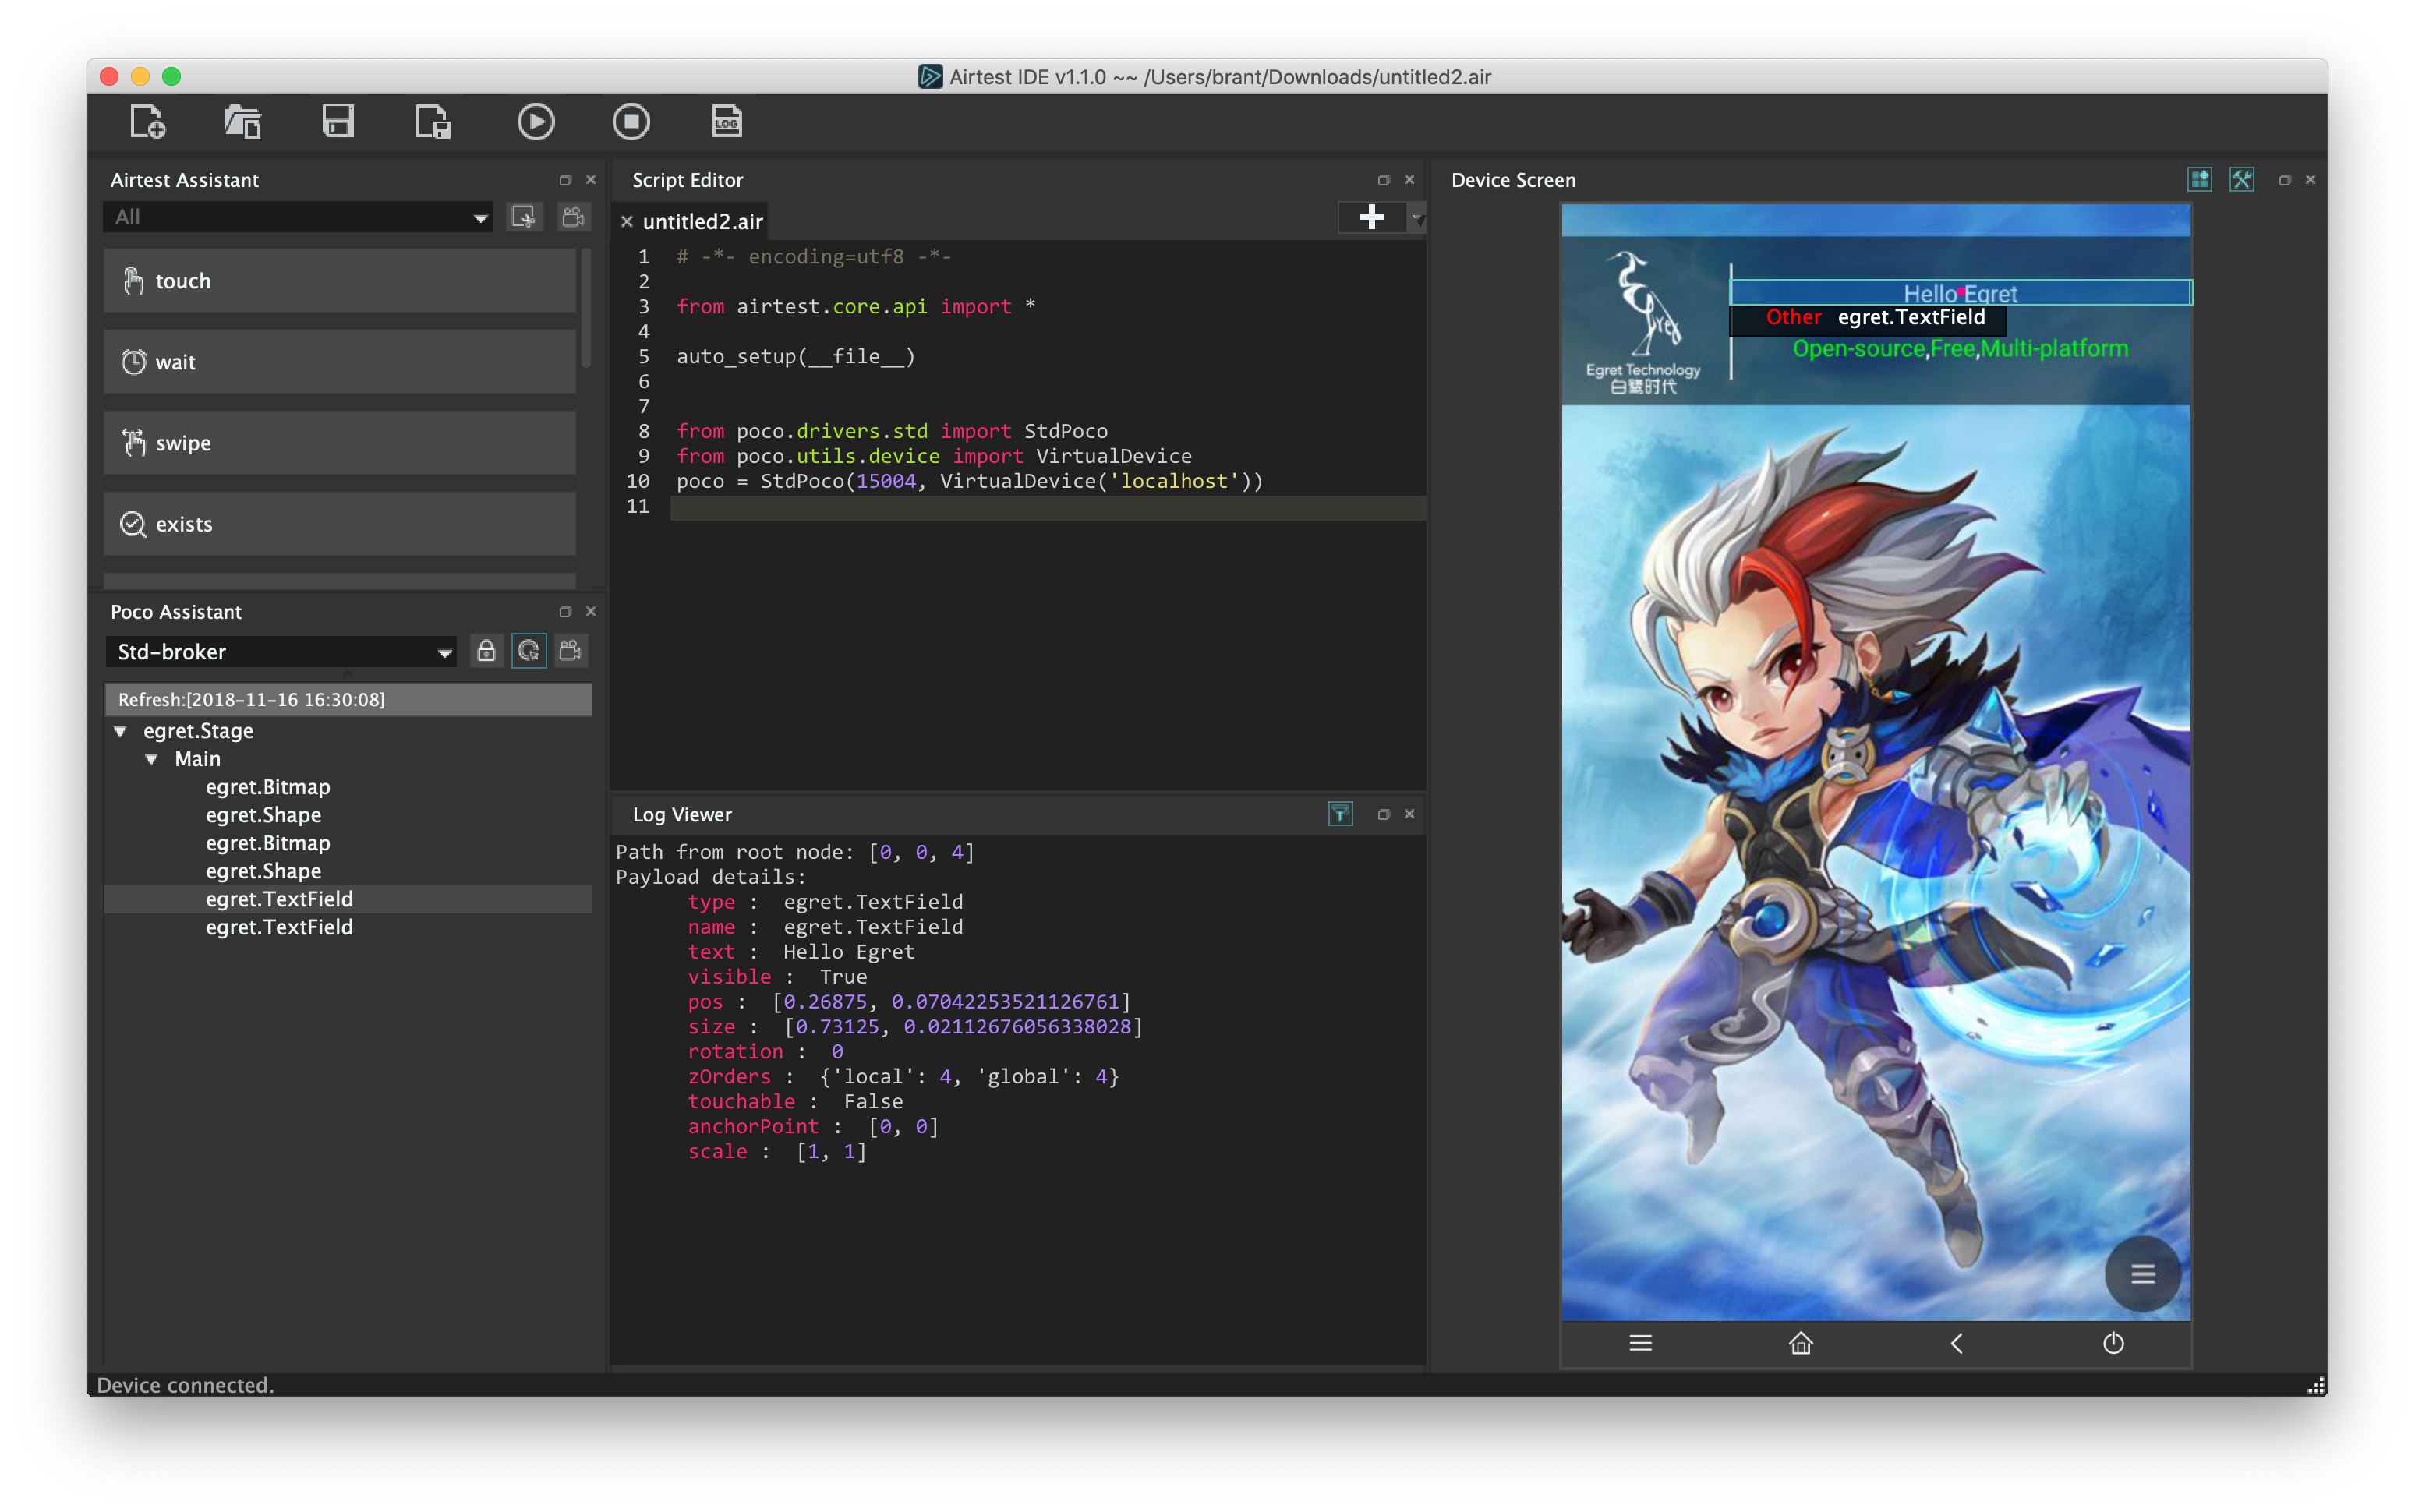
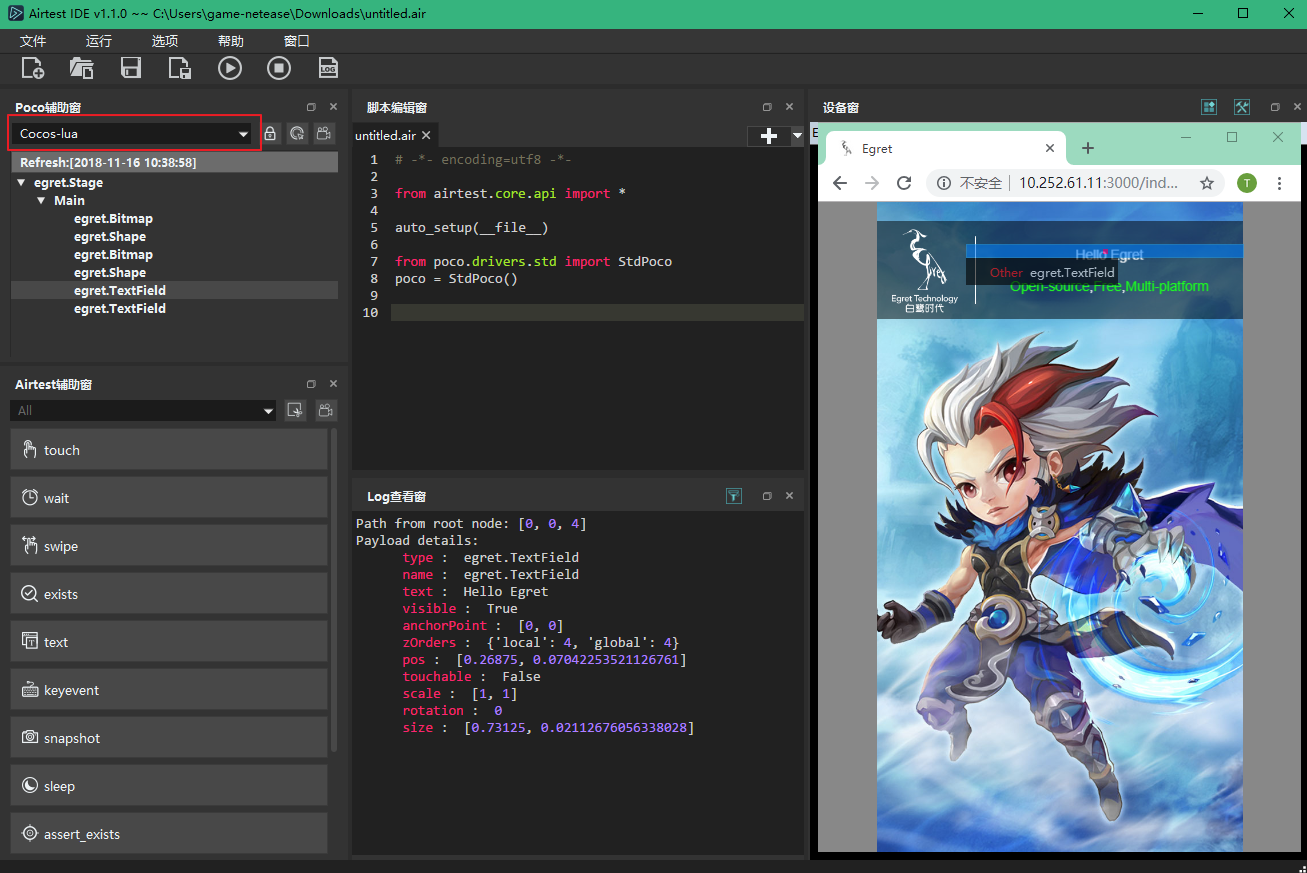
Then you can write and run scripts in AirtestIDE, as well as view the report.
② Connect to desktop browser
AirtestIDE also supports connecting to Windows windows, but MacOS windows are not supported yet. So for now, you need to use a Windows environment to connect to the desktop browser, with the following steps:
- Run the project, open the page in the browser, and start the broker by running the command proxy python -m poco.utils.net.stdbroker ws://:5003 tcp://:15004, as follows:
Set up the Windows window connection mode in AirtestIDE. The following example uses the non-embedded mode:

-
Use the Select Window function in AirtestIDE to connect to a browser window. After a successful connection, the browser window can be seen in the IDE:
-
To select the game area in AirtestIDE, open the poco window area select in settings to determine the area:

- After determining the area, you can use the inspector function in AirtestIDE to inspect the UI:
8.UE4
1) Download the Poco-SDK package
Clone the PocoSDK folder from UE4 Poco SDK and place it in the Plugins directory of your project. If your project does not have a directory called Plugins, you need to create it first.
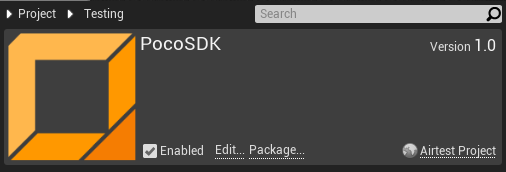
2) Recompile the project
Recompile the project. Make sure that you can see Poco SDK in Edit > Plugins in the editor, and that the Enabled option is checked. If Enabled is not checked, check it and follow the prompts to restart the editor/VS.
3) Run the game
Run the game.
4) How to use
① Make sure pocoui is at least version 1.0.79 or above.
Update to the latest version of Poco with this command:
pip install -U pocoui
Note that the package name is pocoui, not poco. Please make sure that the version of Poco is no lower than 1.0.79 after the update.
② View UI element tree in AirtestIDE
The current version of the IDE does not have the UE4 option for viewing the UI tree. Since the port is consistent with Unity's, you can currently use the Unity option to view the UI tree. The specific usage method at the script level is as follows:
from poco.drivers.ue4 import UE4Poco
poco = UE4Poco()
# example
poco("StartButton").click()
③ Use the editor mode
If you want to use the editor mode, you can pass in parameters when initializing Poco.
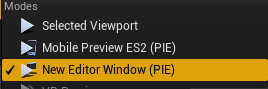
poco = UE4Poco(ue4_editor=True)
Among the several modes of the editor for previewing the game, select New Editor Window (PIE) as a way to open a separate window for previewing. The window connected in this way is editor PIE separate window mode.
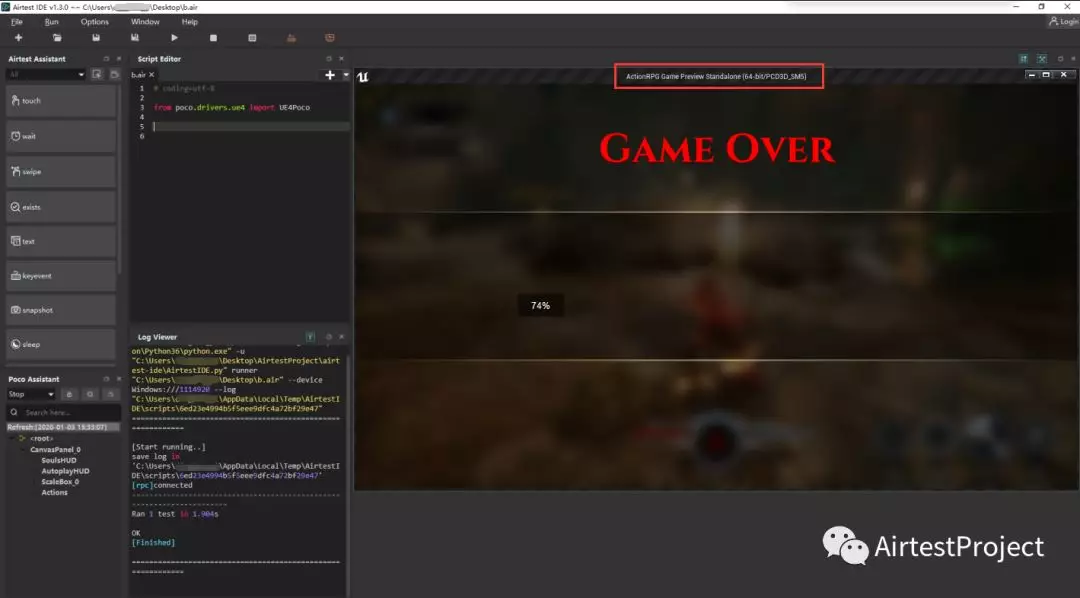
Currently, the Poco code will default to connecting to windows with the words "Game Preview Standalone". For example, the following code is to connect to the UE4 window with the words "Game Preview Standalone".
dev = connect_device("Windows:///?class_name=UnrealWindow&title_re=.*Game Preview Standalone.*")
 The game window connected using the script will not be embedded inside the IDE but will still be displayed independently outside.
If the name of the window has been modified, it may cause the connection to fail. In this case, you can modify the handle of the connected device in
The game window connected using the script will not be embedded inside the IDE but will still be displayed independently outside.
If the name of the window has been modified, it may cause the connection to fail. In this case, you can modify the handle of the connected device in poco/drivers/ue4/device.py.
Of course, when connecting to a window in the IDE using "Select Window", you can also embed the window for game previewing in the IDE:
④ Package the project into an Android package for testing
We highly recommend that you package the project into an Android package. Then you can use the IDE to record scripts normally.
5) Common issues
① Poco-SDK failed to start up properly
Poco SDK failed to start up properly.
Make sure Poco SDK is in an Enabled state. Make sure that the .uproject file contains Poco SDK and is in an Enabled state.
② Error occurs when starting the game
Error occurs when starting the game, and the message in the Output Log is:
LogPluginManager: Error: Unable to load plugin 'PocoSDK'. Aborting.
Please make sure the value of the "Installed" item in the PocoSDK.uplugin file is true and there is no "Enterprise" item.
9.Other Engines (Self-Integration)
If the corresponding Poco-SDK for your game project is not provided, you can also choose to integrate it yourself by following the tutorial document for self-integration.
10.WeChat Mini Program /H5 Page
Currently, Poco may not fully support WeChat Mini Programs or apps with H5 pages embedded. If you would like to try, please note the following:
- Please make sure you are using the lastest version of
pocouiandpocoservice.apk. - For mini programs and H5 pages on Android devices, please select Android mode in the Poco window of the IDE to view.
- For mini programs and H5 pages on iOS devices, please select iOS mode in the Poco window of the IDE to view
- When testing WeChat mini orograms, you can search on Google for how to set to use the local kernel before trying to use Poco to retrieve control information.
11.Windows
Currently, only game windows with the Poco-SDK integrated are supported. Poco support for Windows desktop applications may be released in the future.
12.MacOS
Currently, it is not supported. Poco support for MacOS desktop applications may be released in the future.