VII. Automated Testing on Windows Applications
1.Preface
This tutorial focuses on how to use AirtestIDE for automated testing of Windows apps (using Netease Cloud Music for Windows as an example).
By reading this article, you will learn to:
- Use AirtestIDE to record scripts for a Windows software window.
- Call the APIs for Windows operations.
- Specify the connection to a Windows window in a script and command line.
2.Basic Principles
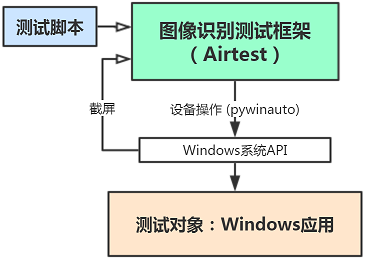
AirtestIDE provides testing support for regular Windows applications by utilizing the image recognition framework of Airtest for location and using the pywinauto's API for simulated operations.
Poco support on Windows is not available yet. We will launch this feature as soon as possible. Please stay tuned.
3.Connecting Windows in AirtestIDE
To test a Windows program using AirtestIDE, you first need to connect the target window to AirtestIDE by providing its handle. Once the connection is established, Airtest will recognize the window as a device and allow you to perform operations such as image recognition and touch, similar to operating an Android device. Note: After selecting the connected Windows window, operating and running scripts in AirtestIDE will depend on the specific window handle. Therefore, please do not close the window at will after selecting it, otherwise it will cause the runtime to fail to find the corresponding window and report an error.
1) Conventional connection method - embedded mode with one click
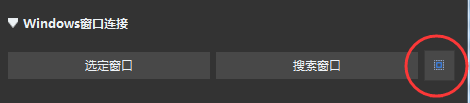
AirtestIDE provides a feature to embed Windows window with one click, as shown below:
Clicking the "Select Window" button in AirtestIDE allows you to select a running Windows application on the desktop (the window border will be highlighted with a green/red box). Embed it in AirtestIDE and then you can easily operate the window, record statements, and run scripts in AirtestIDE.
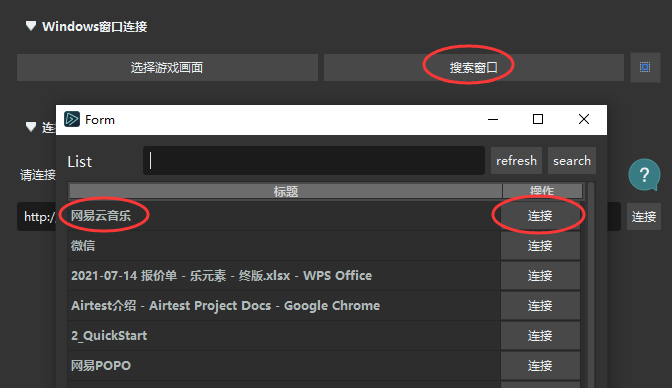
Alternatively, you can click the "Search Window" button next to it, find the title of the application you need to test, and then click the "Connect" button on the right to embed the application window for automated testing:
2) An alternative connection method
Due to the different underlying implementations of Windows applications, some application windows may encounter issues such as inability to operate with the mouse, failure to embed properly, or inability to display images when using the default one-click embedded mode in AirtestIDE.
To address these issues, we provide a non-embedded connection method. To use this alternative method, please go to the top menu bar of AirtestIDE, select "Options" and then "Settings". Find "Device-Windows Embed Backup Method", check the box and click "OK". You can then use this method, i.e., non-embedded mode, to connect to the window.
What you need to next is the same as the embedded method. Click to select the target window, then move the mouse to the window to be tested and click the left button to select the program to be tested.
As you can see from the figure, this window connection method does not embed the Windows window into AirtestIDE. Although it is not as easy to use as the default embedded mode when recording scripts, it can avoid some problems caused by window embedding.
3) Desktop mode
If you want to test more than one window (with multiple different handles), embedding a single window may not satisfy your testing needs, so we also provide a third option: the desktop mode.
Click the "Desktop mode" button, and the device window on the right side of AirtestIDE will be completely hidden, entering the Windows desktop mode.
In this mode, you can record and run scripts normally, just that the entire desktop will be captured and recognized during the execution. Even the snapshot statements in the AirtestIDE script window can be recognized. Therefore, when running the script, you can right click in the AirtestIDE script editor window and switch the images into code mode to prevent them from interfering with the execution result.
4) Special notes
- Since there may be multiple windows open on the desktop, the green/red box may not be able to accurately select the application under test. Therefore, it is recommended to minimize all other irrelevant windows before clicking the "Select Window" button, which can make the selection more accurate.
- To prevent unexpected issues, please do not select the desktop or the AirtestIDE software itself. The principle of window embedding is to set a Windows window as a sub-window of the IDE. Therefore, attempting to connect the desktop may cause unpredictable exceptions. If you want to test all windows on the desktop, you can choose the desktop mode to record the script.
- As the resolution needs to be recorded when a snapshot is captured of the Windows window, the size of the window cannot be modified after embedding it into the IDE. If the embedded window is too large, adjust the window to a suitable size before embedding it.
- For application windows that encounter exceptions after being embedded in AirtestIDE, we recommend using non-embedded mode/desktop mode for testing.
5) Exiting Windows connection
- You can exit the current Windows connection by simply closing AirtestIDE, and the embedded window will be automatically popped out.
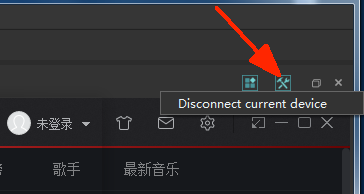
- You can also exit the window connection by clicking the "Disconnect current device" button in the upper right corner.
4.Recording and Writing Airtest Scripts
Once a Windows window is successfully connected, it is like a connected device where you can proceed to record and playback scripts.
1) Generating snapshot statements
Firstly, Airtest statements such as touch, wait, exists, assert_exists, assert_not_exists, which come with snapshots, are not much different from recording on Android/iOS devices:
However, it should be noted that after selecting the desired snapshot area using the mouse, you need to double-click on the selected area to complete the snapshot, instead of automatically completing the screenshot when the mouse is released. This is the biggest difference in taking snapshots on Windows. The steps for taking a snapshot are:
- Drag the mouse to select the snapshot area.
- Double-click the mouse to finish the snapshot.
- Right-click the mouse to re-select the area.
- Press the Esc button to exit this snapshot operation.
Also, when recording swipe statements, after selecting the screenshot area, you need to click on the end point of the swipe to complete the statement recording. (In AirtestIDE 1.2.10 and higher, you can complete the snapshot by releasing the mouse after dragging and selecting the snapshot area without the need to double-click on the snapshot area anymore.)
2) Calling Windows APIs
Like Android/iOS, Airtest also encapsulates the common operations on Windows, using the pywinauto library for the underlying operation. Therefore, when writing test scripts for Windows applications, you may need to refer to the following API documentation:
- Airtest's cross-platform APIs, which can be called directly in the script.
- Airtest's Windows-specific APIs. Please refer to the code examples provided later to learn how to call the APIs exclusive to Windows.
- If more complex operations are required, you may need to refer to the APIs provided by pywinauto.
3) A simple example
For better demonstration, we assume that this script does not pass any parameters in the command line, but instead uses the connect_device API to connect to a window with a handle of 123456 and perform some operations on it:
from airtest.core.api import *
dev = connect_device("Windows:///123456")

# Generic APIs are called in the same way as on other platforms:

touch(Image)
After consulting the Airtest Windows-specific API documentation, you find that there are some operations that are only available on Windows. To call these Windows-specific operations, you can do as follows:
# Call the Windows-specific APIs, such as getting the title of the current window

print(dev.get_title())

# Move the window to a certain coordinate position

dev.move((100, 200))
Next, suppose you want to use the mouse wheel. But after consulting the Airtest API documentation, you find that the Airtest does not encapsulate the mouse wheel operation for Windows. In this case, you can further query the pywinauto documentation, go to the mouse-related section, and find out how to call the mouse wheel API.
dev.mouse.scroll(coords=(80, 100), wheel_dist=1)
4) Entering keyevent
In Android, we can use keyevent("HOME") to simulate the press of the HOME button, and in Windows, we can also send key response by using the keyevent API. The key codes in Android are based on ADB, but for Windows, the Airtest has encapsulated the key codes supported by pywinauto. You can refer to the pywinauto.keyboard documentation to write the keyevent API parameters for Windows.
# In pywinauto, the symbol ^ also represents the Ctrl key, so ^a means selecting all (Ctrl+A)

keyevent("^a")

# For example, this is the way to enter the Delete key, which requires curly brackets {} to be added.

keyevent("{DEL}")
Please refer to the documentation according to your actual needs before writing code for key response.
5.How to specify connecting to a certain window when running the script?
Running scripts and viewing reports in the Windows mode of AirtestIDE is no different from other platforms.
However, the most important thing to note is that the windows connected in AirtestIDE are connected via window handles. A window handle is a unique 32-bit unsigned integer owned by each Windows window object, and this value changes every time the window is opened.
This means that if we embed a window into AirtestIDE and write a script, although it can be run directly this time, it may not be run next time by copying the script command line in AirtestIDE. This is because the command line in AirtestIDE will have such parameter --device Windows:///handle, and the handle may have changed the next time the window is opened. Therefore, we can also connect windows by other means without using handles. Airtest's Windows module uses pywinauto's connect API to connect to windows, so in addition to handles, we can also connect via window titles:
# Connect a Windows window with a handle of 123456

Windows:///123456

# Connect a Windows window with a name matching a certain regular expression

Windows:///?title_re=Unity.*

# Connect to windows desktop without specifying any window, corresponding to desktop mode of IDE

Windows:///
If you want to connect a window using its tile in command line, you don't need to add quotation marks or other symbols, just write it like this:
airtest run test.air --device Windows:///?title_re=Unity.*
6.Poco Support
1) Windows window integrated with Poco-SDK
For some Windows apps which have already integrated with Poco (such as Unity game window), you can use AirtestIDE to easily view and select UI nodes. However, before using this feature, you need to inform AirtestIDE of the location and size of the Windows window. In "Options" - "Settings" - "Poco", select "Windows Content Area Rect", select the main window screen and double click to confirm (right click/esc to cancel), then you can start using Poco related functions, as shown in the figure:
2) Poco-Windows support
For Poco support for Windows window, we are improving the documentation and functionality. Please stay tuned.