2.2. Android Connection FAQ
Note
If this article fails to solve your problem, please go to the AirtestIDE Issues page and submit your phone model, error log, and problem description. We will fix it as soon as possible.
1.Basic Troubleshooting
Turn off mobile assistant apps.
Please make sure that there is no other third-party mobile assistant software running in the current environment. If there is, please turn it off completely. Most mobile assistant software requires manually terminating their processes in the task manager to be completely turned off.
Check the phone settings.
Please make sure that the USB debugging option is turned on in the Developer Options of your phone. Some phones require you to select MTP mode after connecting via USB.
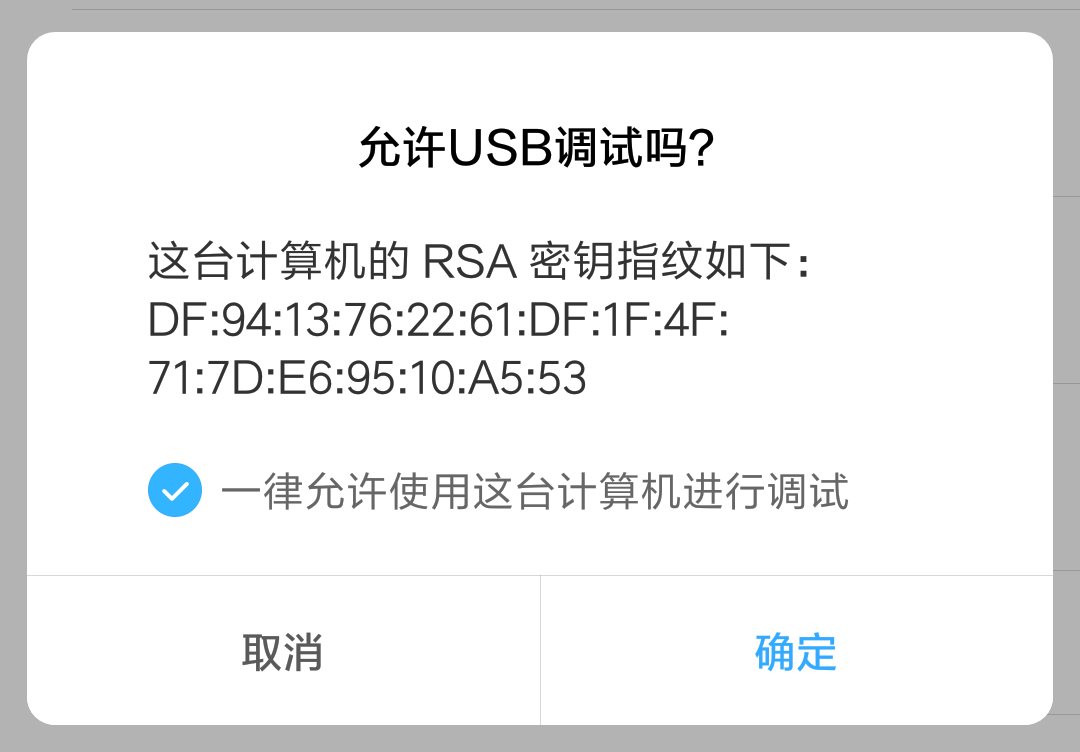
If the device status in the device list of AirtestIDE is unauthorized, as shown in the figure:
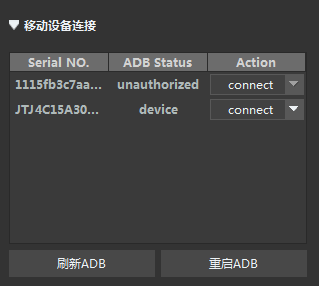 Please confirm the "Enable USB debugging" on your phone and select "Always enable debugging on this computer" to avoid repetitive operations in the future.
Check if ADB can connect to the phone properly.
If you cannot see your device in the device list window of AirtestIDE, please first check if your phone can connect to ADB normally.
- On Windows:
After connecting your phone to the computer using a USB cable, navigate to the AirtestIDE folder, go to AirtestIDE/airtest/core/android/static/adb/windows, hold Shift and right-click to open the command line terminal, and type in adb.exe devices.
- On Mac OS:
After unzipping the dmg, you will be prompted to install the application to the Application/ folder. Therefore, you can use the Command Line to navigate to the directory Application/AirtestIDE.app/Contents/MacOS/airtest/core/android/static/adb/mac and run the ./adb devices.
Under normal circumstances, the expected return content should be as follow:
>adb.exe devices
List of devices attached
JTJ4C15A30048654(IMEI) device
If the above input doesn't appear, you may need to check the following aspects:
- If the IMEI line fails to show up, you need to check if the corresponding official driver software for the phone brand has been installed on the computer. If the driver has not been installed, the phone cannot be detected. Please refer to the official website of different phone brands and download and install the official driver.
- It is recommended to use the USB ports on the back of the computer case which usually has higher stability than those on the front.
- For successful connection, Developer Options and USB debugging need to be enabled on the phone. Additionally, when connecting to the computer, remember to select "Always enable debugging for this computer" to avoid "unauthorized" phone status and connection issues.
- Please make sure that all mobile assistant software on the computer have been turned off and all related processes have been completely terminated. Most mobile assistants require manual termination in the task manager.
ADB is an official Android debugging tool provided by Google. Since AirtestIDE and its related libraries rely on ADB, if you cannot see your device via the "adb devices" command, you will not be able to continue using AirtestIDE. Please make sure your phone can be connected to your PC.
Making sure that the Airtest-related files can be installed on the phone.
If you can see your device via the "adb devices" command but cannot connect to it with AirtestIDE, you can continue to check the following aspects:
- During device connection for initialization in IDE, the RotationWatcher.apk app will also be installed on the phone (to detect whether the phone screen is rotated), which may prompt a pop-up window asking for a manual click to agree to installation of the APK.
- Some models of phones have default settings that prevent the installation of APK via ADB (especially on Xiaomi phones). Please enable this configuration option in Developer Options, otherwise essential APK cannot be installed.
- If the phone has been rooted, Airtest may not have permission to put relevant files into the phone due to changes in the local folder permissions. Please check if the permission of the /data/local/tmp folder on the phone has been changed.
- If the STF library has been installed on the phone before, there may be issues with clicking on the screen. To resolve this, try clearing the previously installed STF-related files (by executing command "adb shell rm /data/local/tmp/mini*") and then reconnect the phone to the IDE for initialization.
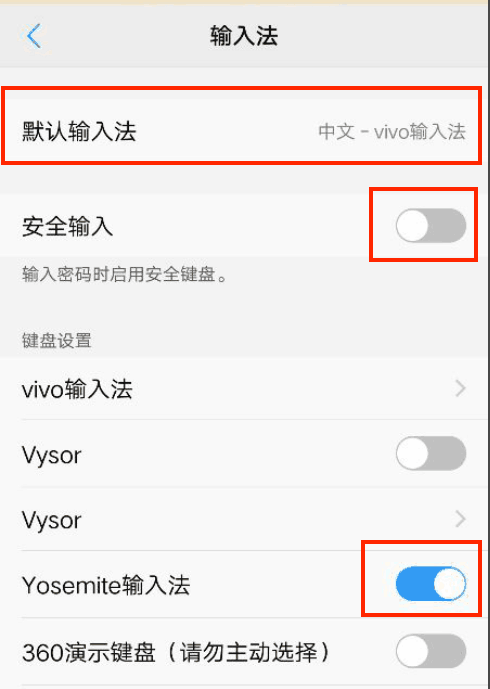
- Some phones may be able to install pocoservices.apk, but may continuously prompt for reinstallation or fail to start properly during launch. In this case, please check if the phone is on a special network (such as using a proxy) and if the settings in Developer Options are enabled (to enable options involving installation and operation via USB, some device models may require you to cancel permission monitoring). If it is a VIVO/OPPO phone, you may need to set the default input method to Yosemite. Please refer to the OPPO/VIVO related section of this document.
If the IMEI can be correctly displayed after entering the adb devices command but AirtestIDE still fails to connect to and operate on your phone, please submit an issue with the phone model, error log, and problem description. The following section provides some guides on modifying the settings of some phone brands. Please locate to the section of your phone model and troubleshoot the problems you encounter. If you still can't solve if, submit an issue on Github.
Device compatibility
We have conducted compatibility testing on most models on the market. Please check the list of compatible models to see if your phone is on the list. (Note: due to the fast pace of device updates, the list has not been maintained for a long time, but most phones currently on the market are compatible.) If your phone model is not on the list, please submit an issue with your phone model, error log, and problem description. If your phone model is on the list but encounters problems during actual use, please refer to following section for troubleshooting.
2.Special Issues of Some Specific Phone Brands
Here are the settings for some special phone models. Please check if there are corresponding options that need to be turned on according to your own phone model.
Xiaomi
Please enable options such as "Allow simulated clicking position", "USB installation", and "USB debugging (Security settings)" in "Developer Options". To do this, you might need to log in to your MIUI account (with a SIM card inserted). Failure to enable these options may result in connection issues with your Xiaomi device.
 If you try to enable the two options shown in the figure but receive a "temporarily restricted" prompt, try logging out of your current Xiaomi account, inserting another valid SIM card, and then logging in to another Xiaomi account registered with this SIM card number. This should generally allow you to enable the options again.
Additionally, certain models of Xiaomi require disabling the following settings to establish a proper connection.
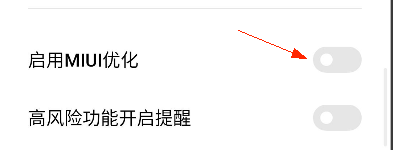
① Disable the "MIUI optimization" option at the bottom of Developer Options.
If you try to enable the two options shown in the figure but receive a "temporarily restricted" prompt, try logging out of your current Xiaomi account, inserting another valid SIM card, and then logging in to another Xiaomi account registered with this SIM card number. This should generally allow you to enable the options again.
Additionally, certain models of Xiaomi require disabling the following settings to establish a proper connection.
① Disable the "MIUI optimization" option at the bottom of Developer Options.
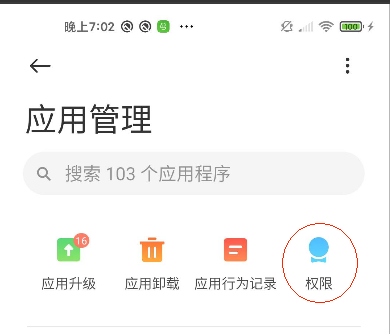
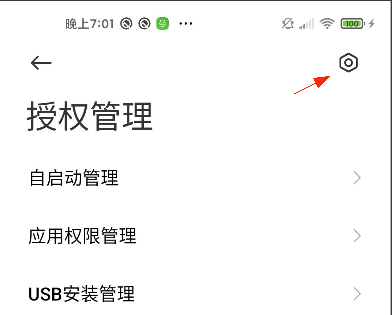
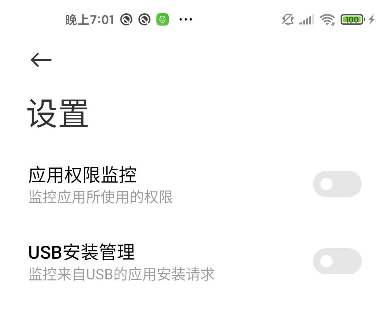
 ② In Phone Manager, go to App Management and then Permissions. In the top right corner, there are two settings, "App Permission Monitoring" and "USB Installation Management," both of which need to be disabled.
 Note: If your Xiaomi phone has been updated to MIUI 11, you need to check "use Javacap" and "use orientation" before clicking the connect button. When running scripts in a local environment, make sure to include these two connection parameters in the command.
③ Turn off "High-risk Warning" in Developer Options.
Explanation on USB Installation and Debugging on MIUI Forum. If you encounter the issue of error or inability to click on the phone screen, please check if the "Allow simulated clicking position" option in Xiaomi settings has been enabled.
Some Xiaomi phones may encounter an connection error of Failure [INSTALL_FAILED_USER_RESTRICTED: Install canceled by user]. This is because Airtest's attempt to install an APK on the phone is blocked by the phone's security measures. In addition to enabling "App Installation via USB" in Developer Options, you can also go to Settings -> Authorization Management -> USB Installation Management -> and remove any restrictions on installing apps via USB.
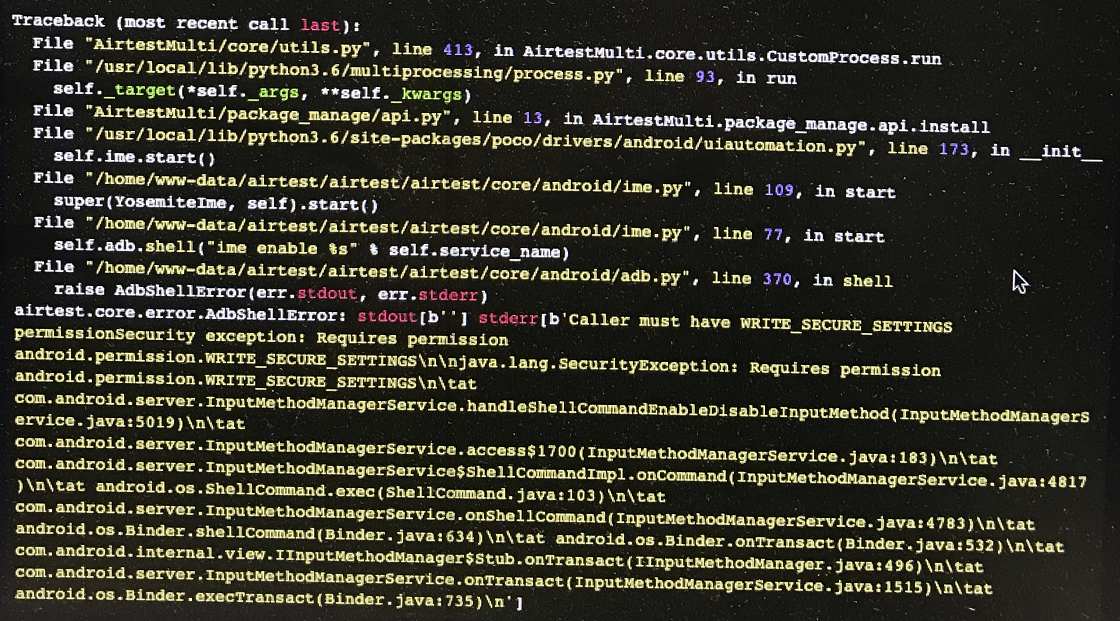
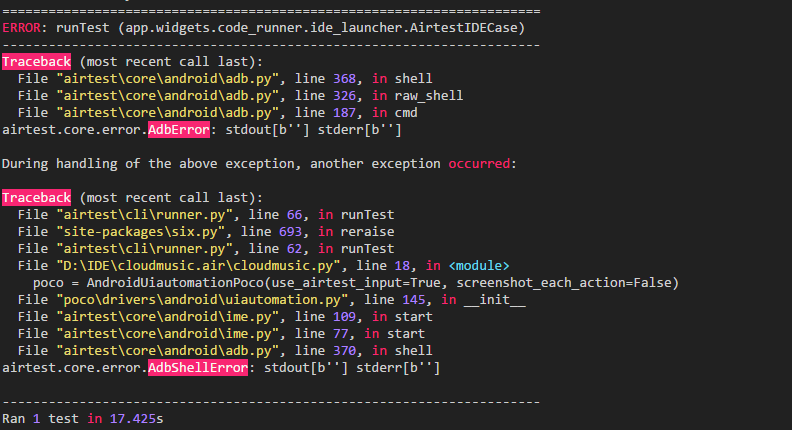
Some Xiaomi phones cannot successfully install the Yosemite input method and report the following error during Poco initialization:
Note: If your Xiaomi phone has been updated to MIUI 11, you need to check "use Javacap" and "use orientation" before clicking the connect button. When running scripts in a local environment, make sure to include these two connection parameters in the command.
③ Turn off "High-risk Warning" in Developer Options.
Explanation on USB Installation and Debugging on MIUI Forum. If you encounter the issue of error or inability to click on the phone screen, please check if the "Allow simulated clicking position" option in Xiaomi settings has been enabled.
Some Xiaomi phones may encounter an connection error of Failure [INSTALL_FAILED_USER_RESTRICTED: Install canceled by user]. This is because Airtest's attempt to install an APK on the phone is blocked by the phone's security measures. In addition to enabling "App Installation via USB" in Developer Options, you can also go to Settings -> Authorization Management -> USB Installation Management -> and remove any restrictions on installing apps via USB.
Some Xiaomi phones cannot successfully install the Yosemite input method and report the following error during Poco initialization:
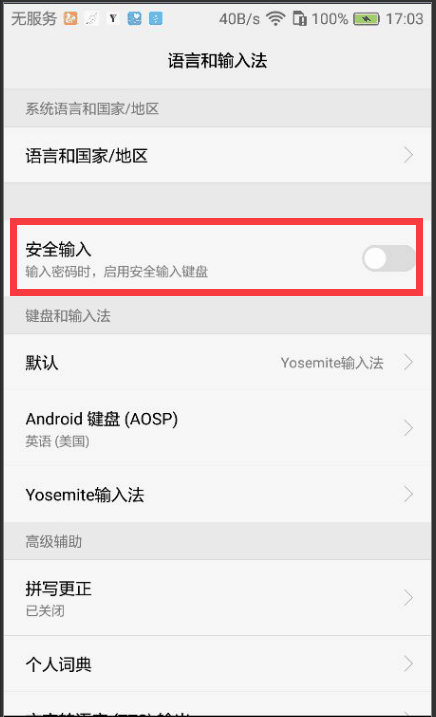
 Disable the Secure Keyboard in the language and input settings of the system.

Samsung
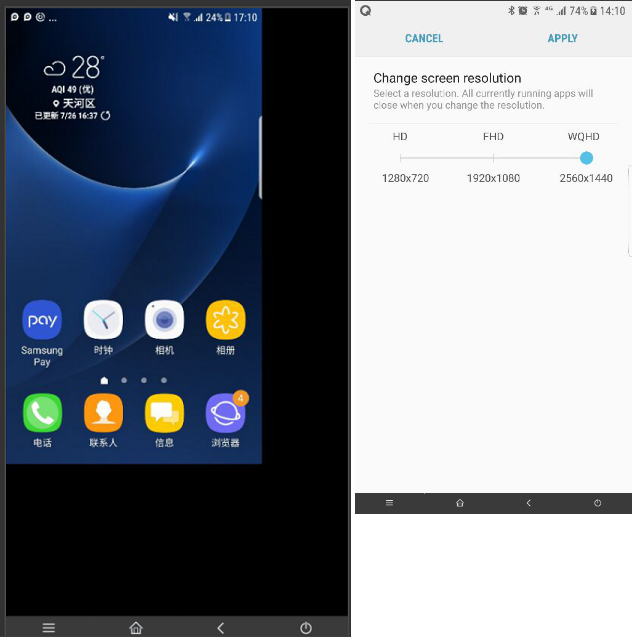
- Set the screen resolution to the maximum in the display settings:
As shown in the figure below, some mobile devices (such as certain models of Samsung phones) may not fill the entire screen when connected to AirtestIDE. Please go to Settings - Display and adjust the screen resolution to WQHD.
- In Developer Options, enable Unknown Sources and disable Permission Monitoring.
Huawei
- In the input method settings, disable Secure Keyboard Input.
- In Developer Options, disable "ADB installation monitoring" and enable "debugging only when charging".
- In permission monitoring settings, enable "Configure permissions automatically".
- On some Huawei phone models (such as Mate20 Pro and Mate7), there may be discrepancies between the clicking position and the actual position. To fix this, go to Settings > Display > Screen Resolution and set it to the highest resolution.

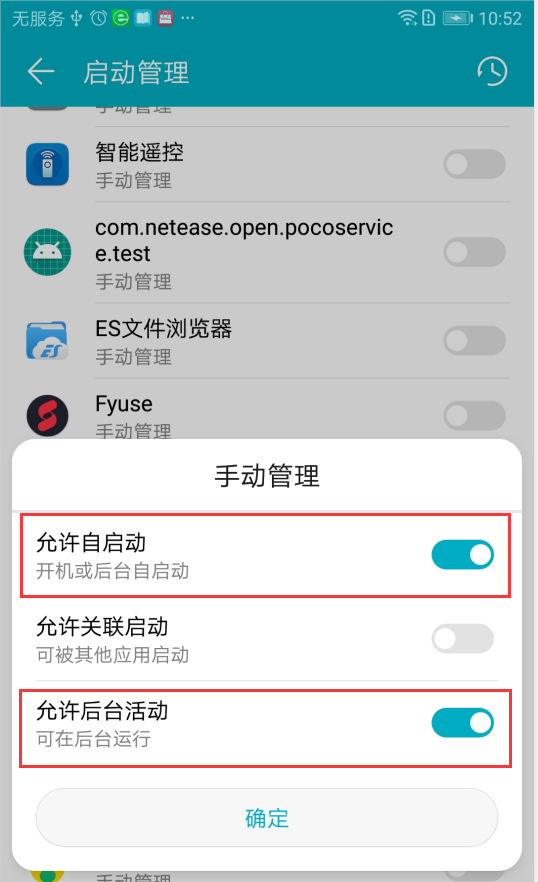
- If Poco automatically disconnects within ten seconds of starting up on a Huawei phone, check if the version number of Phone Manager is greater than 8.0. If it is, go to Phone Manager > Startup Manager > Pocoservice, and enable Self-Start and Background Activity.

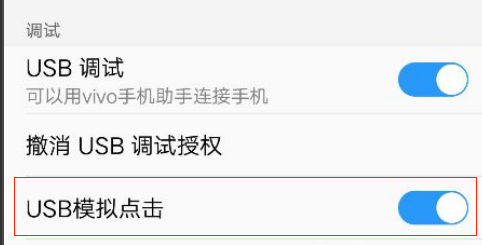
vivo
-
Disable the secure keyboard input. When encountering issues with Poco initialization failure or inability to call the text API, set the Yosemite input method as the default in the input method settings.
-
Some models require enabling Security Permissions in Developer Options, otherwise you may see the following error during Poco initialization.
- If the screen goes black when entering the password on a vivo phone, try turning off the Secure Keyboard in the security settings and then trying again. If you can't find the Secure Keyboard setting, go to vivo Settings > Security & Privacy > and turn off "Prevent malicious screenshots and recordings."
-
If there is an option for USB simulation of clicks, be sure to enable it, otherwise an error may occur when running the script.
-
If the Developer Options are automatically disabled when a vivo phone is connected for a long time, you can solve it by selecting "Do not lock the screen" in Developer Options.
OPPO
- At the bottom of the Developer Options, select "Disable Monitoring Permissions."
- For some models of OPPO, a password is required for every installation of an APK, and no better solution is available currently. However, here is a post for your reference: Problems and Solutions for Automation on Various Phone Models.
- Some OPPO models may encounter initialization errors or fail to call the text() API when installing or switching to the Yosemite input method, which requires an OPPO account password to switch. To resolve this issue, go to System Settings > Input Method Settings > set Yosemite as the default input method. If Yosemite is not yet installed, it can be found in the AirtestIDE\airtest\core\android\static\apks directory. After manually installing it on the phone, you can start using Poco features and the text() API.
- If your OPPO phone disconnects after connecting for 10 minutes, do not unplug it. Instead, enable the USB debugging option again in the drop-down menu at the top of the screen. This should prevent further disconnections.
Meizu
Some models of Meizu phones cannot be directly connected through ADB. For specific solutions, please refer to this post.
LG
To enable USB debugging and recognize the serial number, you need to select the charging mode on LG phones.
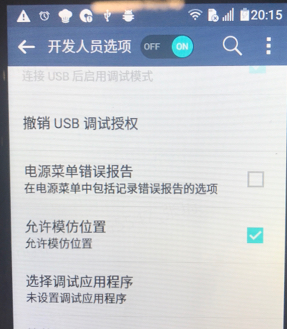
 Also, you need to select the "Allow mock locations" option in Developer Options.
OnePlus
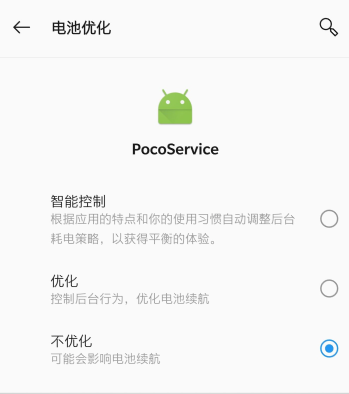
When using Poco on a OnePlus phone, there is an issue of repeated installation with the following error message:
 To fix this, turn off battery optimization for pocoservice.apk and select "Do Not Optimize."
3.Full-Screen Display Issues
Position offset in IDE
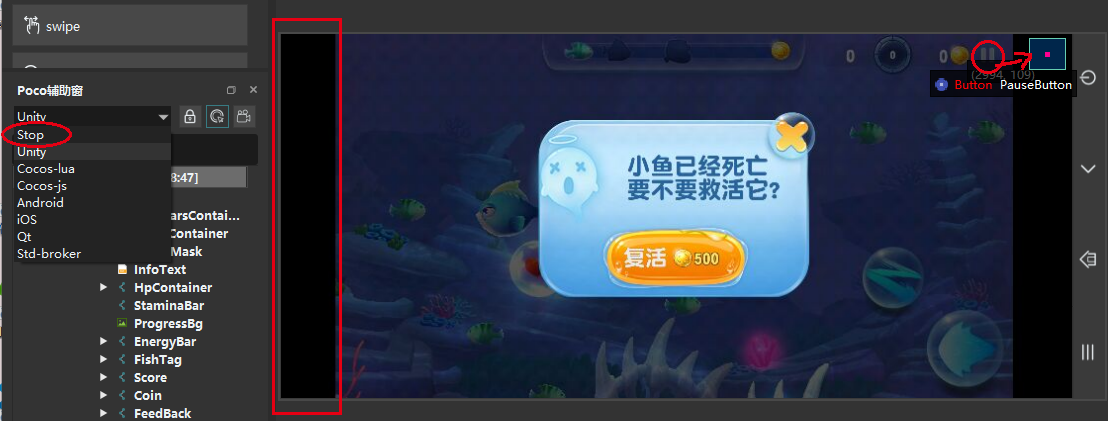
In some apps that do not support full-screen phones, black borders may appear and the poco positioning may be offset. The latest version of IDE has fixed this problem. You only need to click on the Stop button in the Poco Window and reconnect to switch to the current screen rendering resolution.
Custom rendering resolution in IDE
AirtestIDE solves the issue of non-adaptation to over 90% of full-screen displays. For the remaining 10% of unsupported devices, the IDE allows users to customize the rendering resolution.
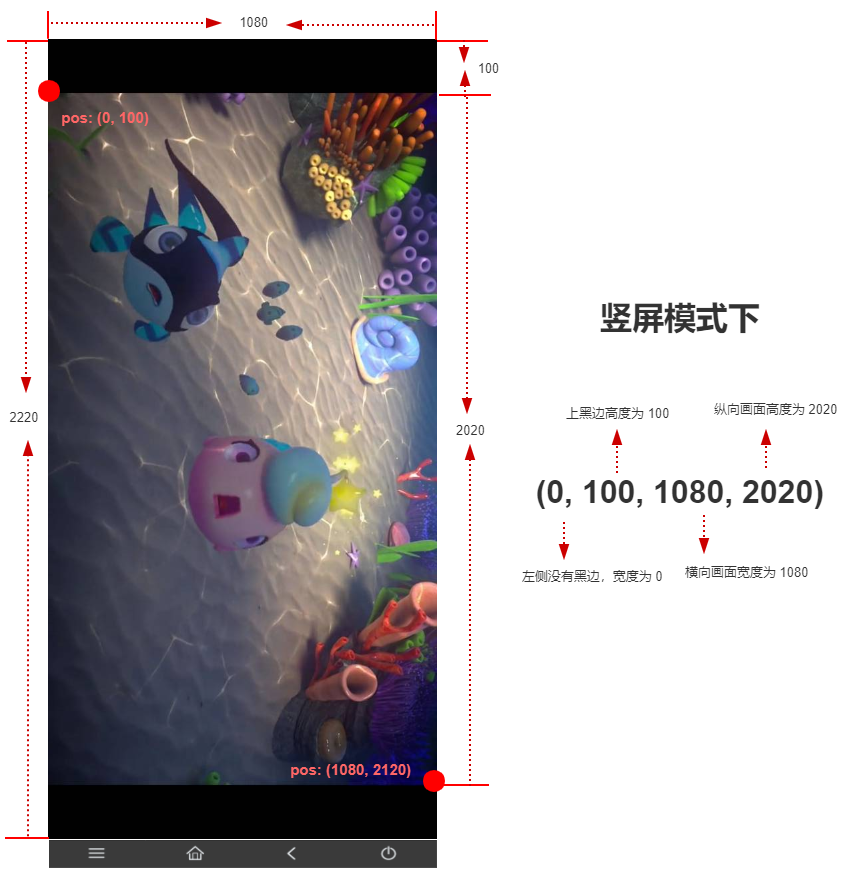
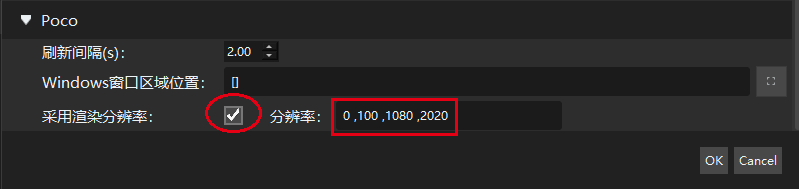 Select "Rendering Resolution", enter the rendering resolution for portrait mode, and click OK. The rendering resolution is made up of four numbers separated by commas, representing offset_x, offset_y, offset_width, and offset_height in the portrait mode.
For example, in the game "Big Fish" at a resolution of 1080*2220, there are two black borders on the mobile device, with the top border being 100px high and the screen being 2020px high, and the bottom border also being 100px high. Therefore, its rendering resolution is (0, 100, 1080, 2020).
Select "Rendering Resolution", enter the rendering resolution for portrait mode, and click OK. The rendering resolution is made up of four numbers separated by commas, representing offset_x, offset_y, offset_width, and offset_height in the portrait mode.
For example, in the game "Big Fish" at a resolution of 1080*2220, there are two black borders on the mobile device, with the top border being 100px high and the screen being 2020px high, and the bottom border also being 100px high. Therefore, its rendering resolution is (0, 100, 1080, 2020).
Offset during the script running
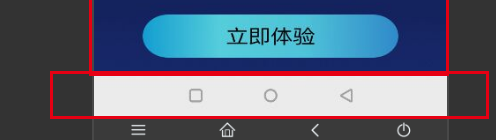
When the app does not support full-screen and black bars appear, offset may occur when running the Poco click script. For example, when executing poco("PauseButton").click() in the figure below, the actual it will not click the expected position.

Ensure that the current version of Poco or IDE is up to date, close the virtual keyboard shown in the figure below, and call poco.
use_render_resolution() in the script to switch Poco to the current screen rendering resolution. Run the script, and it will perform an accurate click. For full-screen devices that are not supported by Airtest, you can set the custom rendering resolution. poco.use_render_resolution(True, (0 ,100 ,1080 ,2020)) If the page switches from a screen that does not support full screen to another one that does, namely from a page with black borders to another one without, it is necessary to reset the Poco resolution by passing "False", as in poco.use_render_resolution(False). Poco will then switch to the complete resolution of the phone. If the current operation involves multiple devices with both regular-screen and full-screen phones, and the app does not support full-screen mode, you need to turn off the virtual keyboard for all phones and write the script designed for full-screen devices.
4.Other Common Issues
Malfunctioning of the "Return", "Home", "Menu" buttons on some devices
-
Some devices fail to respond to operations on certain system buttons, such as "Home" and "Back":
-
vivo Y55A
- vivo Y67
- vivo X20 Plus (In-Screen Fingerprint Version)
- Redmi 3X
- Xiaomi 5C
For more models, please refer to the section on device compatibility.
-
Due to system customization, some models may encounter script exceptions when inputting text:
-
vivo Y55A
Please catch the errors in the script or use poco("xxx").set_text("input").
The text() API fails to enter passwords in the password field or causes the freezing of the IDE window.
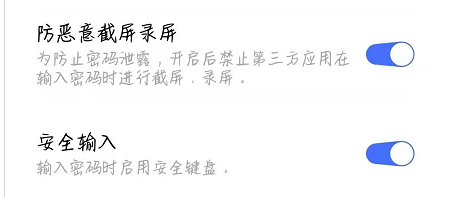
Some models of smartphones from certain brands (such as Huawei and VIVO) restrict the input of the password field. The security option in the settings of these phones is set to default as enabled, forcing the use of the system keyboard for entering passwords (i.e., the secure keyboard input). This makes Airtest's text() API unable to input content when a password is required. Therefore, the secure input option must be manually disabled in order to input passwords normally.
 In addition, for some VIVO phones, when the script clicks on the password input window, the IDE's visual window may freeze and not update the phone screen in real-time, causing an error of "not finding the image".
You can turn off the options related to anti-screenshot and secure keyboard input on your phone to avoid the IDE visual window from freezing when a script clicks on the password input box.
In addition, for some VIVO phones, when the script clicks on the password input window, the IDE's visual window may freeze and not update the phone screen in real-time, causing an error of "not finding the image".
You can turn off the options related to anti-screenshot and secure keyboard input on your phone to avoid the IDE visual window from freezing when a script clicks on the password input box.
Are emulators and IOS supported?
Emulators are currently supported with two connection methods available.
- Connect to an emulator as you would do with an Android real device. Refer to the Emulator Connection Methods for details.
- Embed an emulator directly as a Windows window. Refer to the Windows Connection Method for details.
The connection to iOS is now also supported, see iOS-Connection Methods for details.
To avoid a black screen during the connection process of the emulator, select the use javacap option in the dropdown menu under the connect button before connecting the device. This will allow you to view the emulator screen normally.
Duplicate devices are Identified.
Upon refreshing, two identical devices were identified with statuses of "device" and "offline" respectively.
To fix this, simply refresh the page again after turning off the mobile assistant.
A device named as emulator-5554 is identified before running the emulator.
Reason: After opening port 5554 on the emulator, ADB will recognize the device as long as it detects this port is open. Please refer to this link for solutions. Using Windows 7 as an example:
-
Navigate to the AirtestIDE/airtest/core/android/static/adb/windows folder, then right-click while holding the Shift key to open command window, and type in "adb.exe devices." If the device emulator-5554 appears, perform Step 2.
-
Execute the operations:
a. Execute shortcut key Windows + R.
  b. Enter "services.msc".
  c. Stop BlueStacks Android Service.
Pop-ups of "adb.exe has stopped working" frequently occur.
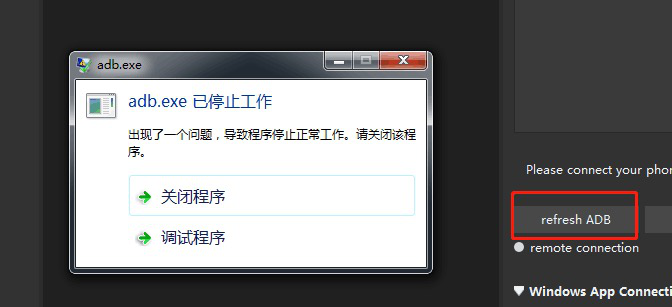
Usually, it is caused by the phone assistant that takes over ADB. Please turn off the phone assistant and ensure that the adb.exe process and related processes of the phone assistant are not running in the background, and then try again. The main reason for this issue is that there may be multiple versions of adb.exe in the local environment, which can result in conflicts during startup. If you have installed Airtest in your local Python environment and encounter this error when running a script in AirtestIDE, please refer to the section of ADB version conflicts.
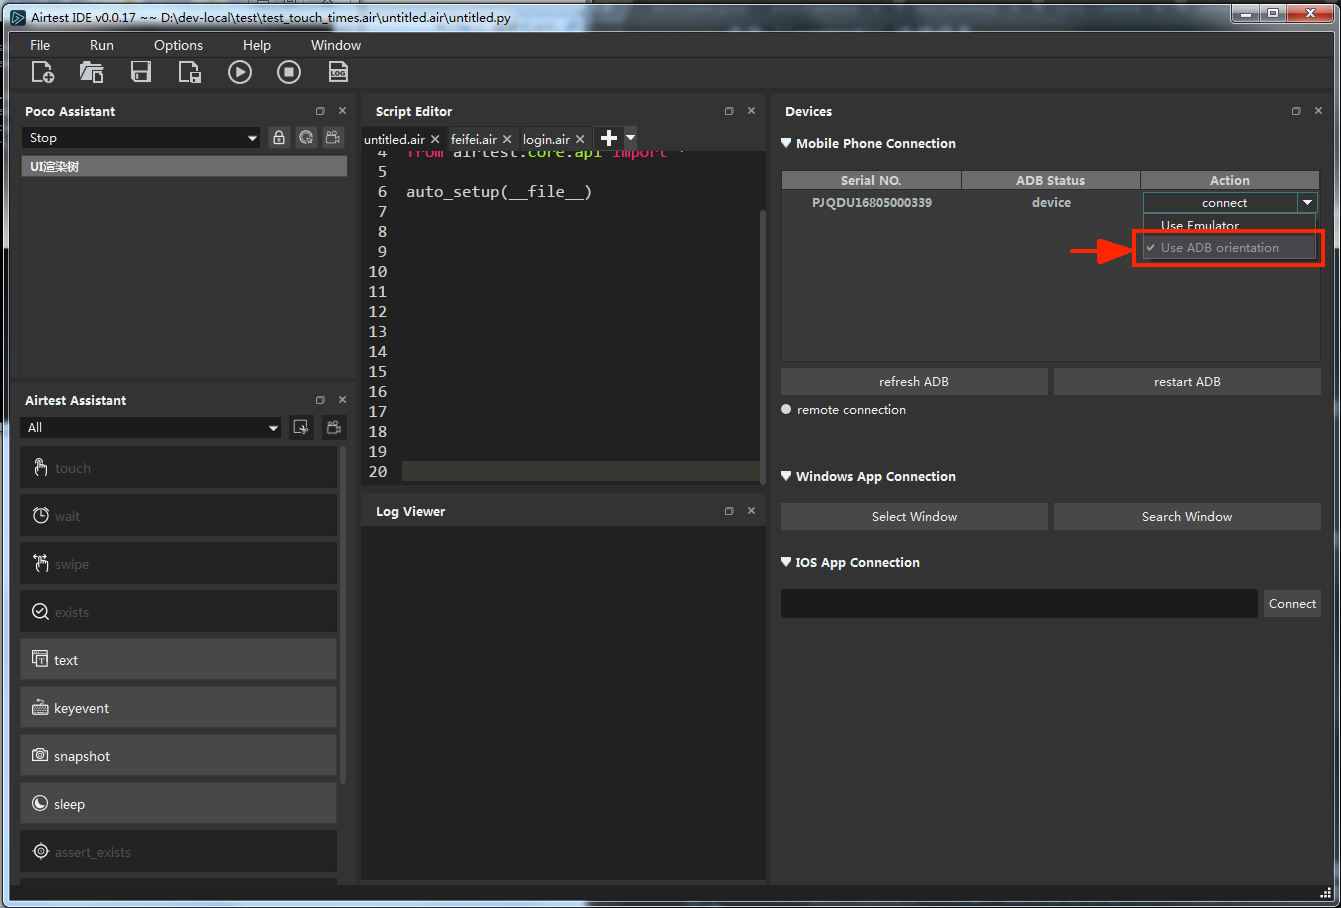
The connected device has an incorrect screen orientation.
 Please select the "use ADB orientation" option, and then click on the connect button to connect the device.
The screen of a connected device cannot be clicked.
If the phone is able to connect to AirtestIDE but fails to respond when you use the mouse to operate its screen, with a prompt saying "minitouch initialization failed", please first make sure that the "Allow simulation of click position" option is enabled and activated in the phone settings (mainly for MIUI phones). If the issue persists, try disconnecting the phone and selecting "Use ADB touch" in the dropdown menu under the connect button.
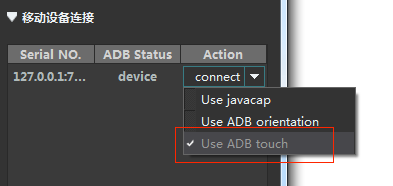 Then click the connect button to reconnect to the phone, and you should be able to use the mouse to operate the screen now.
If the device is connected only after you select the "Use ADB touch" or "Use ADB orientation" option (for some devices or emulators where initialization fails, you may need to check this option), you also need to add the corresponding information for these two parameters in the --device Android:/// connection string when running the script via the command line. For more details, please refer to the "Special Parameters for Some Android Devices" section in Chapter Four Running Scripts.
If you encounter an error message of "Unable to open device /dev/input/event3 for inspectionopen: Permission denied", you can run the command "adb shell chmod 777 /dev/input/*" to grant permission to the /dev/input directory. (This operation may require root permission on your phone. Please refer to online resources on how to use adb shell.)
Then click the connect button to reconnect to the phone, and you should be able to use the mouse to operate the screen now.
If the device is connected only after you select the "Use ADB touch" or "Use ADB orientation" option (for some devices or emulators where initialization fails, you may need to check this option), you also need to add the corresponding information for these two parameters in the --device Android:/// connection string when running the script via the command line. For more details, please refer to the "Special Parameters for Some Android Devices" section in Chapter Four Running Scripts.
If you encounter an error message of "Unable to open device /dev/input/event3 for inspectionopen: Permission denied", you can run the command "adb shell chmod 777 /dev/input/*" to grant permission to the /dev/input directory. (This operation may require root permission on your phone. Please refer to online resources on how to use adb shell.)
Connection issues of other smart devices
Some smart devices such as TV boxes may encounter screen orientation errors or issues with simulated clicks when connected to AirtestIDE. To fix these problems, try selecting the "Use ADB touch" and "Use ADB orientation" options. If you still can't perform a successful connection, please contact the development team.
Version conflicts of ADB in Airtest
When running Airtest scripts in a Windows environment, if adb.exe already exists in the local environment (such as when Android SDK is installed, or other tools are equipped with adb.exe), and the ADB version is different from the one used in Airtest, errors may occur. We will see statements like this in the log:
adb server version (40) doesn't match this client (39); killing...
  * daemon started successfully *
This is caused by a conflict between two different versions of the ADB server running simultaneously (as seen in this log, version 40 and version 39 were both used). The solution is to unify all local adb.exe files to the same version.
- AirtestIDE users:
- The path of adb.exe in IDE is AirtestIDE/airtest/core/android/static/adb/windows/adb.exe.
- If you only use IDE without installing Airtest in the local Python environment, you only need to ensure that the adb.exe used in other local applications and processes is the same version. You can use the search function of Windows to replace the different versions.
- AirtestIDE users who run Python locally:
- Copy the desired adb.exe and replace the one in the path of the Airtest installed in the local Python environment. (The path to the Airtest is Lib\site-packages\airtest. The path to adb.exe in airtest is airtest/core/android/static/adb/windows/adb.exe.)
- Win7 users are advised to use ADB39 version consistently, which can be found in the IDE folder at AirtestIDE/tools/adb39/adb.exe. Simply replace other versions of ADB with this version.
- Win10 users can directly copy the adb.exe file located in AirtestIDE/airtest/core/android/static/adb/windows/ directory of the IDE, which is version 40 of ADB.
- Execute adb.exe version to see the version number.
- Users who perform multithreading operation:
- To simultaneously run ADB commands (e.g., collecting ADB information) while executing a .air script, you can try using the Airtest API "adb shell". Examples can be found here.
- Hers is another code example using ADB command.
If the error still occurs after unifying the ADB versions, you can try right-clicking on the current adb.exe in the task manager and selecting "Open file location" to make sure the ADB is located in the correct folder. Alternatively, you can conduct a full disk search to make sure that all ADB files have been replaced.