5.2 Related configuration of Airtest script
There are some additional configuration options available in Airtest that we can modify them to make the script run more as expected.
1. Options for image recognition
There are 3 options for image recognition, threshold,target_pos and rgb.
Options related to editing a single picture
Modify directly in AirtestIDE
In AirtestIDE, you can bring up the image settings menu by double-clicking the picture in the script:
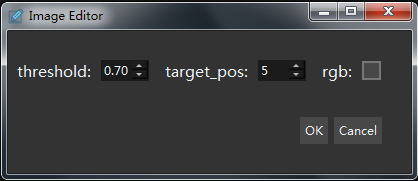
You can directly change the attributes of this image by modifying the values in the menu.
Modifying properties in script code
If you directly use a text editor to open the .py file with the same name in the Airtest script directory that we edited, you can see that each picture is composed of statements similar to this:
Template(r"tpl1532588127987.png", record_pos=(0.779, 0.382), resolution=(407, 264))
Just add the value you want to modify:
Template(r"tpl1532588127987.png", record_pos=(0.779, 0.382), resolution=(407, 264), threshold=0.6, target_pos=5, rgb=False)
The threshold of image recognition (floating point type)
threshold is the threshold used to determine the success of an image recognition.For example, the matching degree recognized by an image is 0.65, and if we set the threshold to 0.7, Airtest will consider the match to fail and proceed to the next match.
Generally speaking, the higher the threshold , the higher the accuracy of image recognition, but the success rate will also decrease. Please set it according to your actual situation.
The value ranges from 0 to 1, [0, 1]. The default value is 0.7 .
If you want to modify the image recognition threshold of all pictures, that is, the global threshold value -THRESHOLD, you can check the introduction below.
The click position of the image -target_pos (integer)
When an image is recognized, Airtest will click on the exact center of the image by default. Sometimes we want it to click on another location after identifying the image. This can be achieved by modifying the attribute target_pos .
For example:
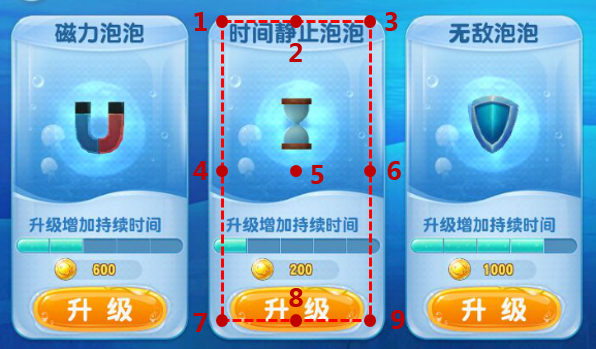
In the picture above, we want to click the "upgrade" button in the middle option, and we don't want to click on the other "upgrade" button. So just cutting out the upgrade button will not meet our needs.
At this time, we can consider expanding the scope of the screenshot to the area selected by the red dotted frame. After the screenshot is completed, the square picture is regarded as a nine-square grid, and each dark red dot on the box represents a number.Find the value of the position you want to click, and set it to the value of target_pos.In this example, we can make the "upgrade" button exactly at the bottom of the screenshot area, and then set target_pos = 8, so that we can just click on the button.
The target_pos ranges from 1 to 9, [1, 9], and it must be an integer. The default value is 5 (the center of the image).
Switch color and grayscale recognition -rgb option
When recognizing an image, Airtest will first convert the image into a gray scale image for recognition.So if there are two buttons with the same shape and content and only different colors, Airtest will consider them to be the same.
By checking the rgb option, or addingrgb = True in the code, you can force the use of color images for recognition.
2. Global settings for scripts
In airtest.core.settings, some global default properties are provided. Among them, we list several common properties and their default values:
- RESIZE_METHOD = staticmethod(cocos_min_strategy)
- THRESHOLD = 0.7 # [0, 1]
- THRESHOLD_STRICT = 0.7 # [0, 1]
- OPDELAY = 0.1
- FIND_TIMEOUT = 20
- FIND_TIMEOUT_TMP = 3
- PROJECT_ROOT = os.environ.get("PROJECT_ROOT", "") # for
usingother script
How to set global properties
To change the values in the above settings, just write it in the script like this:
from airtest.core.api import *
# airtest.core.api contains a variable named ST, which is a global setting
ST.THRESHOLD = 0.8

# Without specifying the threshold of the picture, the default value of 0.8 in ST.THRESHOLD is used
touch(Template(r"tpl1532588127987.png", record_pos=(0.779, 0.382), resolution=(407, 264)))

# If you manually specify the threshold of the picture, the 0.6 set by the picture will prevail
touch(Template(r"tpl1532588127987.png", record_pos=(0.779, 0.382), resolution=(407, 264), threshold=0.6))
Introduction to attribute values
RESIZE_METHOD
When using devices with different resolutions for image recognition, the recognition success rate may be poor, so Airtest provides a default resolution adaptation rule (using the Cocos engine's default scaling rule). And the code is Here.
To improve the recognition accuracy of 2d games, the best way is to explicitly specify the resolution adaptation rules of your game. For example, write directly at the beginning of the .air script file:
from airtest.core.api import *

def custom_resize_method(w, h, sch_resolution, src_resolution):
    return int(w), int(h)

# Replace the default RESIZE_METHOD
ST.RESIZE_METHOD = custom_resize_method
The above code specifies a custom scaling rule: return the original value directly, regardless of the screen resolution, and all UI are not scaled (some games have this strategy).
The RESIZE_METHOD, which is thecustom_resize_method we defined, uses the following input parameters:
- w, h # The width and height of the recorded UI picture
- sch_resolution # Screen resolution during recording
- src_resolution # Screen resolution during playback
The output is:
- The width and height of the UI picture during playback
To customize your RESIZE_METHOD, you only need to know the scaling rules of the game you tested, and then implement it incustom_resize_method with code. This can greatly improve the success rate of image recognition under different resolution devices.
THRESHOLD
THRESHOLD has been mentioned above. It is the threshold for image recognition. In addition to being able to set the recognition value ofTHRESHOLD for a single picture, you can also set the global THRESHOLD so that each picture takes effect by default.
There is also a THRESHOLD_STRICT in the setting, which is a stricter threshold setting.And it is only used in the interface assert_exists (picture) .
OPDELAY
In our script, there will be a short time interval between the operations of each step. The default setting is OPDELAY.
The default value of OPDELAY is 0.1, that is, wait 0.1 seconds after each step.You can set it larger appropriately so that the program can pause for a short period of time after each operation avoiding the problem that the next operation is too fast and will not succeed.
FIND_TIMEOUT
In each image search, if one search is unsuccessful, the screenshot-search cycle will be performed again, and it will stop until the timeout. The timeout period is FIND_TIMEOUT, and the default value is 20 seconds.
At the same time, we also provide a FIND_TIMEOUT_TMP, which is only 3 seconds by default. These two values are used in different screenshot interfaces:
The interface that uses FIND_TIMEOUT as the image search timeout is:
- touch
- double_click
- swipe(Swipe supports sliding from the first image to the second image, here only the first image uses
FIND_TIMEOU) - wait(wait supports directly passing in a
timeoutparameter. Iftimeoutis not specified,FIND_TIMEOUTis used as the timeout by default) - assert_exists
In some other interfaces with lower requirements for finding pictures, the shorter duration FIND_TIMEOUT_TMP is used:
- swipe(If the second parameter is passed in an image, it will use a shorter lookup time)
- exists
- assert_not_exists
If you want to modify the global image search timeout period, please pay attention to which value needs to be modified.
PROJECT_ROOT
Before using the using interface, we can set a default project root directoryPROJECT_ROOT, so that the program can find other subscripts in the current root directory without filling in the full path, which makes it more convenient for the scripts to call each other.
For example, we create a script named test1.air, the actual path is /User/test/project/test1.air
from airtest.core.api import *

def test():
    touch("tmp.png")
Another main.air script in the same directory can reference the test in it:
from airtest.core.api import *

ST.PROJECT_ROOT = "/User/test/project"
using("test1.air")
from test1 import test
Image recognition algorithm -CVSTRATEGY
In Airtest, a variety of different image recognition algorithms are provided. The list of method names are: ["tpl", "kaze", "brisk", "akaze", "orb", "sift", "surf", "brief "].
For specific evaluation data such as the recognition effect and memory usage, you can refer to the Airtest / benchmark document. In actual use, due to different usage scenarios, picture resolutions, and different types of mobile phones, the specific performance of each algorithm is different. Therefore, you can use your own use case to test the algorithm and choose a more appropriate one.
In the Airtest script, use the following code to set the image matching algorithm in the script:
from airtest.core.settings import Settings as ST
# When the script runs, it will recognize according to this algorithm order, until "the recognition result that meets the set threshold" or "recognition timeout" :
ST.CVSTRATEGY = ["surf", "tpl"]
3. Related settings for script running
Click position and Poco selection offset problem under Windows
In Windows, there may be a system border around the edge of the application under test, which causes a fixed offset when clicking the location and when Poco selects the node. For a specific case, please refer to this issue.
The solution is that in AirtestIDE you can open "Options-Settings-Poco" and then set the border position of Windows Content Area Rect to specify the size and location of the tested application area so that the Poco plugin of AirtestIDE can learn about the screen area of the game.

In the code, you can specify the border width between the connected window and the actual effective screen by setting focus_rect:
# focus_rect:[Left border width, top border width, right border width, bottom border width]
device().focus_rect =  [int, int, int, int]