2.4 iOS设备连接

iOS-Tagent 是基于 facebook 的 WebDriverAgent, 项目上进行开发的 , 目的是为了对 AirtestProject 。提供iOS平台的测试支持,在原项目的基础上进行了定制化的优化和功能调整。
如果需要使用airtest项目对iOS平台进行测试,请 事先准备一台macOS ,使用xcode部署 iOS-Tagent 成功后,能够在mac或windows机器上连接到iOS手机。请点击 链接 下载项目代码到本地进行部署。
这个项目在如下版本上进行了开发和测试:
| iOS | Xcode |
|---|---|
| ≥14 | 12.x |
| ≥ 13 | 11.x |
| 10.x-12.x | 10.x |
| ≥ 9.3 | ≥ 9.3 |
另外,自Airtest1.1.8起,我们同步支持了 Appium 的 WebDriverAgent工具 ,所以同学们既可以使用 Appium 的 WebDriverAgent 工具来部署 iOS 真机,也可以使用我们 Airtest 底下的 iOS-Tagent 工具来部署 iOS 真机,非常灵活。
对于低版本的 iOS(iOS11 以下),我们更建议使用我们的 iOS-Tagent 工具,高版本的iOS使用 Appium 的 WebDriverAgent 工具,兼容性会更好一些。
关于如何安装 appium 的 WebDriverAgent 教程,我们推荐以下几篇教程:
- Appium 的
WebDriverAgent工具 - 安装资料:https://testerhome.com/topics/7220 - Facebook 的
WebDriverAgent工具 - 安装资料:https://testerhome.com/topics/10463 - Appium 的
WebDriverAgent工具 - 疑难解决:https://github.com/appium/WebDriverAgent/issues - Facebook 的
WebDriverAgent工具 - 疑难解决:https://github.com/facebookarchive/WebDriverAgent/issues
如果同学们选择在 iOS 真机上安装 appium 的 WebDriverAgent 工具,按上述教程安装好以后,现在同样支持使用我们的 AirtestIDE 连接这台 iOS 设备:

现在这个项目在公开测试状态,会存在一些问题 如果对于这个项目有问题和反馈建议,可以到 Issues 里进行提出。
2.4.1 Airtest Api 支持状况
经过改进,iOS-Tagent 现可以与 AirtestIDE 和 airtest项目 协同工作
支持通用的 airtest 的 iOS Api
- start_app: OK
- stop_app: OK
- snapshot: OK
- home:     OK
- touch:    OK
- swipe:    OK
- text:     OK
- wait:     OK
- exists:   OK
- find_all: OK
- assert_exists: OK
- assert_not_exists: OK
除了一些例外:
- wake: 暂未支持 (考虑用'home'方法替代)
- keyevent: 只支持 'home' 事件
- clear_app:  暂未支持
- install:  暂未支持
- uninstall: 暂未支持
2.4.2 使用Poco快速查看窗口视图
现在已经支持Poco查看窗口视图功能,可以看下面图片的效果

这个功能可以与 Poco 和 airtest-ide 一同使用达到最好的效果。
请注意,若只部署了wda项目,是无法使用本功能的,请务必确保部署的是我们提供的 iOS-Tagent 项目。
2.4.3 简单部署流程
step 1 iOS-Tagent
在手机上创建一个WebDriver服务器,可用于远程控制iOS设备,定位UI元素
-
a 下载 iOS-Tagent 到本地电脑
git clone git@github.com:AirtestProject/iOS-Tagent.git
-
b 使用Xcode打开 iOS-Tagent, 用数据线连接iPhone至Mac
选择项目,在菜单栏
product->Scheme->WebDriverAgentRunner选择设备,在菜单栏
product->Destination-> 选择你的真机
-
c 启动Test,在菜单栏
product->Test。当你看到这样的日志的时候,代表 iOS-Tagent 已经启动成功了
    Test Suite 'All tests' started at 2017-01-23 15:49:12.585
    Test Suite 'WebDriverAgentRunner.xctest' started at 2017-01-23 15:49:12.586
    Test Suite 'UITestingUITests' started at 2017-01-23 15:49:12.587
    Test Case '-[UITestingUITests testRunner]' started.
    t =     0.00s     Start Test at 2017-01-23 15:49:12.588
    t =     0.00s     Set Up
可以从以下了解更多的关于如何成功启动这个项目的方法 [here](https://github.com/facebook/WebDriverAgent/wiki/Starting-WebDriverAgent).和 [here](https://github.com/appium/appium/blob/master/docs/en/drivers/ios-xcuitest-real-devices.md)
step 2 设置代理
iproxy 可以把iPhone端口映射到电脑端口,那么就可以通过访问电脑的端口访问到手机的端口了。
一般情况下,需要通过设置usb代理的方式访问手机上的Agent,直接通过wifi对手机进行访问可能会出现问题,具体的原因可以参考 Issues 和 detail
-
a 通过 Homebrew 安装iproxy
$ brew install libimobiledevice -
b 运行iproxy
$ iproxy 8100 8100
启动成功后,可以试着在浏览器访问 http://127.0.0.1:8100/status ,如果访问成功并且可以看到一些json格式的手机信息,即表示启动成功。此时,访问 http://127.0.0.1:8100/inspector 可以看到iPhone屏幕投影在浏览器上
有一点需要 注意 的,iproxy只能监听localhost,所以如果你想使用 Windows 连接iPhone,可以改用 wdaproxy。具体步骤为:
- 使用usb数据线连接iPhone至Mac
- 在Mac上运行 wdaproxy,wdaproxy可以把iPhone端口映射到Mac端口,具体安装运行步骤可参考 https://github.com/openatx/wdaproxy
- 在Windows上的AirtestIDE iOS地址输入框,输入Mac的ip地址和端口,点击"connect"按钮
step 3 AirtestIDE
通过ip方式连接iPhone,实时刷新界面,可进行UI测试
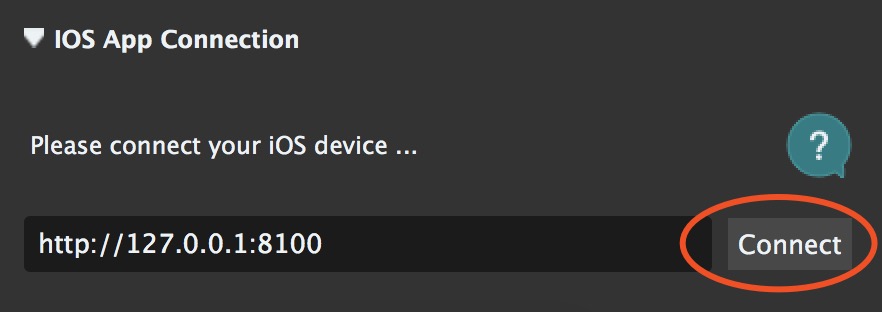
完成上面两个步骤后,就可以在AirtestIDE的iOS地址栏填入地址 http://127.0.0.1:8100 ,点击 “connect” 连接设备,开始编写你的Airtest测试脚本了


2.4.4 Q & A
我们猜测你在部署过程中会遇到很多问题,所以整理了一份 Q&A,你可以先看看,如果对于这个项目有问题和反馈建议,也欢迎到Issues里进行提出.
1. Xcode版本问题
2. 申请开发者证书
3. 登陆开发者账号
4. 设置开发者证书
5. Xcode failed to create provisioning profile
6. 第一次安装,信任设备
2.4.5 License
iOS-Tagent 基于WebDriverAgent 进行了定制化的开发和优化:
WebDriverAgent is BSD-licensed. We also provide an additional patent grant.
Have fun with Airtest!